Guide | MobiPOS > Settings > Settings > Payment Types
Payment Types
General
MobiPOS integrates up to 20 payment types.
If the payment type is deleted or modified, it will affect past report reading.
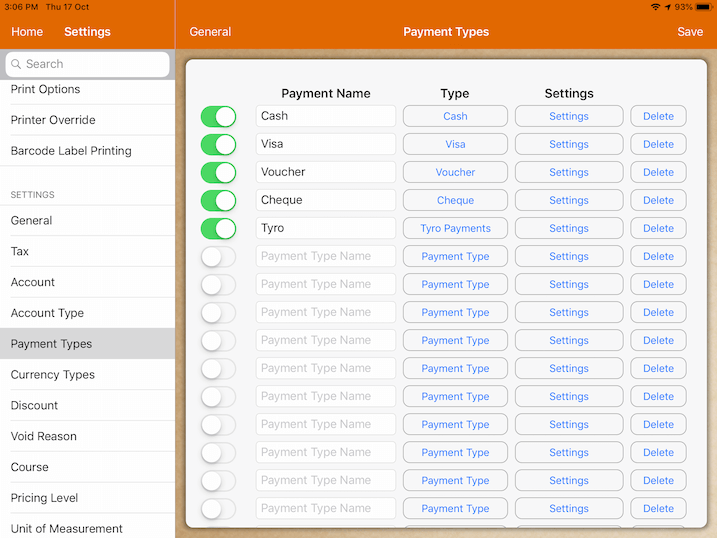
Types
Cash
If the payment is set as cash, payment closed with this payment will affect the till balance.
Visa / Master
If payment is done using credit cards, the payment type can be set to either visa or master.
However, using either type will not affect the functions of payment as the categorisation is merely for reporting purposes.
Cheque
Cheque functions are currently unavailable.
Voucher
Voucher as a payment type must be set up according to the application of the voucher.
The configuration of two voucher payment types are stated as below:
Non-Refundable Voucher
For a non-refundable voucher whereby the sum of a transaction is not repayable or returnable in any circumstances, user should configure "Payment Type" in settings to "Voucher".
Hence, any balance from the voucher used upon check-out will be forfeited.
Changing the setting is important as it will be reflected in daily reporting.
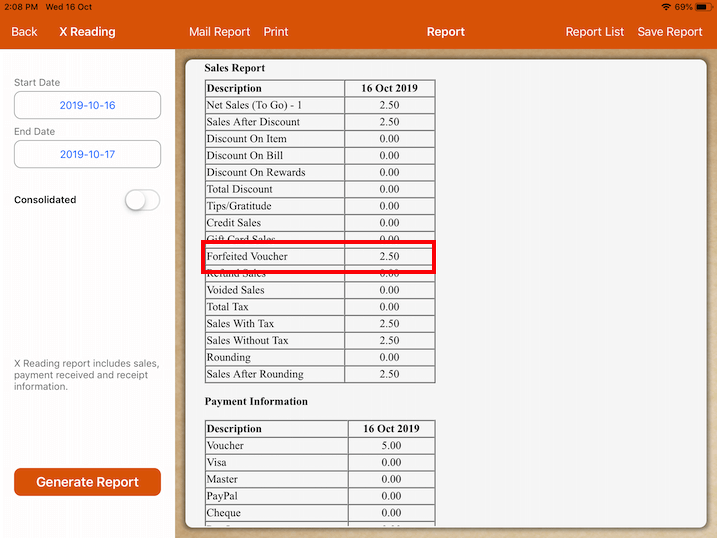
The amount will be stated under "Forfeited Voucher" in your daily sales report as portrayed below.
The image shows payment for a $2.50 item using a $5.00 voucher.
There is a supposed balance of $2.50 to be returned to the customer.
But due to the configuration of voucher as the payment type, the balance is automatically forfeited and no balance is returned to the customer.
Refundable Voucher
A refundable voucher is used similarly to cash therefore, "Payment Type" should be set to "Cash" instead.
When customer applies voucher upon checkout, the supposed balance will be returned and daily report will reflect sales amount according to the transaction.
* For utilization and setup of MobiPOS integrated payment systems, navigate through the tabs above.
Settings
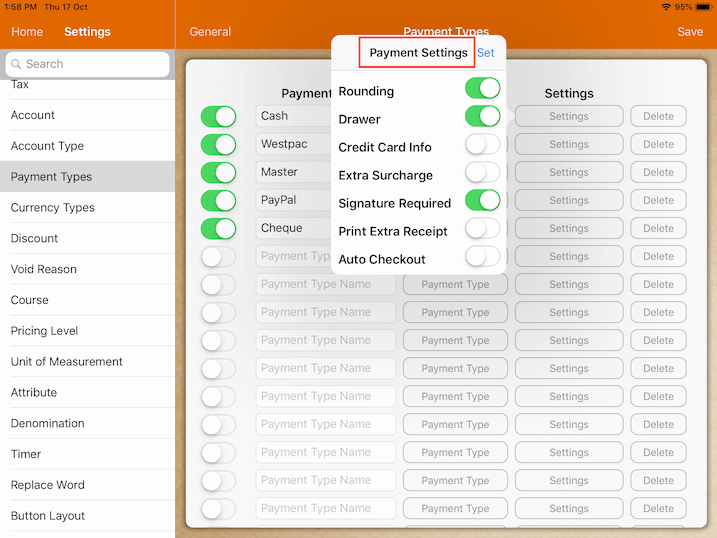
Payment settings can be modified for each payment type by tapping on the switch.
Be sure to tap on "Set" each time after toggling the settings switch.
The function of each payment setting is explained below.
Rounding
Rounding can be switched on or off for each individual payment.
If rounding is switched on, it will follow the rounding setting under restaurant setting.
Drawer
Drawer will pop depending on which payment type is used to close the bill.
Switch on to pop the drawer.
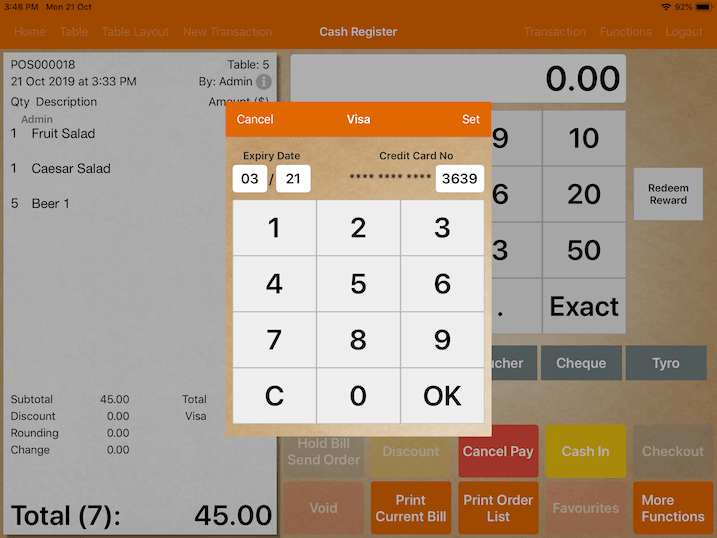
Credit Card Info
If credit card info is switched on, it will prompt you to enter credit card
information before payment.
Information entered will be printed out on receipt.
This is solely for recording purpose as it does not process the information.
Extra Surcharge
Payment selected will add an extra surcharge to bill if it's turned on.
Before turning it on, a tax with the type of payment surcharge has to be setup.
Please refer to
Tax Settings -> Tax For section for more information.
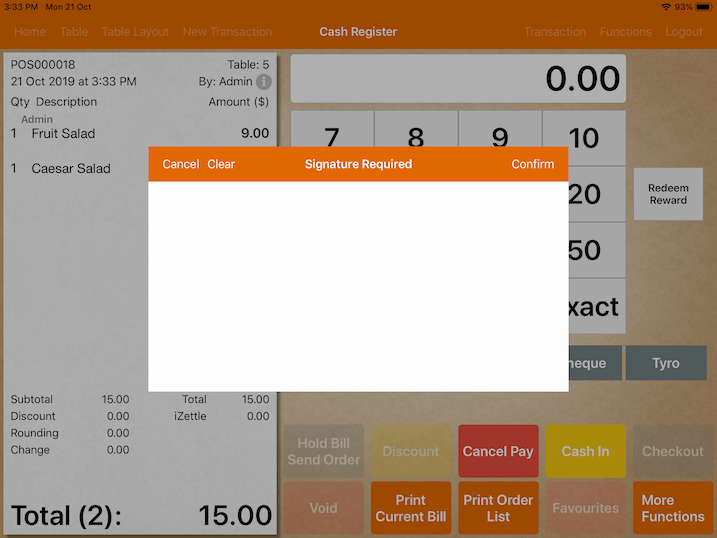
Signature Required
Signature Required is an additional verification step.
When switched on, a window will appear for user to enter signature upon payment.
The payment process will be: Pay -> Select Payment Type -> Signature -> Enter Amount -> Cash In -> Checkout
Print Extra Receipt
The system will automatically initiate printing of an additional receipt when this setting is switched on.
This function rids the hassle of manually printing a receipt twice.
Merchants can immediately obtain another copy of receipt if it is necessary for reporting purposes.
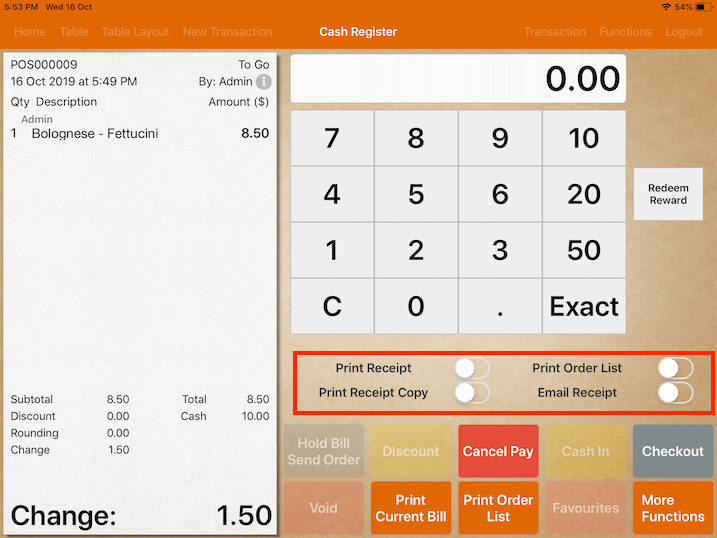
Auto Checkout
Auto Checkout is switched on to speed up the completion of payment.
It eliminates the extra step of tapping on "Checkout" after cashing in the amount to be paid.
Note that upon switching on this function, user will no longer be able to choose mode of receipt delivery to customers.
The system will automatically checkout after cash in hence, user can start a new transaction immediately.
The picture below shows the disabled functions when this setting is switched on.
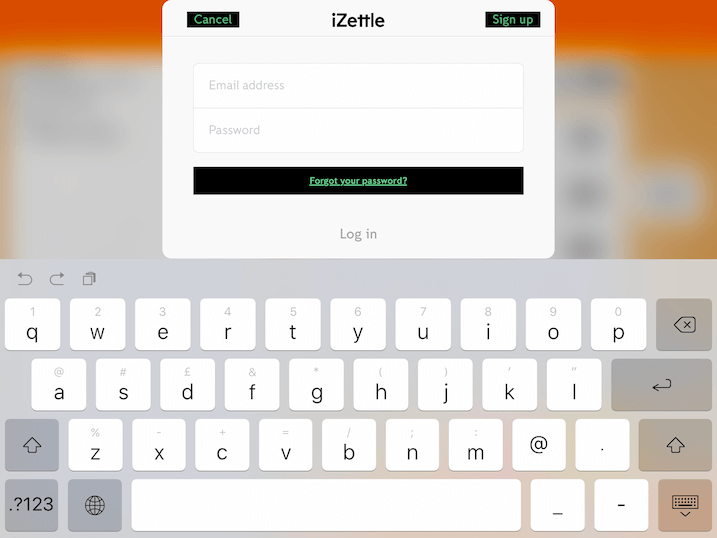
iZettle by Paypal
Under Settings -> Payment Types -> Type, tap on iZettle to set it as a payment type.
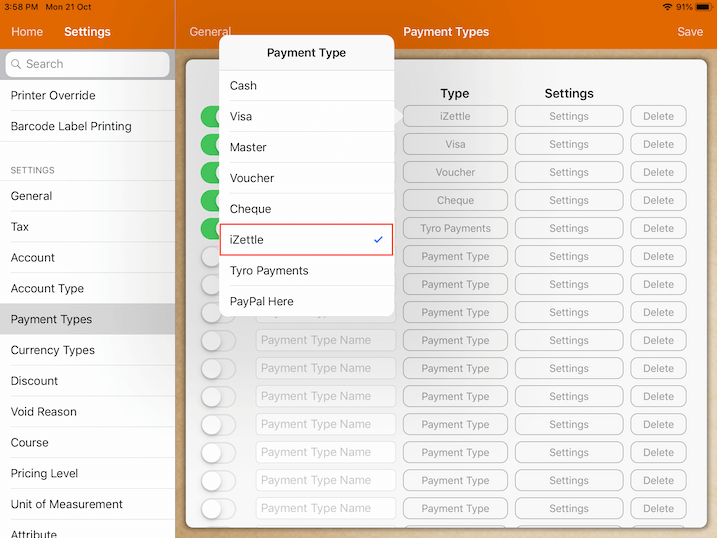
Once iZettle by Paypal is set as a payment type, the function will be available upon checkout/payment.
Tapping on iZettle will prompt a window for users to enter log in details.
Tyro Payments
Under Settings -> Payment Types -> Type, tap on Tyro Payments to set it as a payment type.
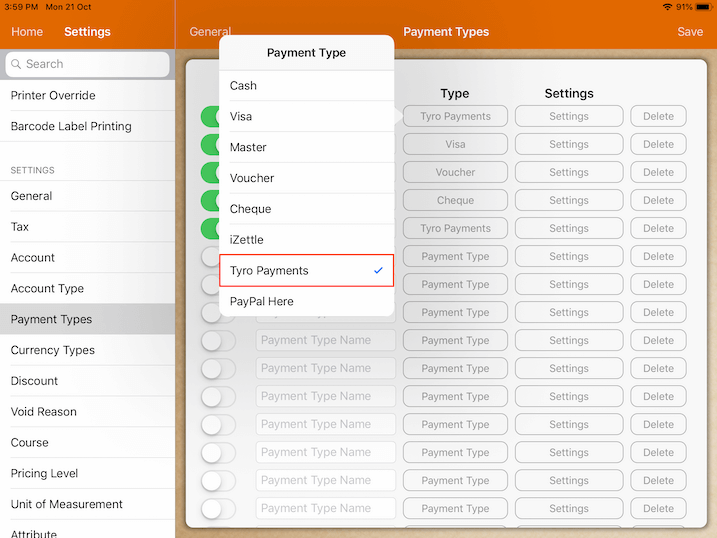
For a successful transaction using Tyro Payments, performing the proper set-up is necessary.
Refer to the guide below for Tyro Setup.
Tyro Setup
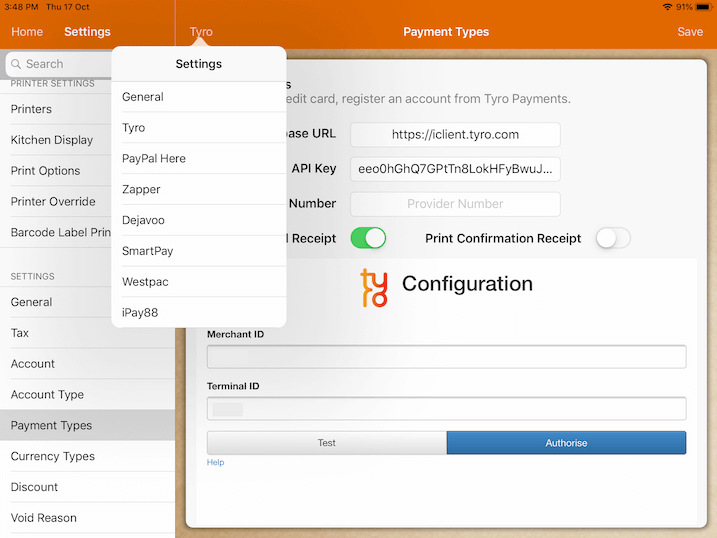
To link the connection of your Tyro terminal with MobiPOS, it requires Merchant ID and Terminal ID.
This information can be found on the terminal device itself or you could contact Tyro to seek help.
Tap on "Help" to begin configuration.
Choose your device type that is displayed at the bottom, follow the instructions to authorize the link.
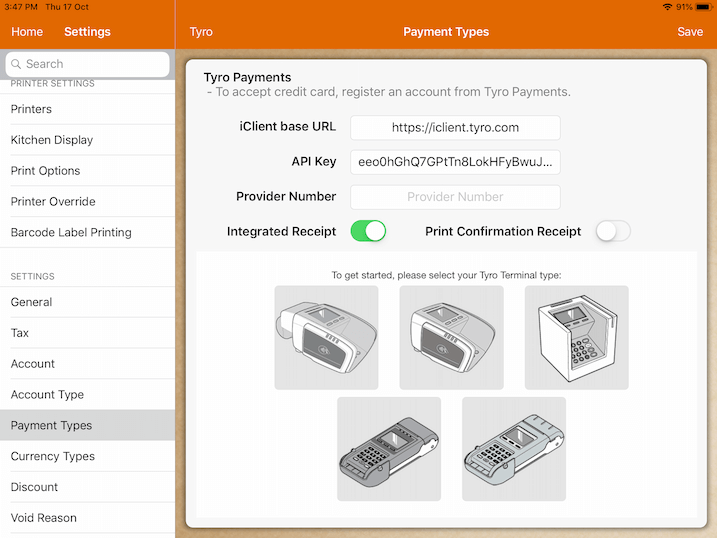
Upon setting up the link, create a new payment with Tyro Paymentsas the payment type.
Closing bill with this payment will initiate the terminal to process credit card.
Integrated Receipt
If integrated receipt is turned on, receipt from Tyro will be printed in MobiPOS instead of Tyro terminal device.
PayPal Here
Under Settings -> Payment Types -> Type, tap on PayPal Here to set it as a payment type.
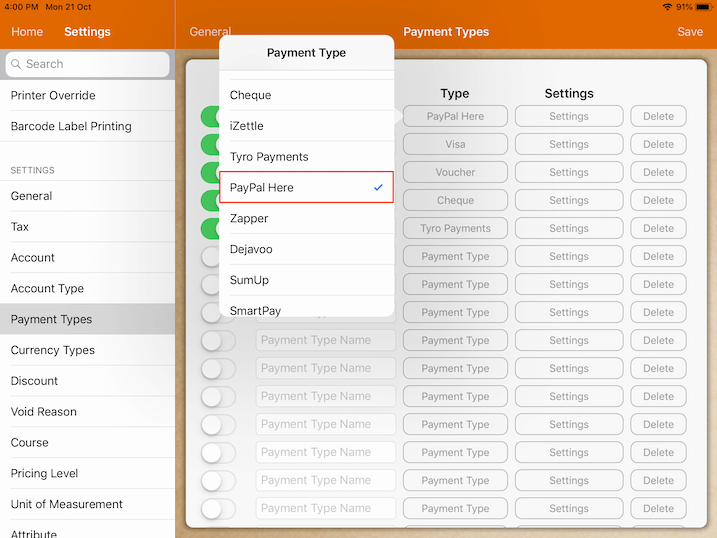
To use PayPal Here, login is needed under a registered account.
Refer to the guide below for PayPal Here Setup.
PayPal Here Setup
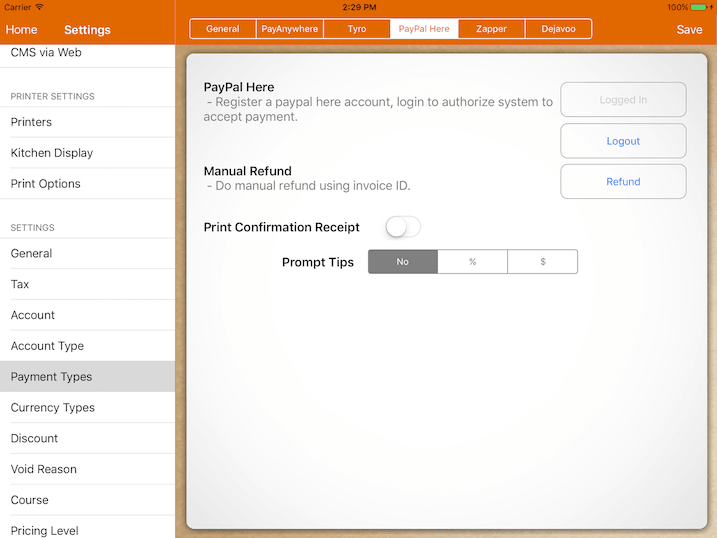
Login to authorize MobiPOS to process payments on your behalf.
This may take a few steps. If the authorization process is successful, you will be directed back to MobiPOS.
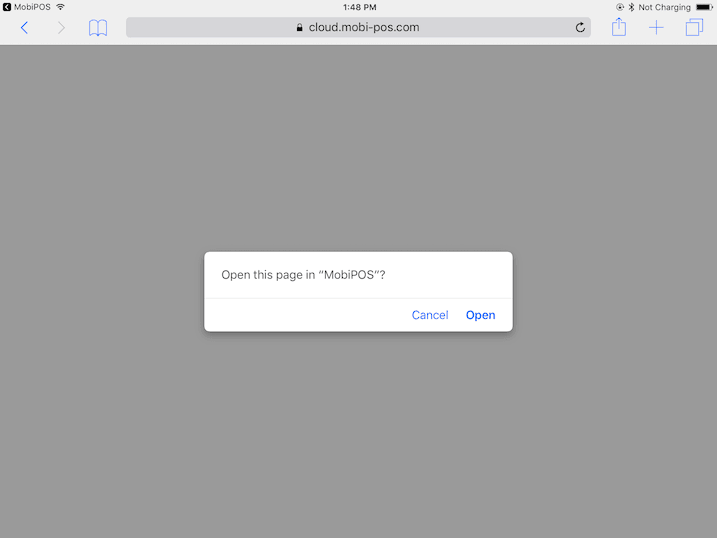
Open up MobiPOS and you'll see the message below.
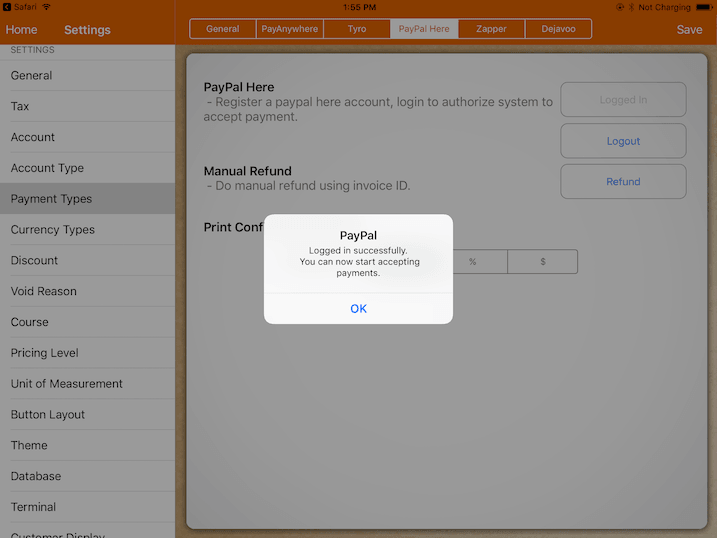
Create a new payment with Paypal Here as the payment type and you should be up and running.
During the authorization, if you did not see the pop up asking to open up MobiPOS, it means you do not have a valid Paypal Here account.
Zapper
Under Settings -> Payment Types -> Type, tap on Zapper to set it as a payment type.
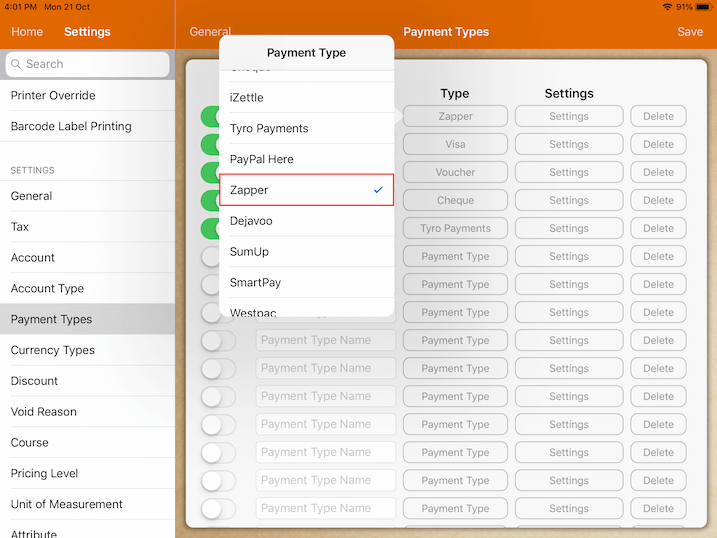
Zapper provides a convenient method of payment via mobile phones.
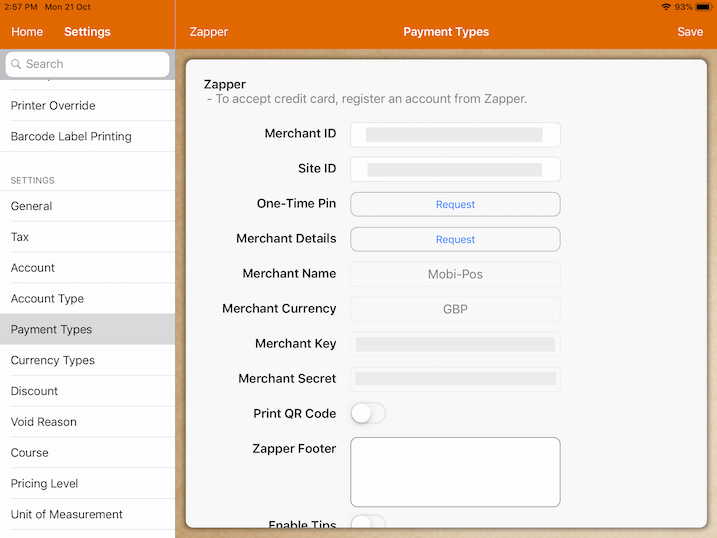
Download the pdf files below to guide you through the Zapper setup.
Dejavoo
Under Settings -> Payment Types -> Type, tap on Dejavoo to set it as a payment type.

Dejavoo can be used after set up of this payment type within the MobiPOS app.
To begin setup, user must enter IP Address, Register ID and Auth Key.
Please contact MobiPOS reseller to obtain these credentials.
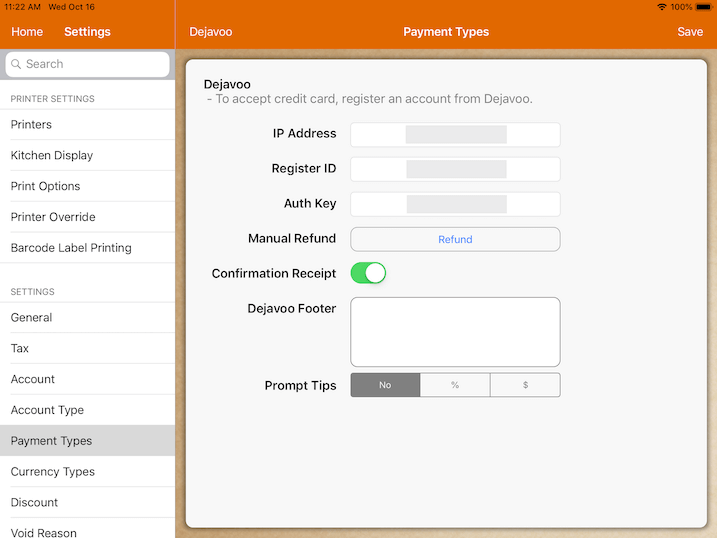
Pairing is not needed for Dejavoo setup.
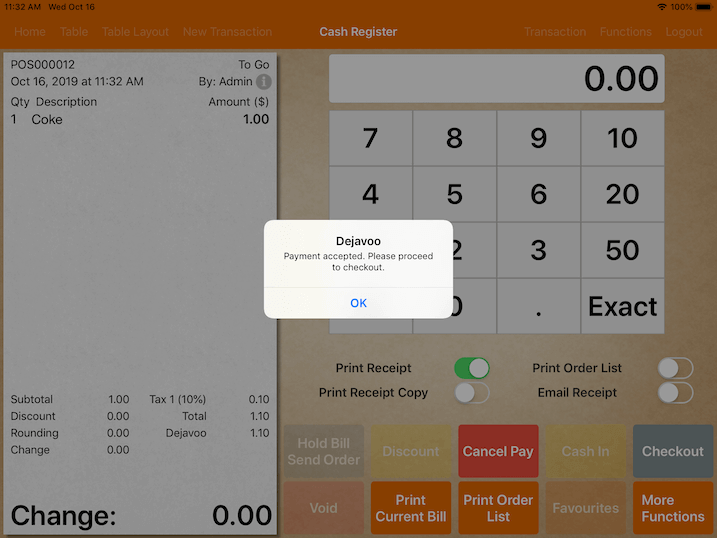
After entering credentials, set Payment Type as Dejavoo then proceed to make payment.
The terminal will be triggered to authenticate payment by "sending" a signal.

Once verified, payment will be accepted and user may proceed to checkout.
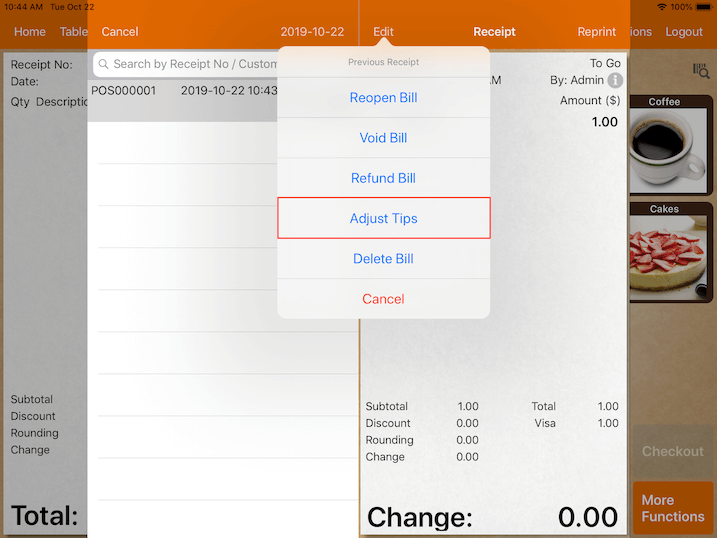
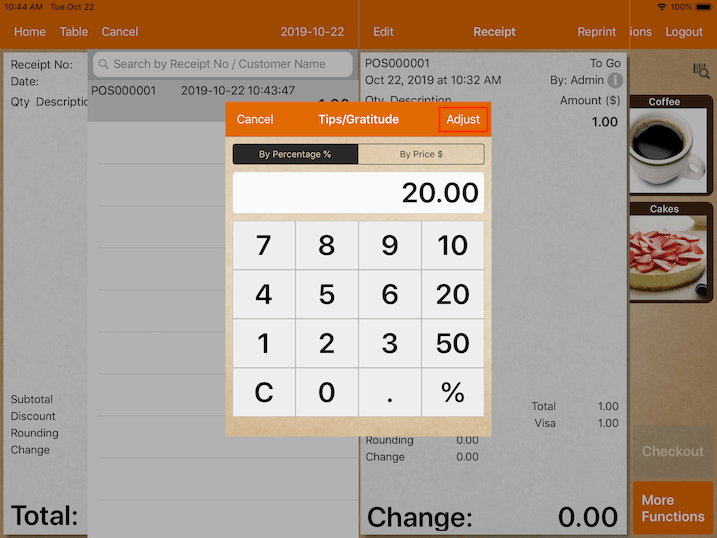
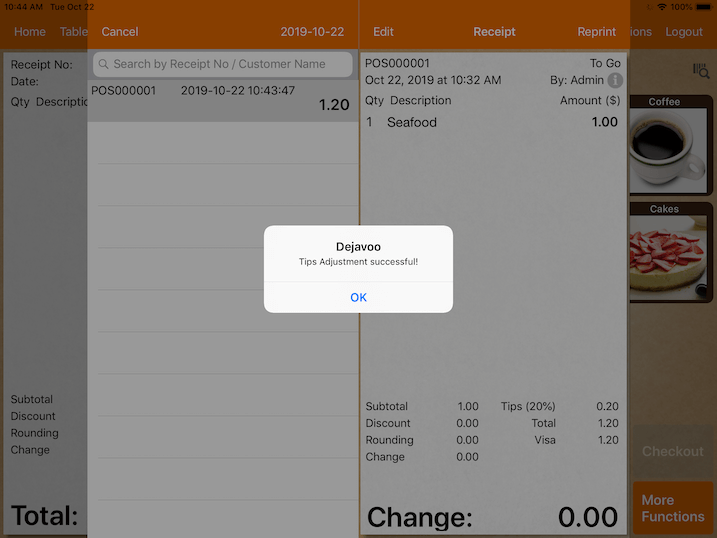
Tips Adjustment
On the cash register page go to Transaction -> More -> Select Transaction -> Edit -> Tips Adjustment.
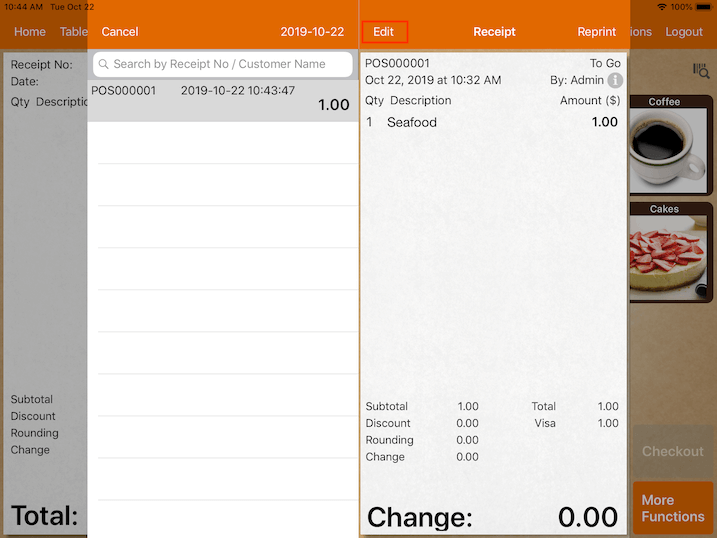
A keypad will appear for you to key in amount of tips by percentage or price.
Tap on Adjust after entering confirmed amount to be adjusted.
A notification will appear once adjustments are made successfully.
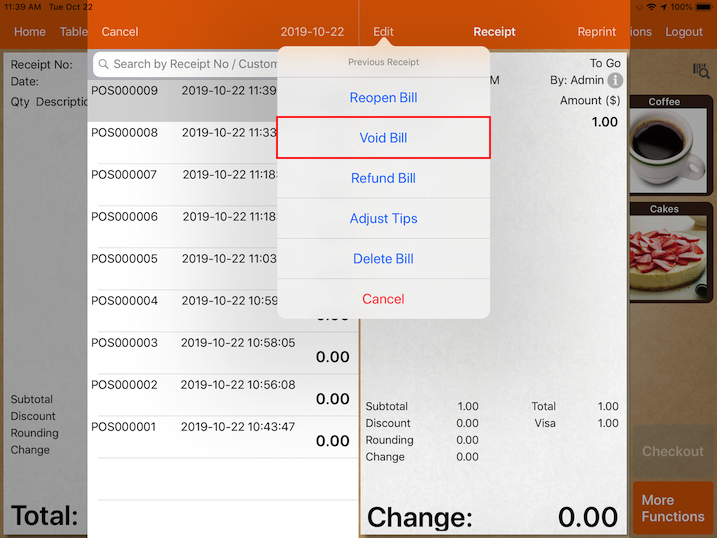
Void Bill
Voiding a bill will automatically refund customers' payment through Dejavoo.
To Void Bill via Dejavoo, go to Transaction -> More -> Select Transaction -> Edit -> Void Bill on the cash register page.
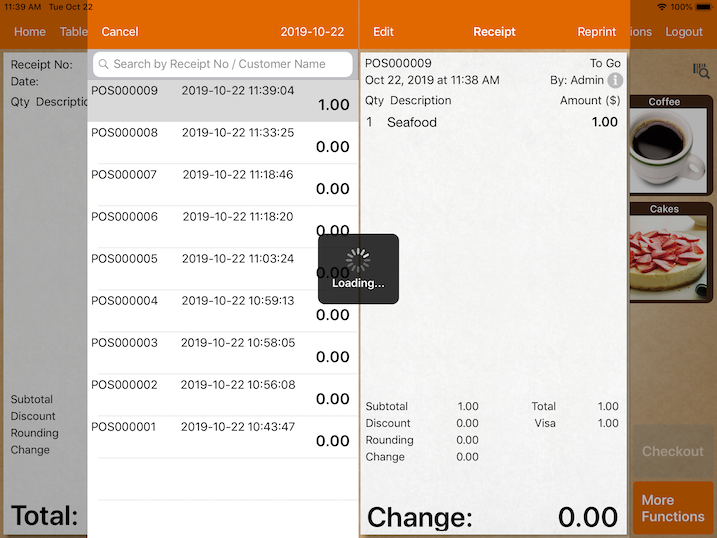
Wait for the page to load after selecting transaction to void.
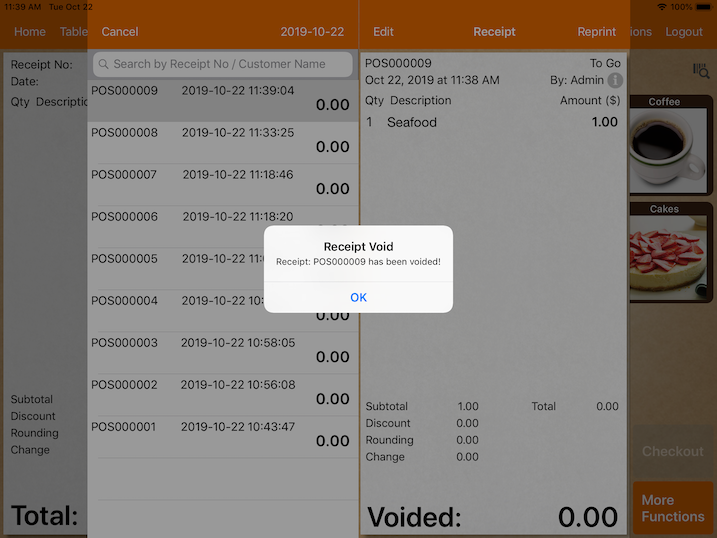
A message will appear to notify you when the receipt has been voided.
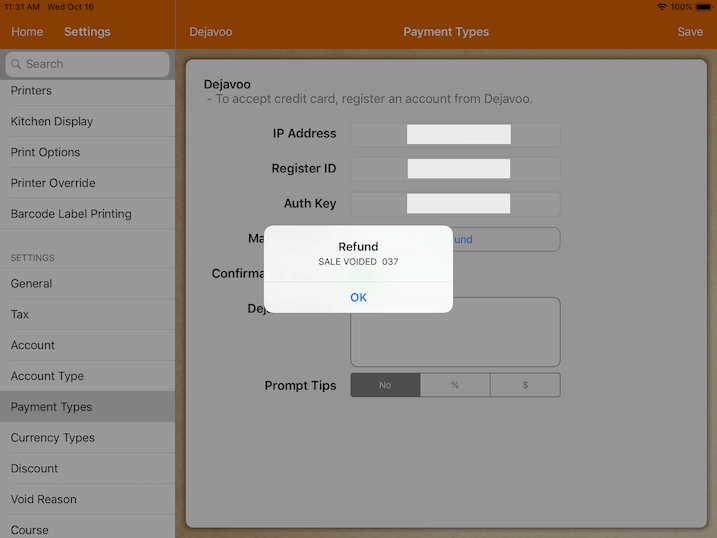
Refund Payment
If payment cannot be returned to customers through voiding a bill, perform manual refund.
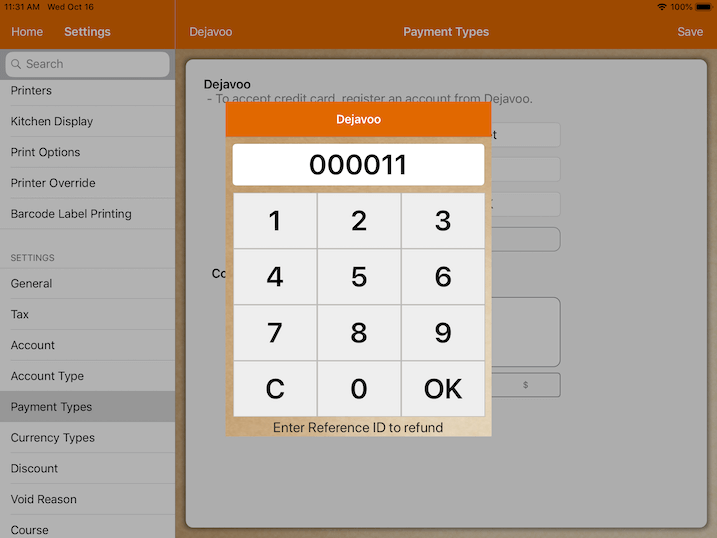
To perform Refund Payment via Dejavoo, go to Payment Types -> Settings -> Dejavoo -> Manual Refund -> Refund.
Key in reference ID which is the reference number for individual transactions found under Transaction.
Refund is successful when a message pops up as in image below.
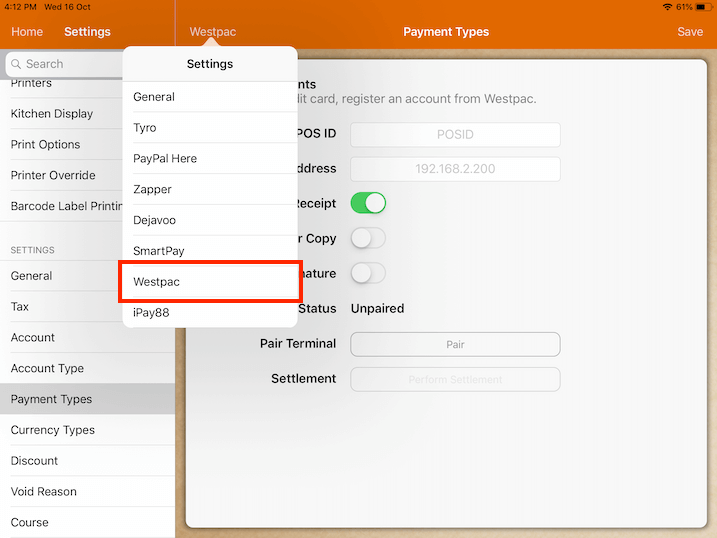
Westpac
Westpac is another method that offers fast and secure payment processing.
MobiPOS integrates with Westpac to include functions of both Westpac and Westpac MOTO.
Westpac MOTO is a payment method for "card not present" transactions.
It is utilized for Mail Order / Telephone Order or manual entry transactions.
It can only be processed on credit and charge cards, when the cardholder is not present during the time of payment.
The guide below shows the set up process which is identical for both Westpac and Westpac MOTO.
Under Settings -> Payment Type -> Simple Payments Integration will lead you to a page to fill up the necessary credentials.
Do note that Westpac option has been renamed to Simple Payments Integration. For newer version, please do not refer to the screenshot below.
To begin integrating the systems, first connect the EFTPOS terminal to the same Wi-Fi used by the POS system.
(For this example, we are using Verifone 355 EFTPOS terminal device)
Press "O" and "1" at the same time on the EFTPOS terminal to configure Wi-Fi settings.
After EFTPOS is successfully connected to Wi-Fi, the IP Address will be displayed.
The IP Address shown is keyed in as a credential on the MobiPOS App.
Note that it is mandatory to enter POS ID and IP Address.
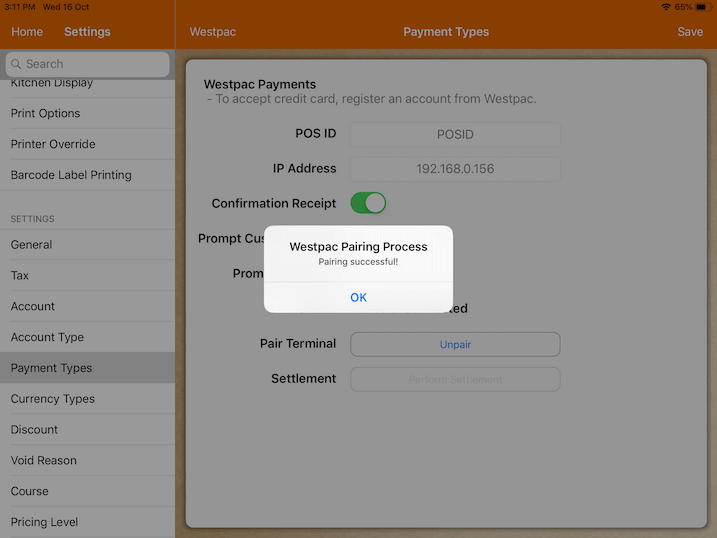
On the EFTPOS device, press "#" to enter pairing mode.
Ensure that your EFTPOS Terminal has been unpaired with any existing pairings.
Proceed to pair your EFTPOS terminal device with MobiPOS.
Press "Pair" on both MobiPOS app and the EFTPOS terminal.
A pop up will prompt code confirmation for both the EFTPOS Terminal and MobiPOS App.

Tap "Yes" to confirm and complete pairing process.
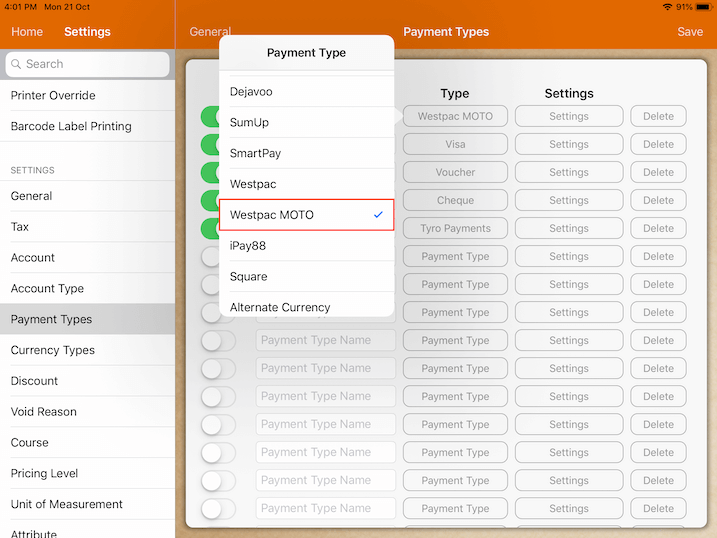
After setup is completed, Westpac can now be added as a "Payment Type" in your system.
Under Settings -> Payment Types -> Type, tap on Westpac to set it as a payment type.

Alternatively, Westpac MOTO can also be added as a "Payment Type" in your system..
Under Settings -> Payment Types -> Type, tap on Westpac MOTO to set it as a payment type.
During payment, selecting Westpac as payment type will initiate payment confirmation on the terminal.
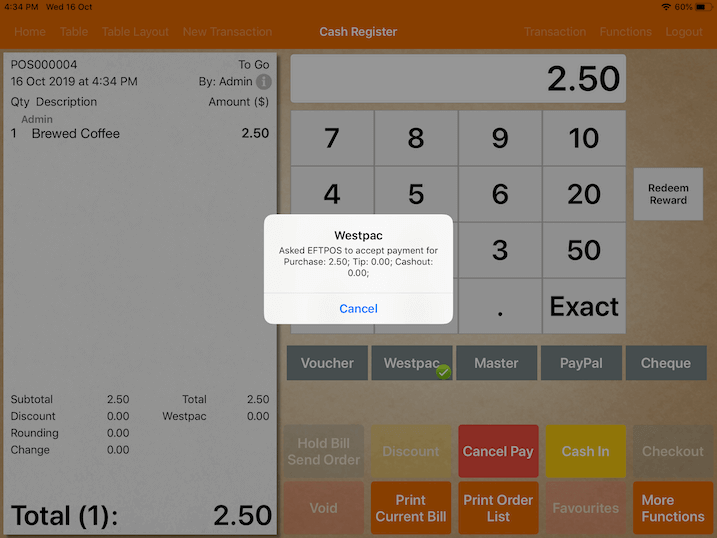
Verification on the terminal will complete a successful transaction.
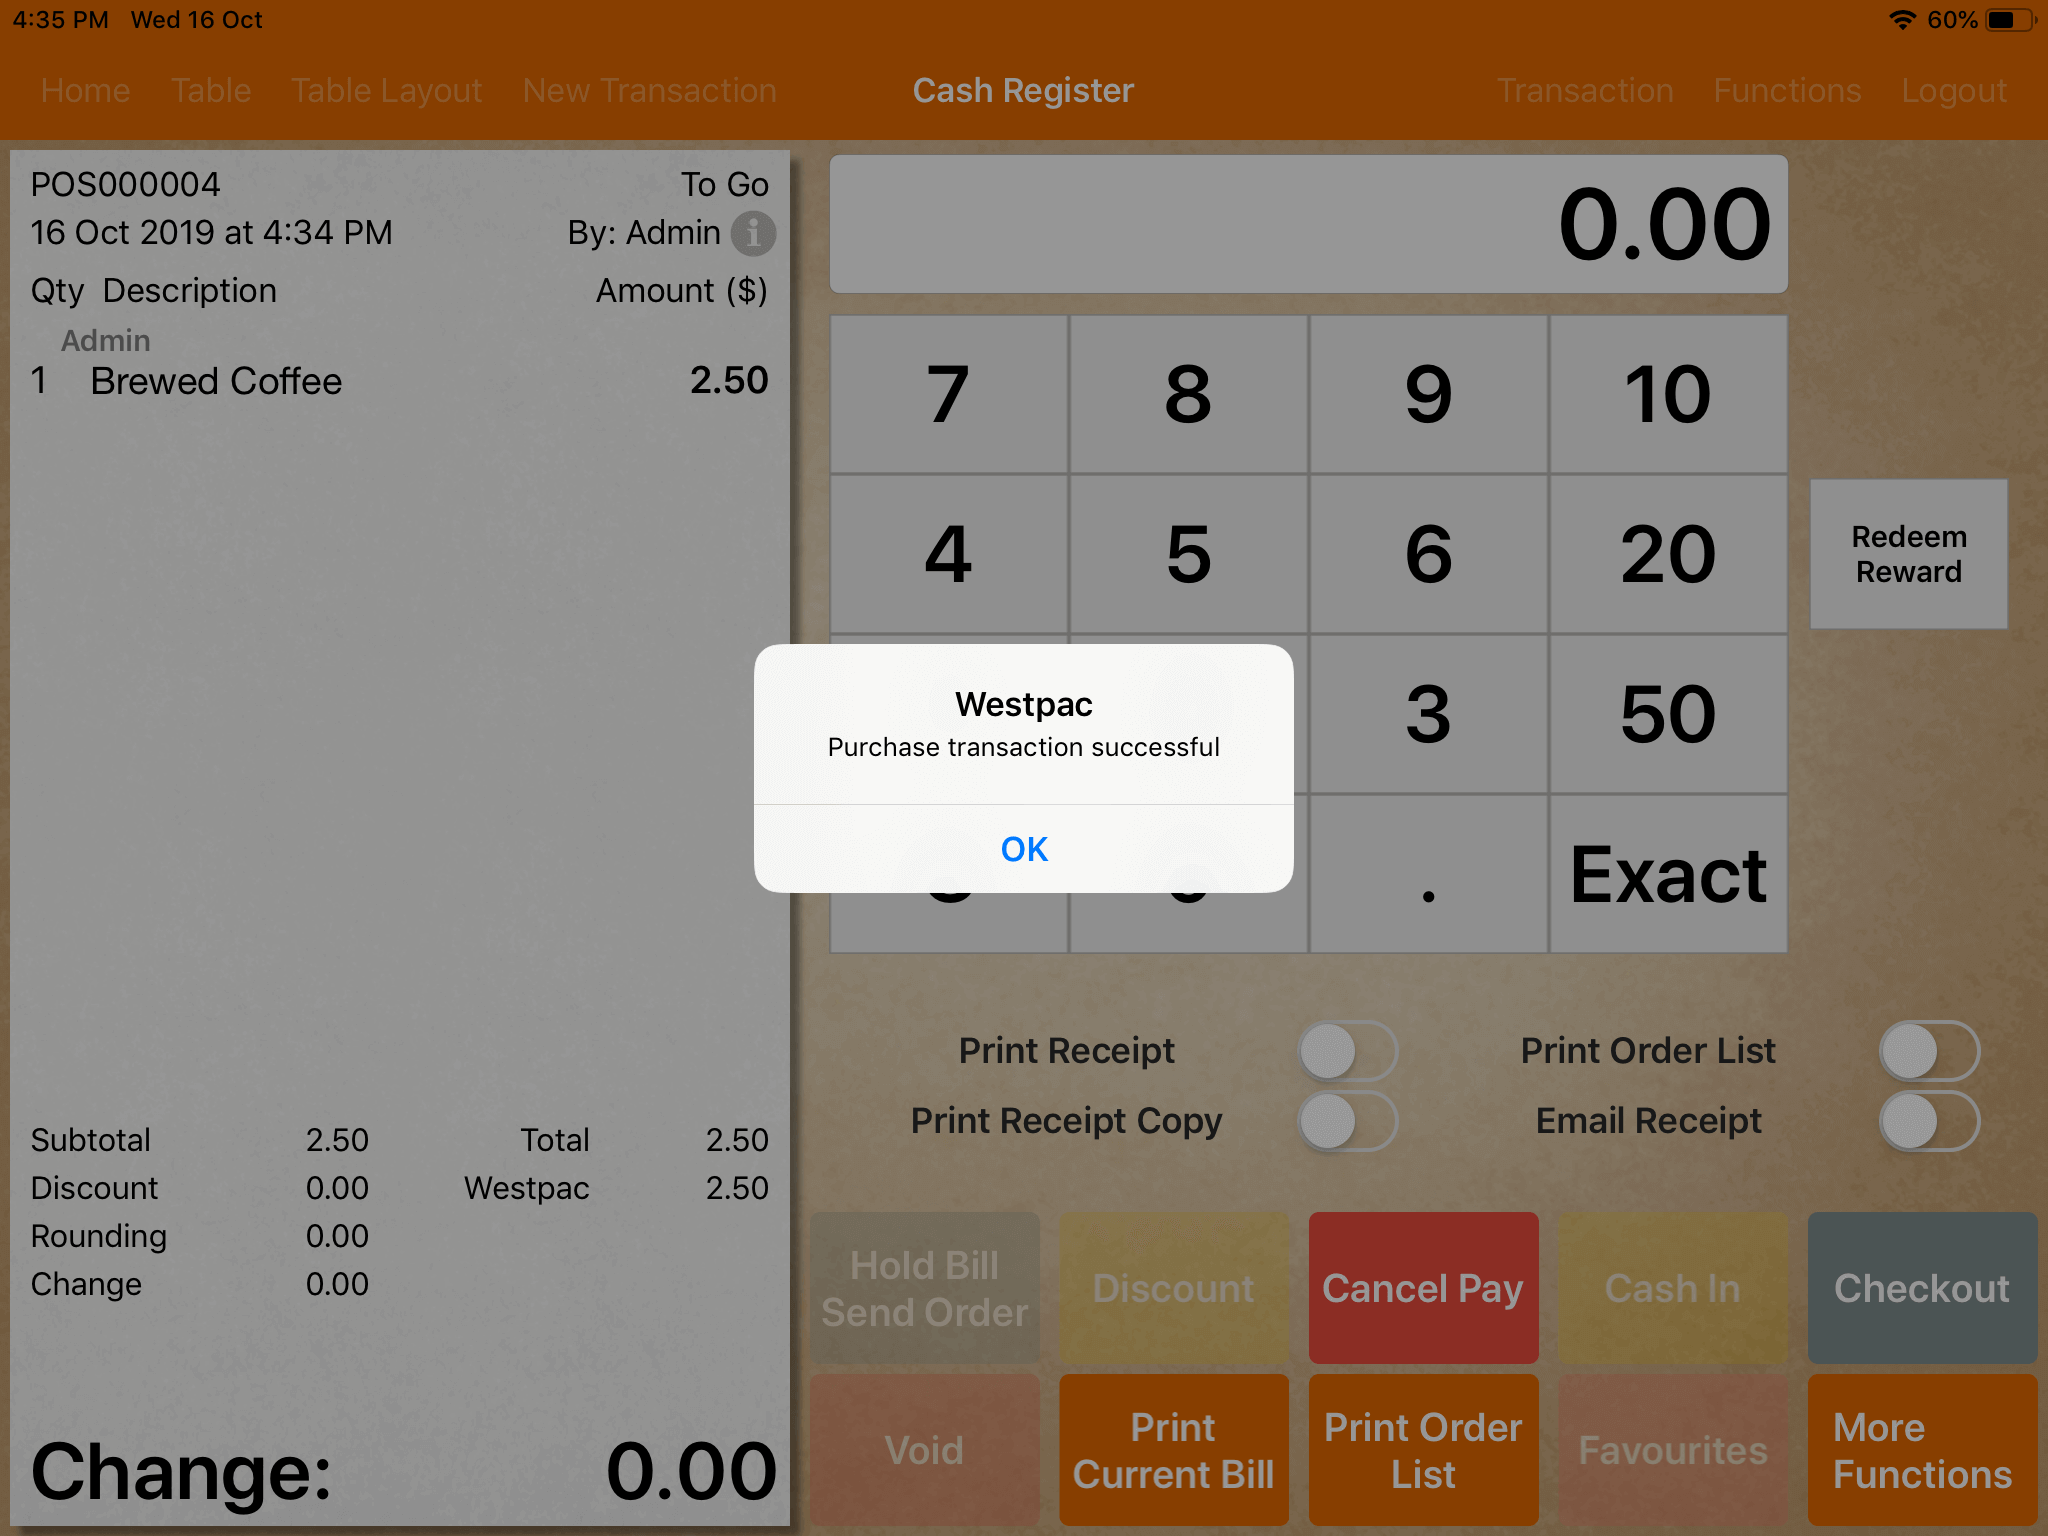
You can now proceed to checkout.
* Westpac and Westpac MOTO can only be configured as payment types in your system after set up is completed.
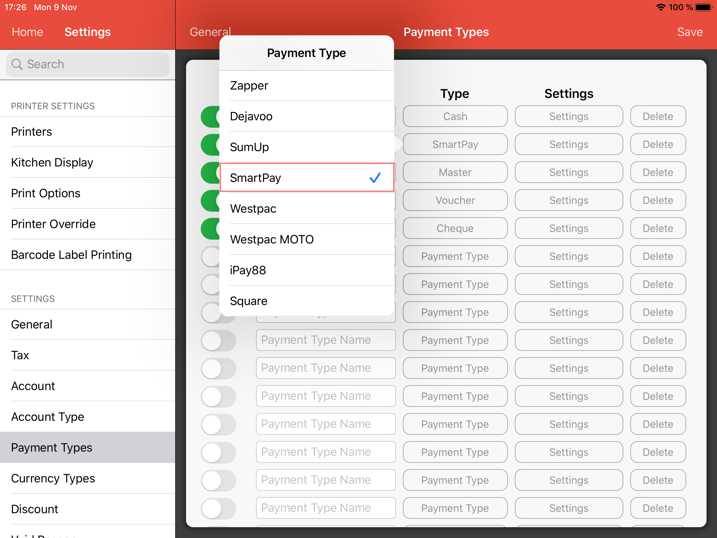
SmartPay
Under Settings -> Payment Types -> Type, tap on SmartPay Payments to set it as a payment type.
Before using SmartPay payments, the iPad has to be paired with the eftpos terminal.
Please refer to the guide below.
Under payment types, Click on General and select SmartPay as highlighted on the screenshot above.
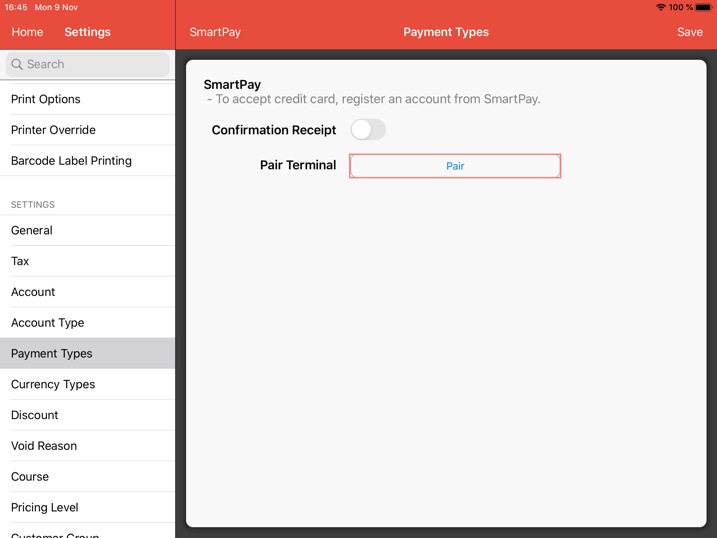
Under Pair Terminal, Click on Pair as shown.
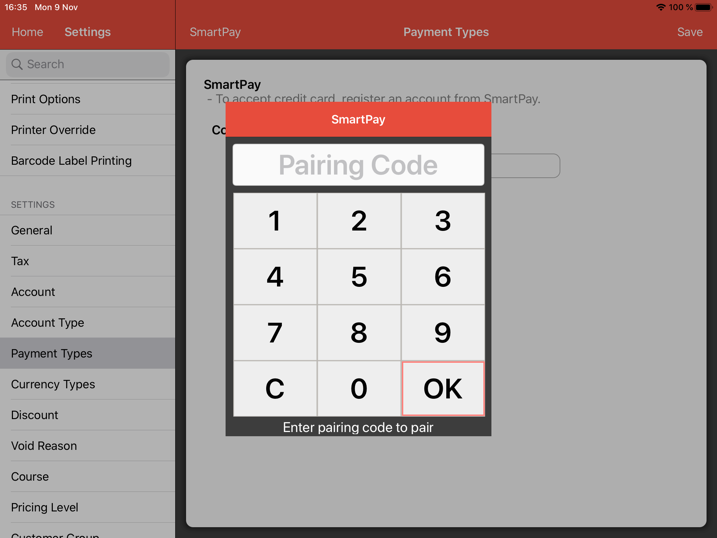
Do contact SmartPay to obtain the SmartPay pairing code.
Insert Pairing Code and click "OK" to pair the terminal to the system.
Upon successful pairing, closing bill with this payment type will initiate the terminal to process credit card.
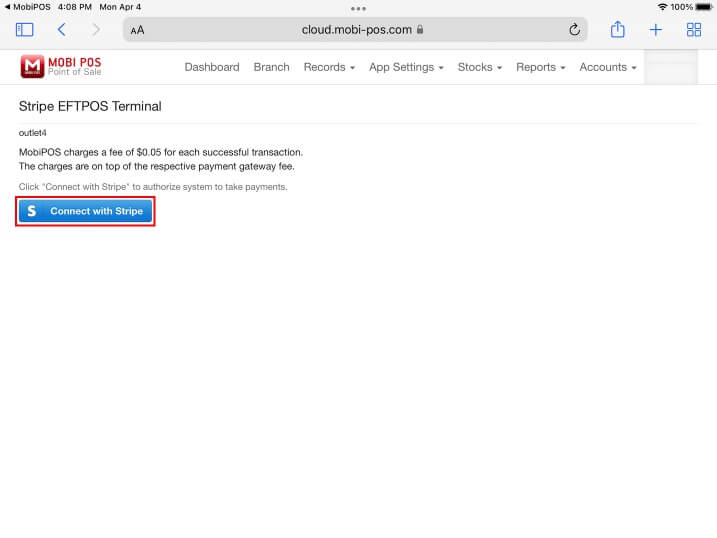
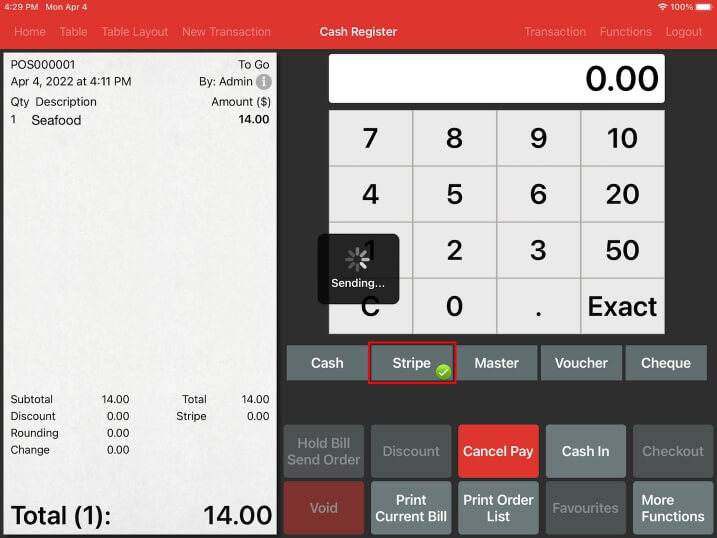
Stripe
In order to accept Stripe in person payments, you first you have login with your Stripe account and pair with the EFTPOS terminal.
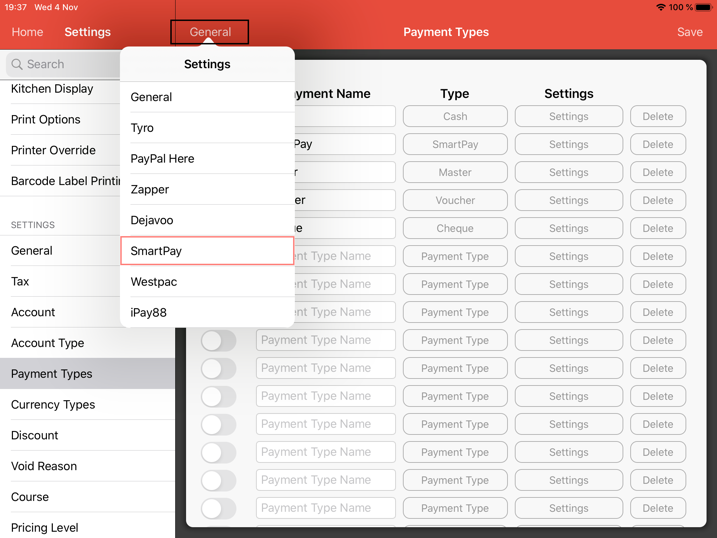
On the app, start by going to Settings -> Payment Types -> General and select Stripe as shown below.

Upon selecting Stripe, you will see a Login button on the right top.
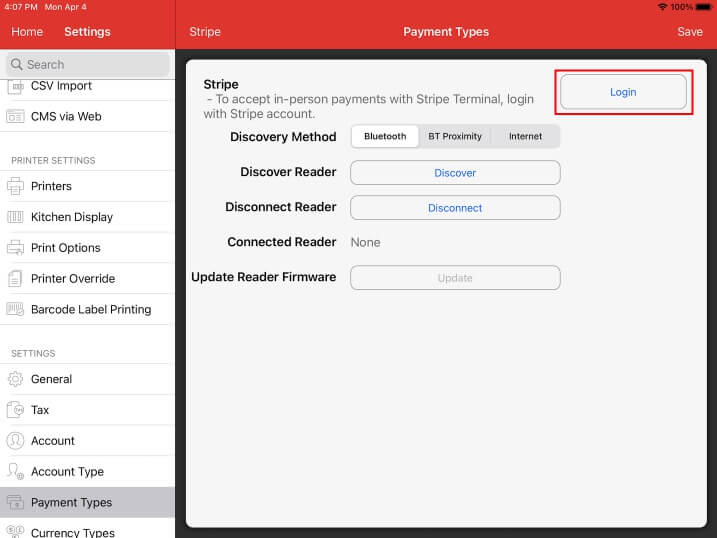
Clicking on the Login button will bring you to MobiPOS CloudSync, you are required to login with your credentials if you are not logged in.
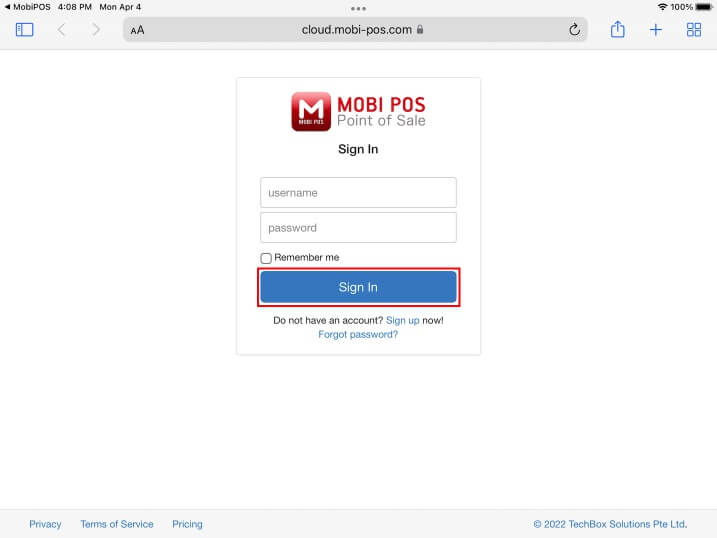
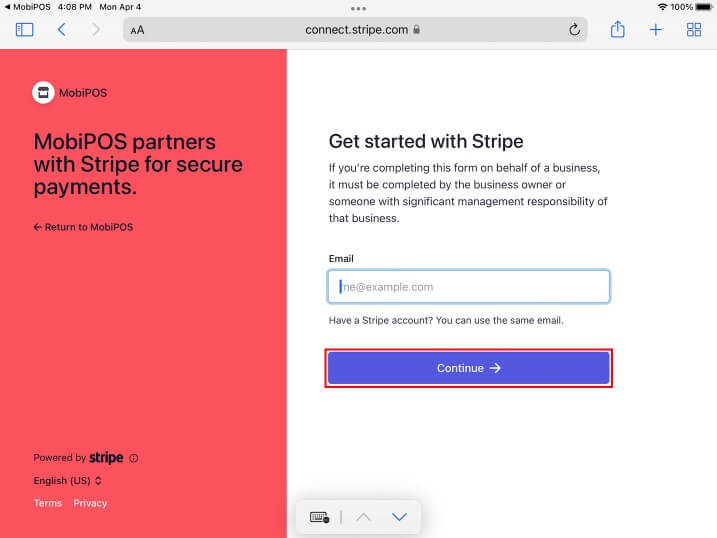
Upon login, you will be lead to Stripe EFTPOS Terminal page, click on Connect with Stripe button and login with Stripe credentials.
Proceed to login with Stripe credentials.
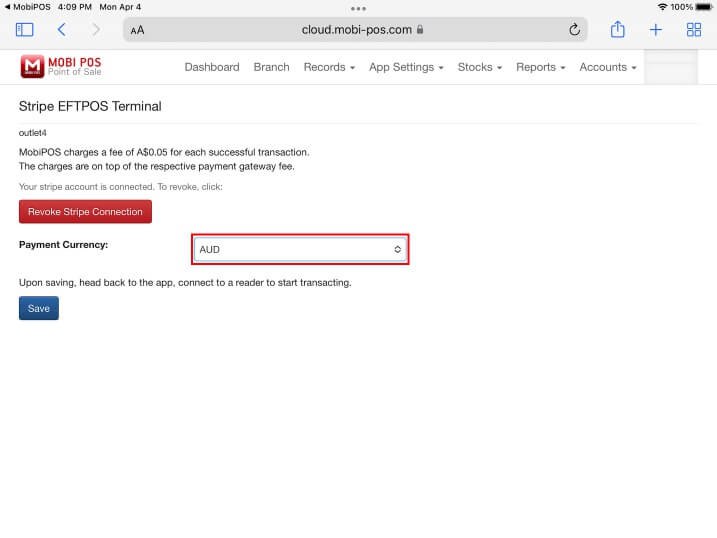
Upon successful login, you will be lead back to MobiPOS CloudSync portal.
Now it shows that your account is connected, you just have to choose your preferred charging payment currency.
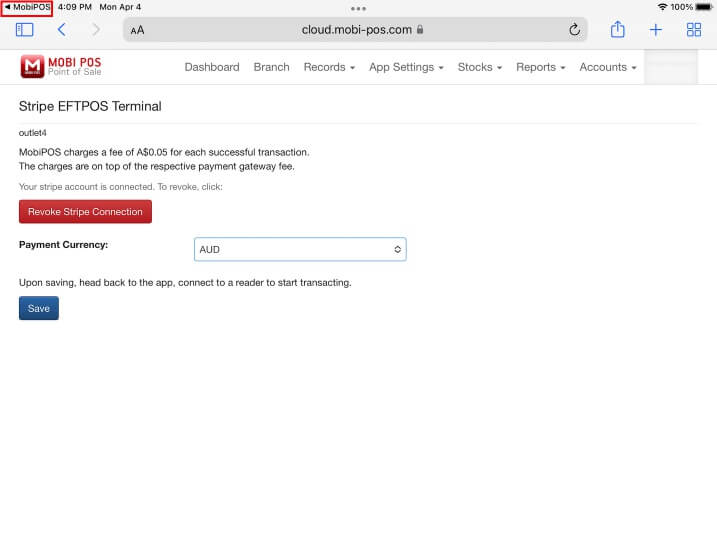
Click on Save and you can head back to the app.
Click on the left top area to return to MobiPOS application.
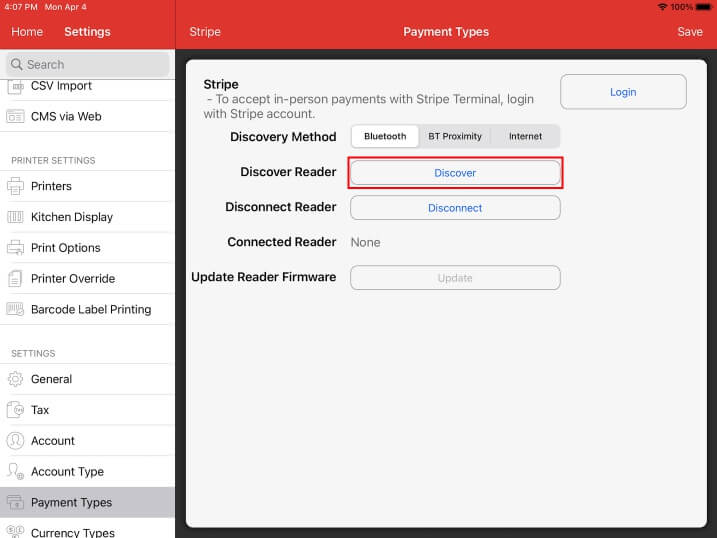
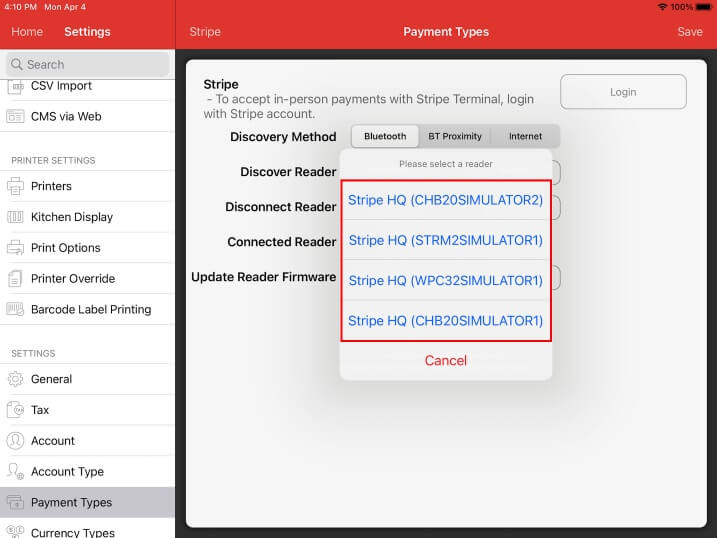
Back to the application, click on Discover to scan for nearby EFTPOS terminal reader.
Choose your preferred reader.
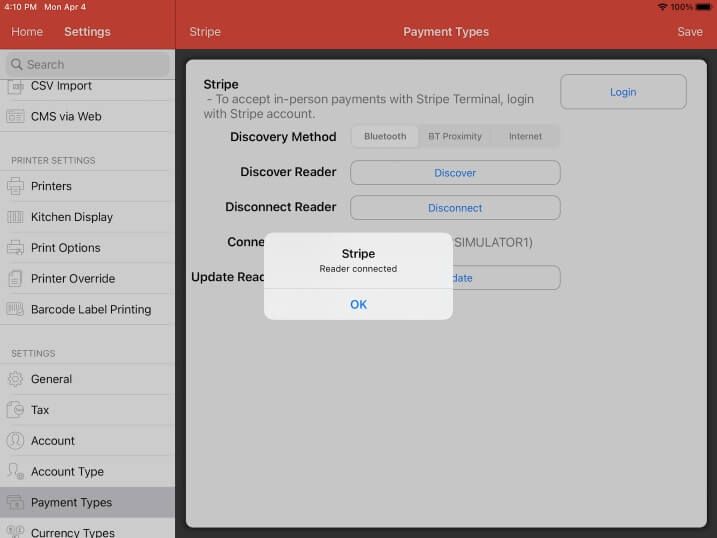
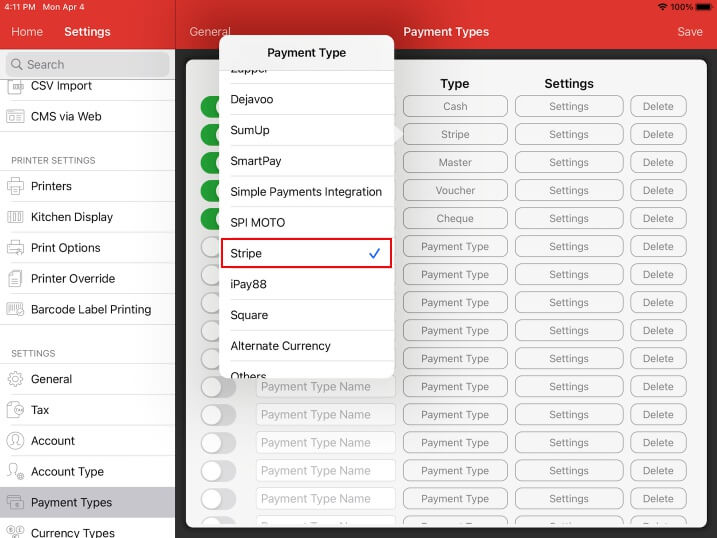
If reader is connected, proceed to General again to setup a payment with a type of Stripe.

Click on settings for the particular payment, and set the type to Stripe.
Now, going back to Cash Register, selecting Stripe payment should initiate the payment on your Stripe EFTPOS.
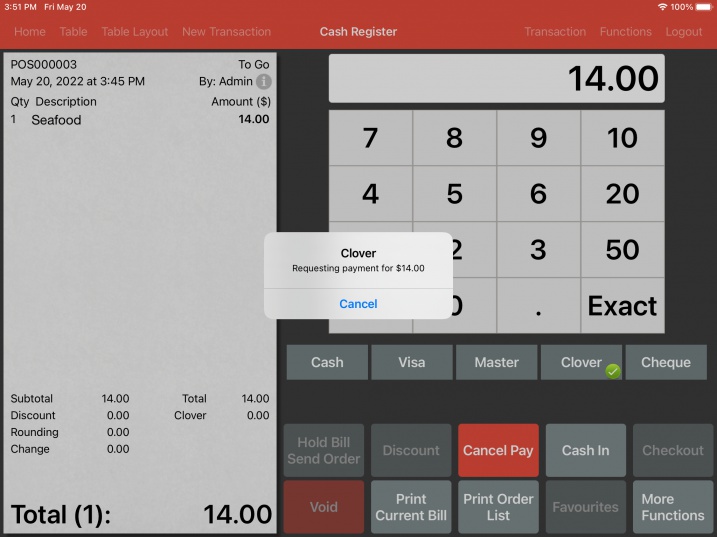
Clover
Before attempting to pair:
- Follow instructions provided by the Clover terminal to perform the initial setup.
- POS and Clover terminal must be on the same WiFi / Local Area Network.
- Clover terminal must have the Network Pay Display app installed and running. (can be found under the More Tools app market)
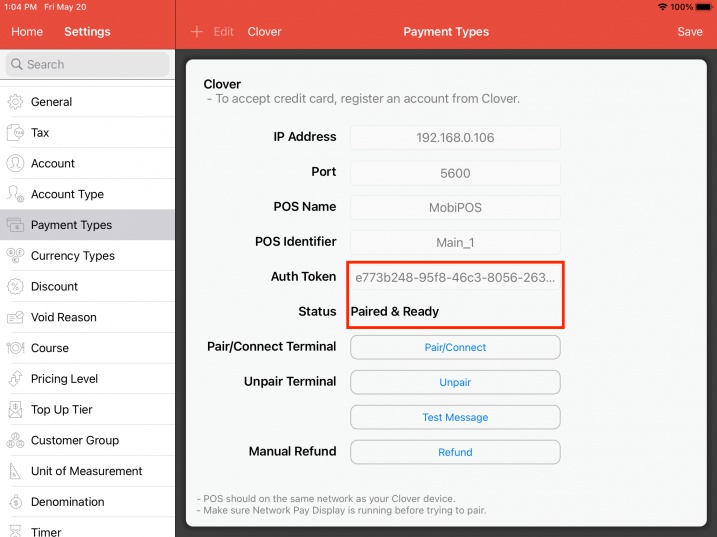
To accept payments through your Clover device, you will need to ensure that the Clover terminal status shows Paired & Ready.
Paired & Ready - your POS is paired and connected to the Clover terminal and it is ready to accept payments.
Paired - your POS is paired to the Clover terminal, but Network Pay Display may not be running.
Unpaired - your POS is not paired and disconnected from the Clover terminal.
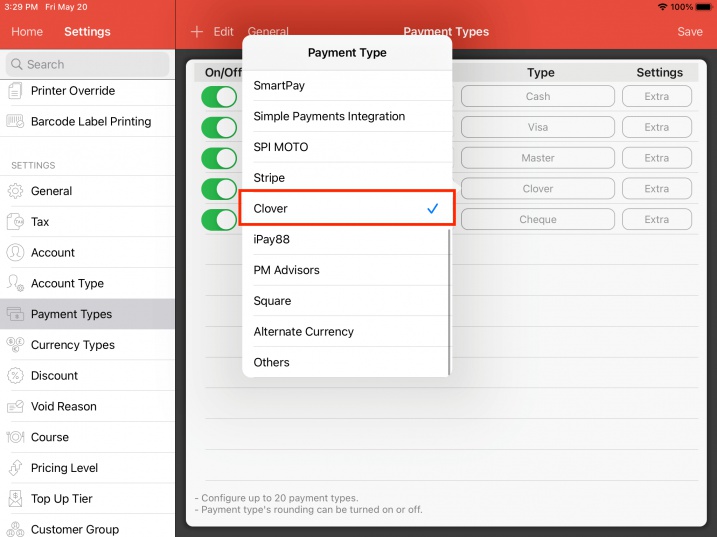
Start by going to Settings -> Payment Types -> General and select Clover as shown below.

Enter IP Address, Port, POS Name and POS Identifier in the respective fields as indicated.
IP Address and Port can be found on the Clover terminal upon launching Network Pay Display.
Port number may be manually configured in Network Pay Display -> Settings -> Server Port. (1024 - 65535)
Any changes made to Network Pay Display settings will require user to press Configure and Restart Server in order to apply the changes.
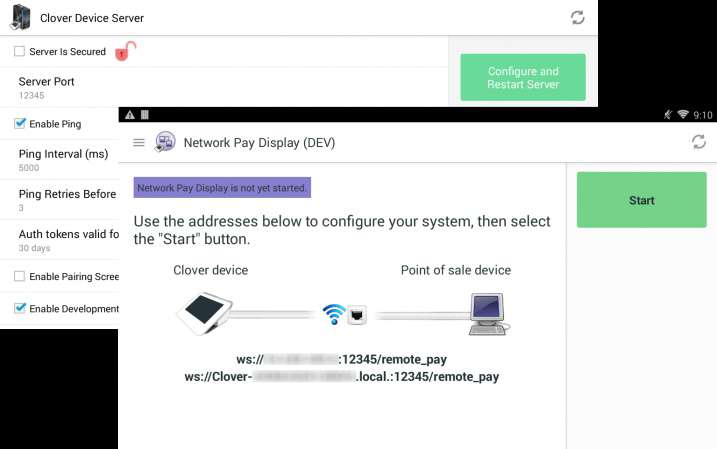
After configuring the Network Pay Display settings, press Start to start the server on the Clover terminal.

POS Name and POS Identifier are for users to identify the POS that is attempting to pair with the Clover device.
Users are free to input any POS Name and POS Identifier they wish.
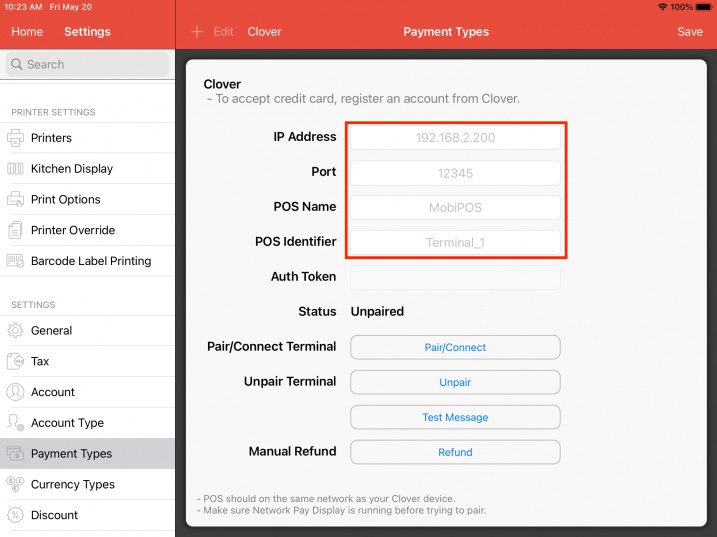
After filling in the necessary credentials, tap on Pair/Connect to begin the pairing process.
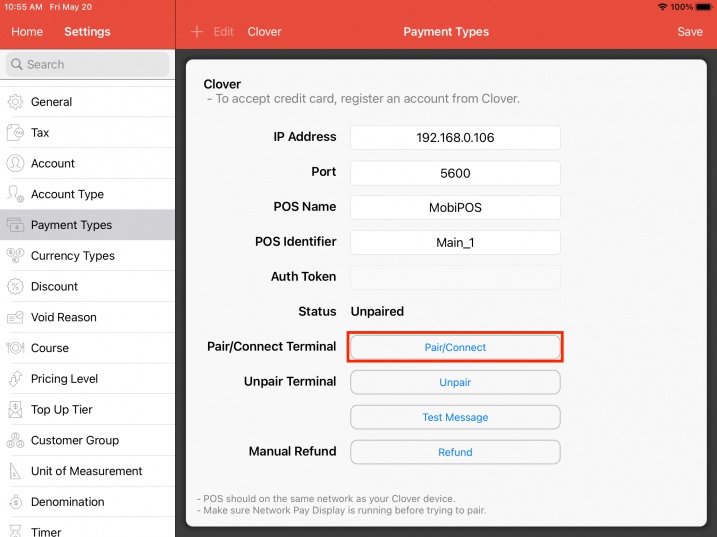
A pairing notification will appear on screen while the pairing process is ongoing.
If POS is pairing to the Clover terminal for the first time, user may be required to enter Manager Passcode that they set up on the Clover terminal earlier.
Manager Passcode may also be required by Clover terminal if the POS was previously unpaired from the Clover terminal.

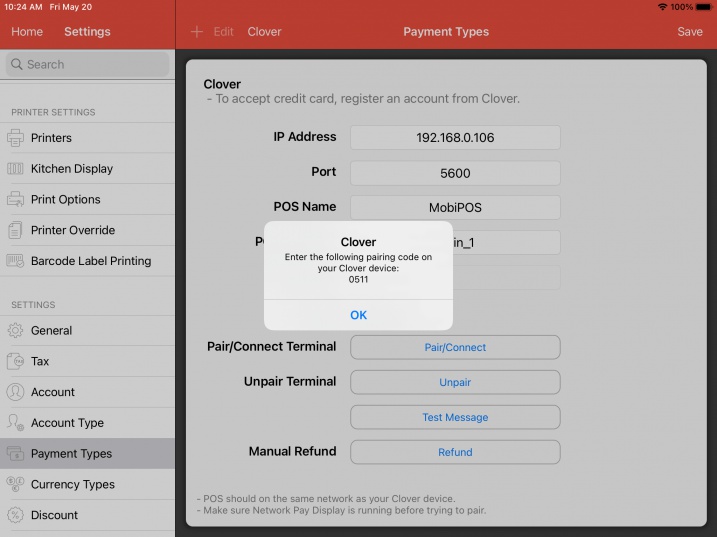
Upon entering the Manager Passcode, Clover will generate and send a Pairing Code for the POS to display.
User will need to key this pairing code into the Clover Terminal.
If multiple devices are attempting to pair with the Clover terminal, make sure to check that the POS Name and POS Identifier belong to this device before keying in the pairing code.
If the pairing code provided to the Clover terminal is correct, a notification will appear to indicate the pairing was successful.
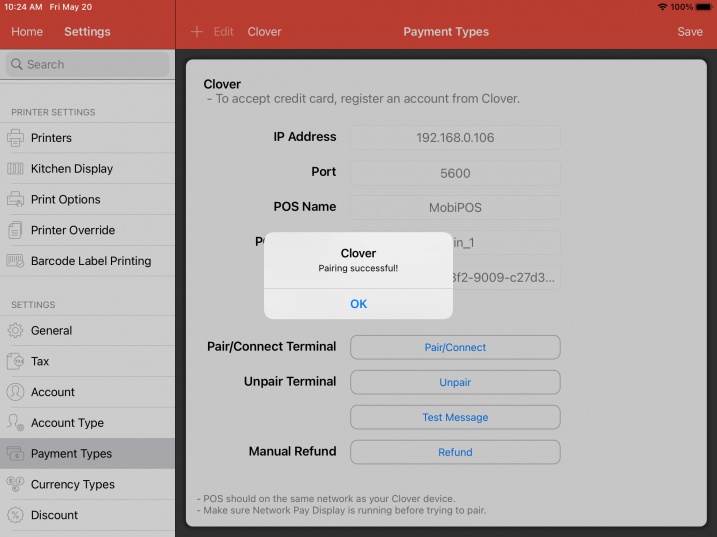
Status will now show Paired & Ready, and the Clover terminal is ready to accept payments.
The Auth Token field will now contain a non-editable text used by the POS to auto-reconnect to the Clover terminal on app restart, or if there is a disconnection.
After successful pairing with Clover terminal, return to General to setup a payment with a type of Clover.
In Cash Register, selecting the Clover payment should initiate the payment request to the Clover terminal.
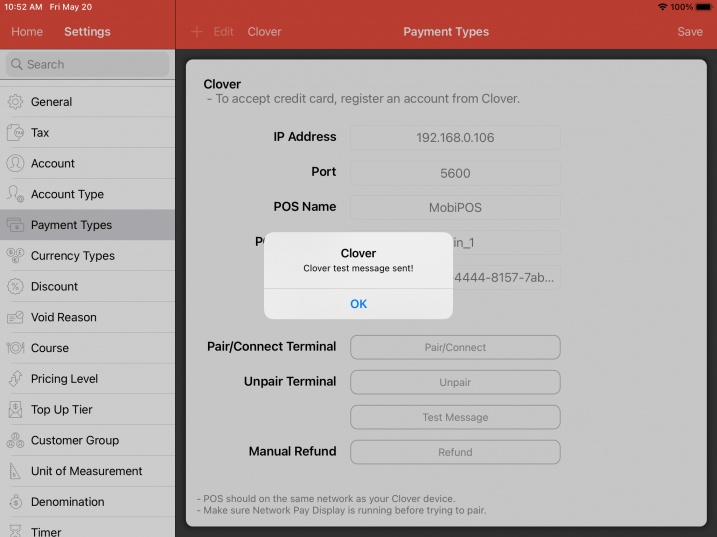
Send Test Message
When Clover terminal is Paired & Ready, user may send a test message to Clover terminal by pressing the Test Message button.
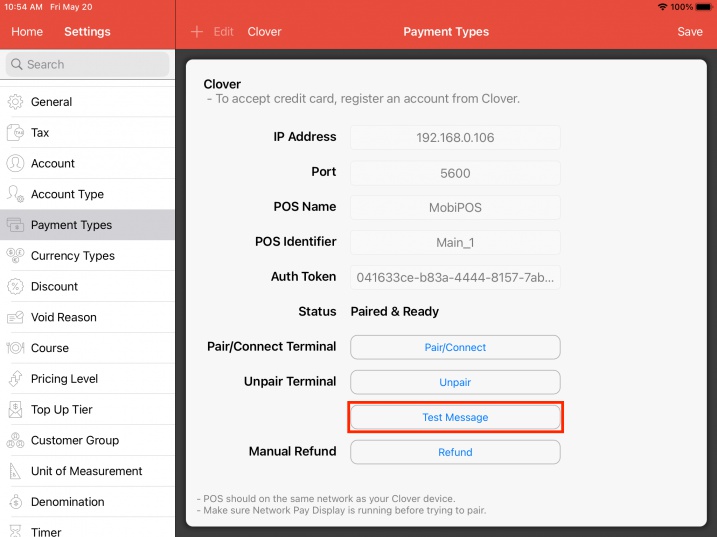
A notification will appear to indicate that the test message has been sent to the Clover terminal.
Clover terminal should show the message "Test message sent from < POS Name >".
Manual Refund
User may process a manual refund for bills with payments received via Clover terminal.
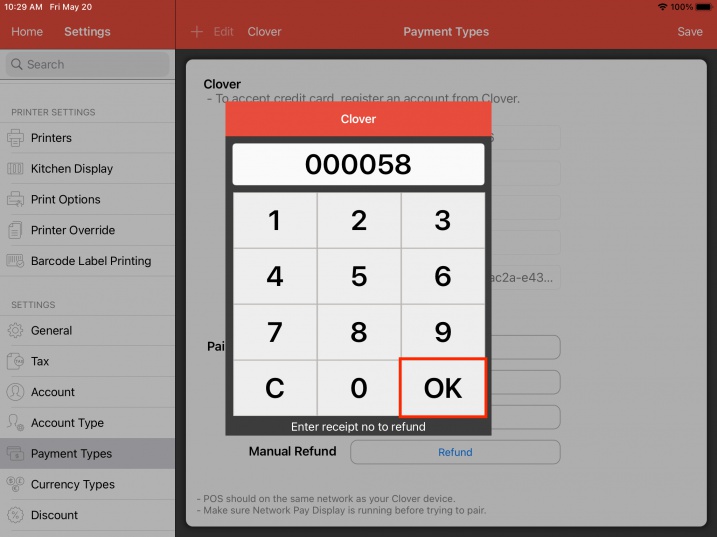
To perform manual refund via Clover, tap on the Refund button.
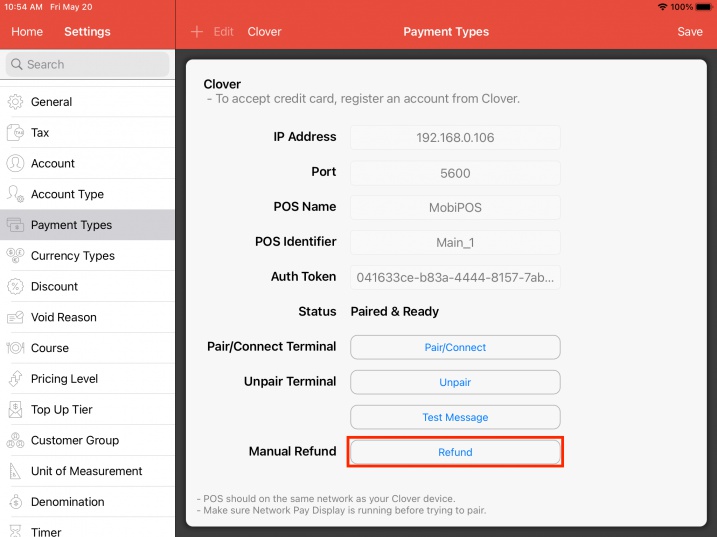
A keypad will appear for you to key in the Receipt No of the bill you wish to refund, followed by OK.
Receipt No refers to the 6-digit Receipt or Transaction No found on the bill printout, without the outlet prefix.
(For example: bill printout shows POS000058, user may enter either 58 or 000058)
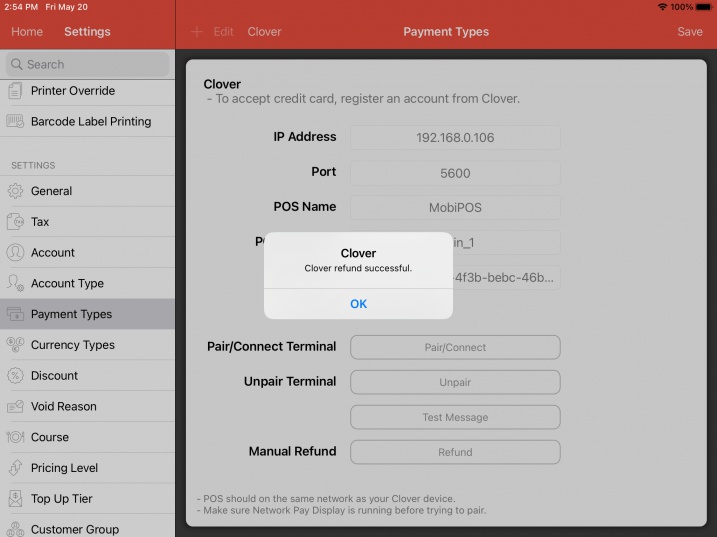
User may be asked to select a receipt type option on the Clover terminal.
If refund is successful, a notification will appear on screen to indicate that the refund was successful.
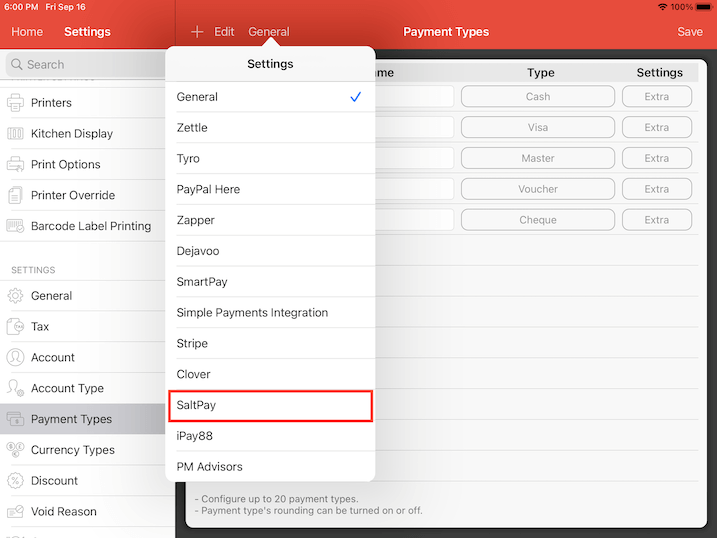
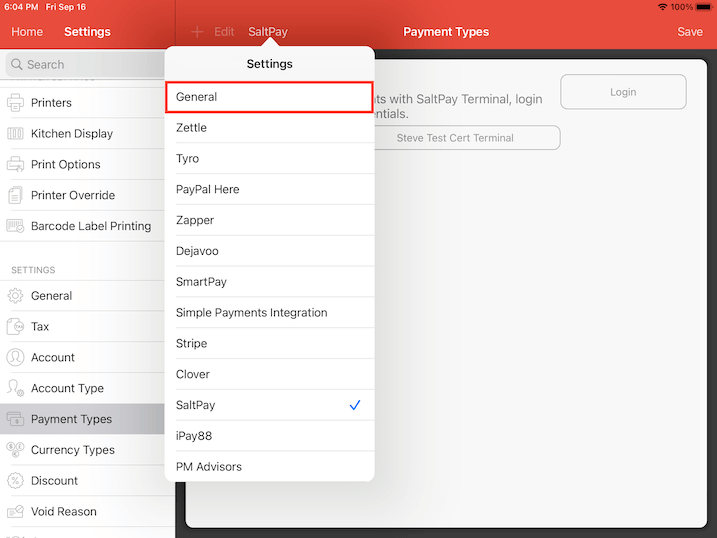
SaltPay
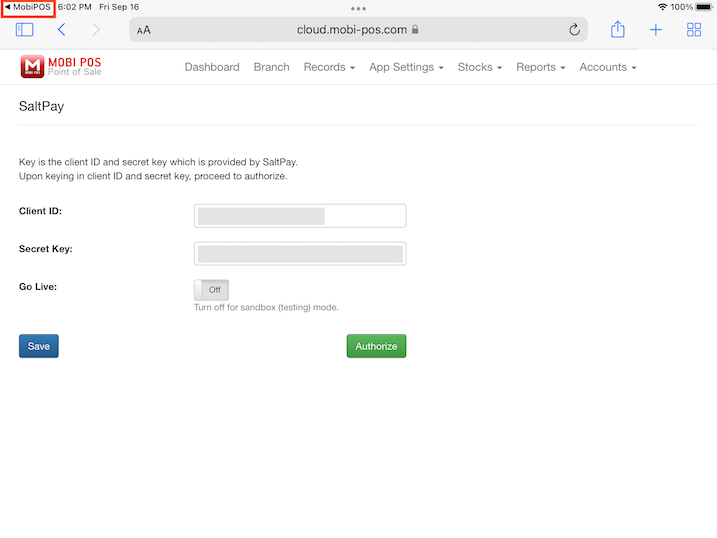
In order to accept SaltPay in person payments, you first you have login with your SaltPay account and connect with the EFTPOS terminal.
On the app, start by going to Settings -> Payment Types -> General and select SaltPay as shown below.
Upon selecting SaltPay, you will see a Login button on the right top.
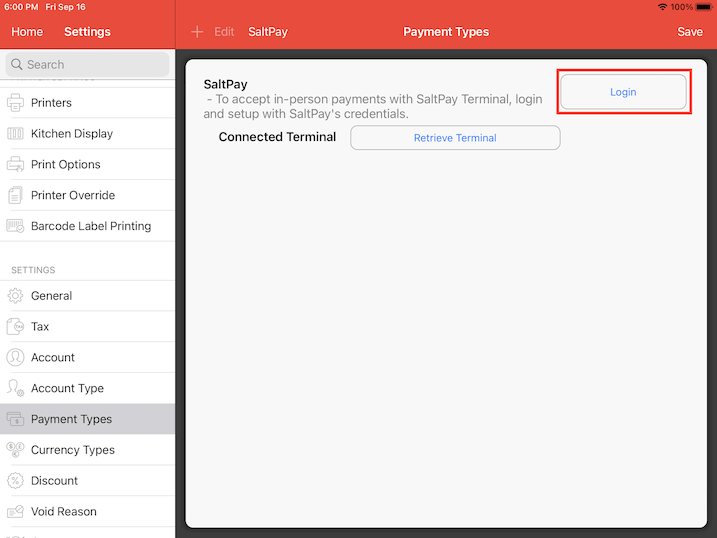
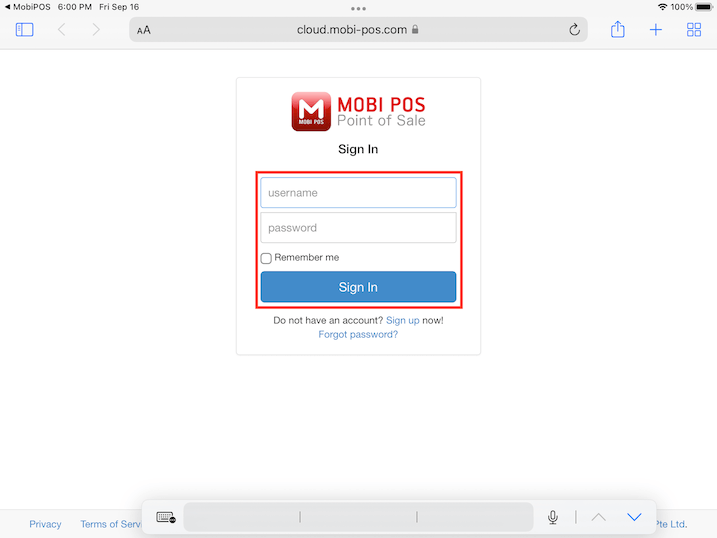
Clicking on the Login button will bring you to MobiPOS CloudSync, you are required to login with your credentials if you are not logged in.
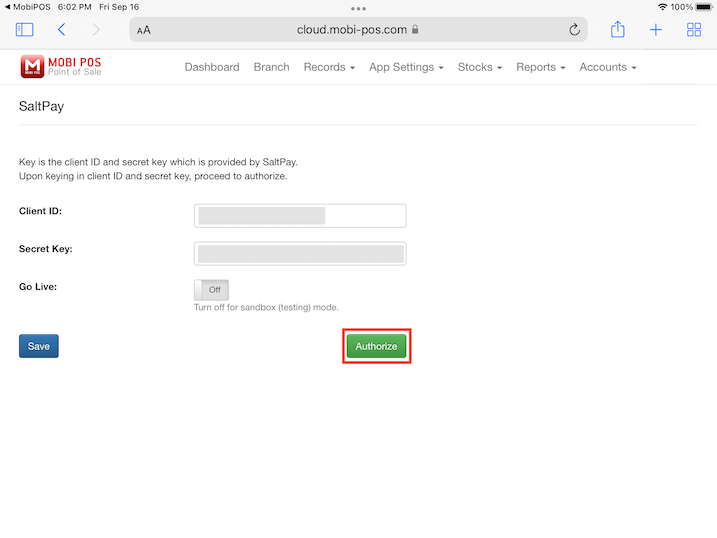
Upon login, you will be lead to SaltPay configuration page, key in the Client ID and Secret Key provided by SaltPay and proceed to click on Authorize.
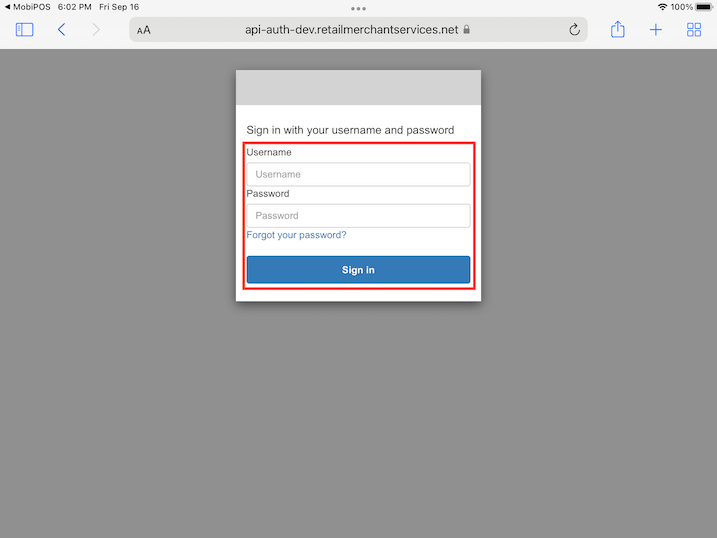
You will be redirected to SaltPay website, proceed to key in the Username and Password provided by their platform.
Upon successful login, you will be redirect back to MobiPOS CloudSync portal, if all is well, you will be greeted with the "Successfully authorized." popup message.
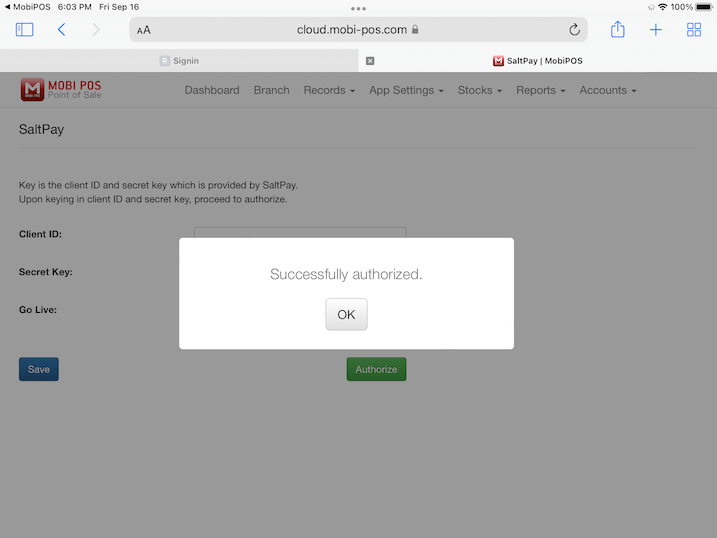
That's all you need to do from here, proceed to click on the left top area to return to MobiPOS application.
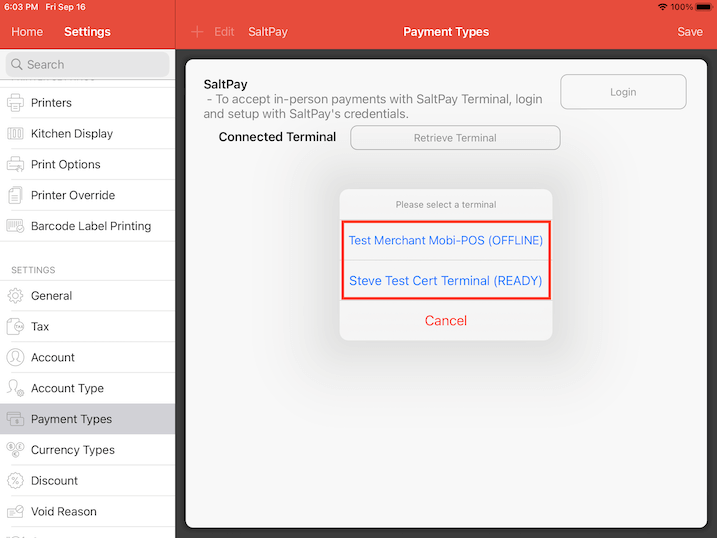
Back to the application, click on Retrieve Terminal to retrieve the configured EFTPOS terminal reader.
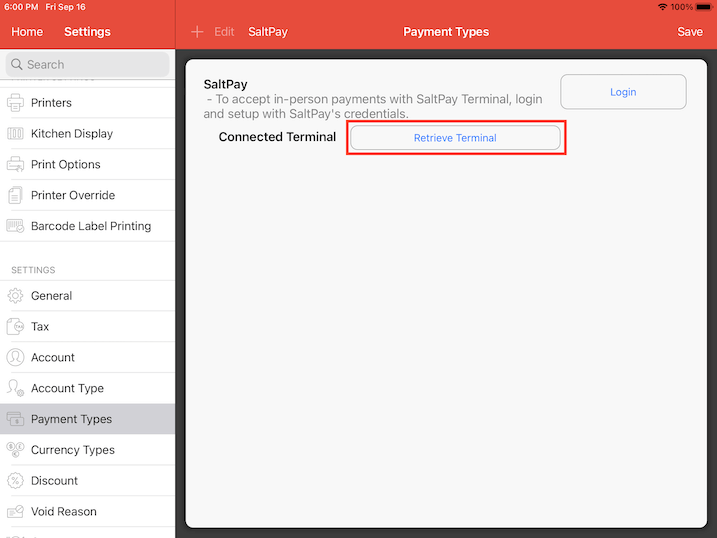
Choose your preferred reader.
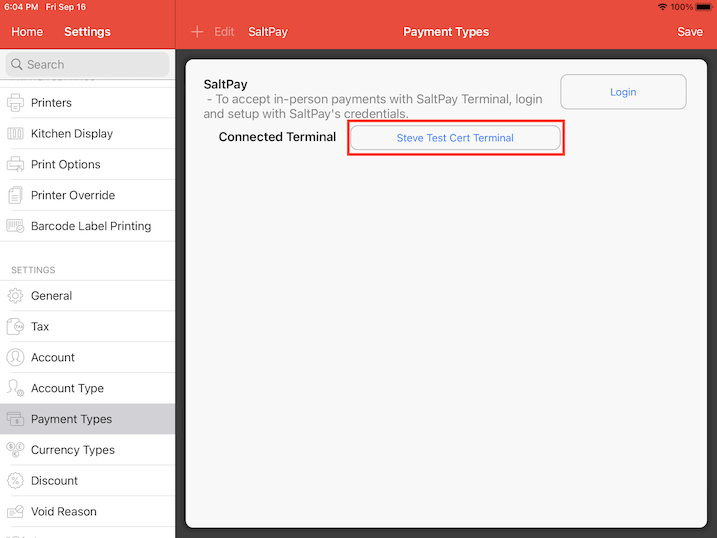
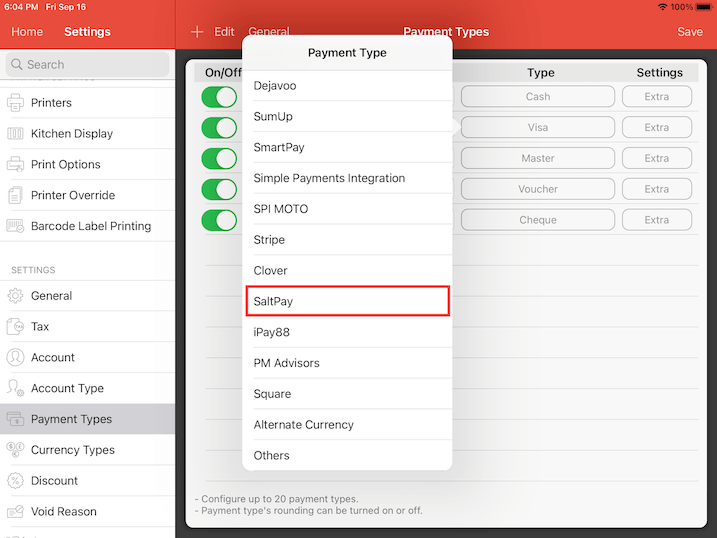
If reader is connected, proceed to General again to setup a payment with a type of SaltPay.
Click on settings for the particular payment, and set the type to SaltPay.
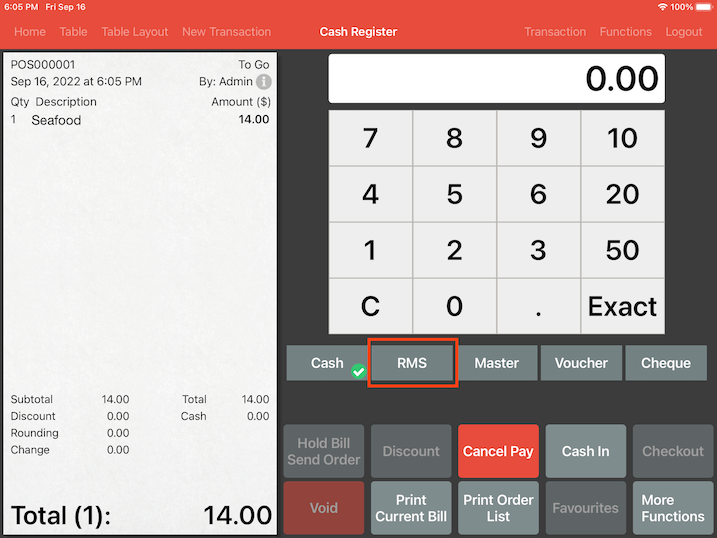
Now, going back to Cash Register, selecting SaltPay payment should initiate the payment on your SaltPay EFTPOS.
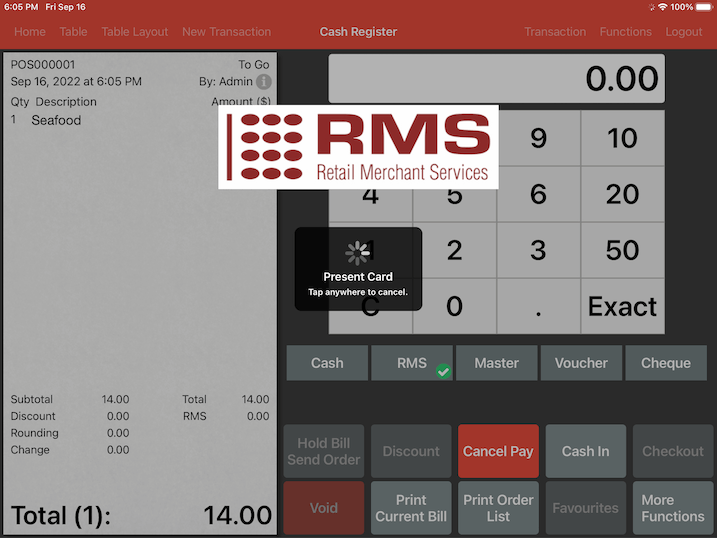
If the payment is initiated, you will see the RMS logo being shown asking to present card for payment.
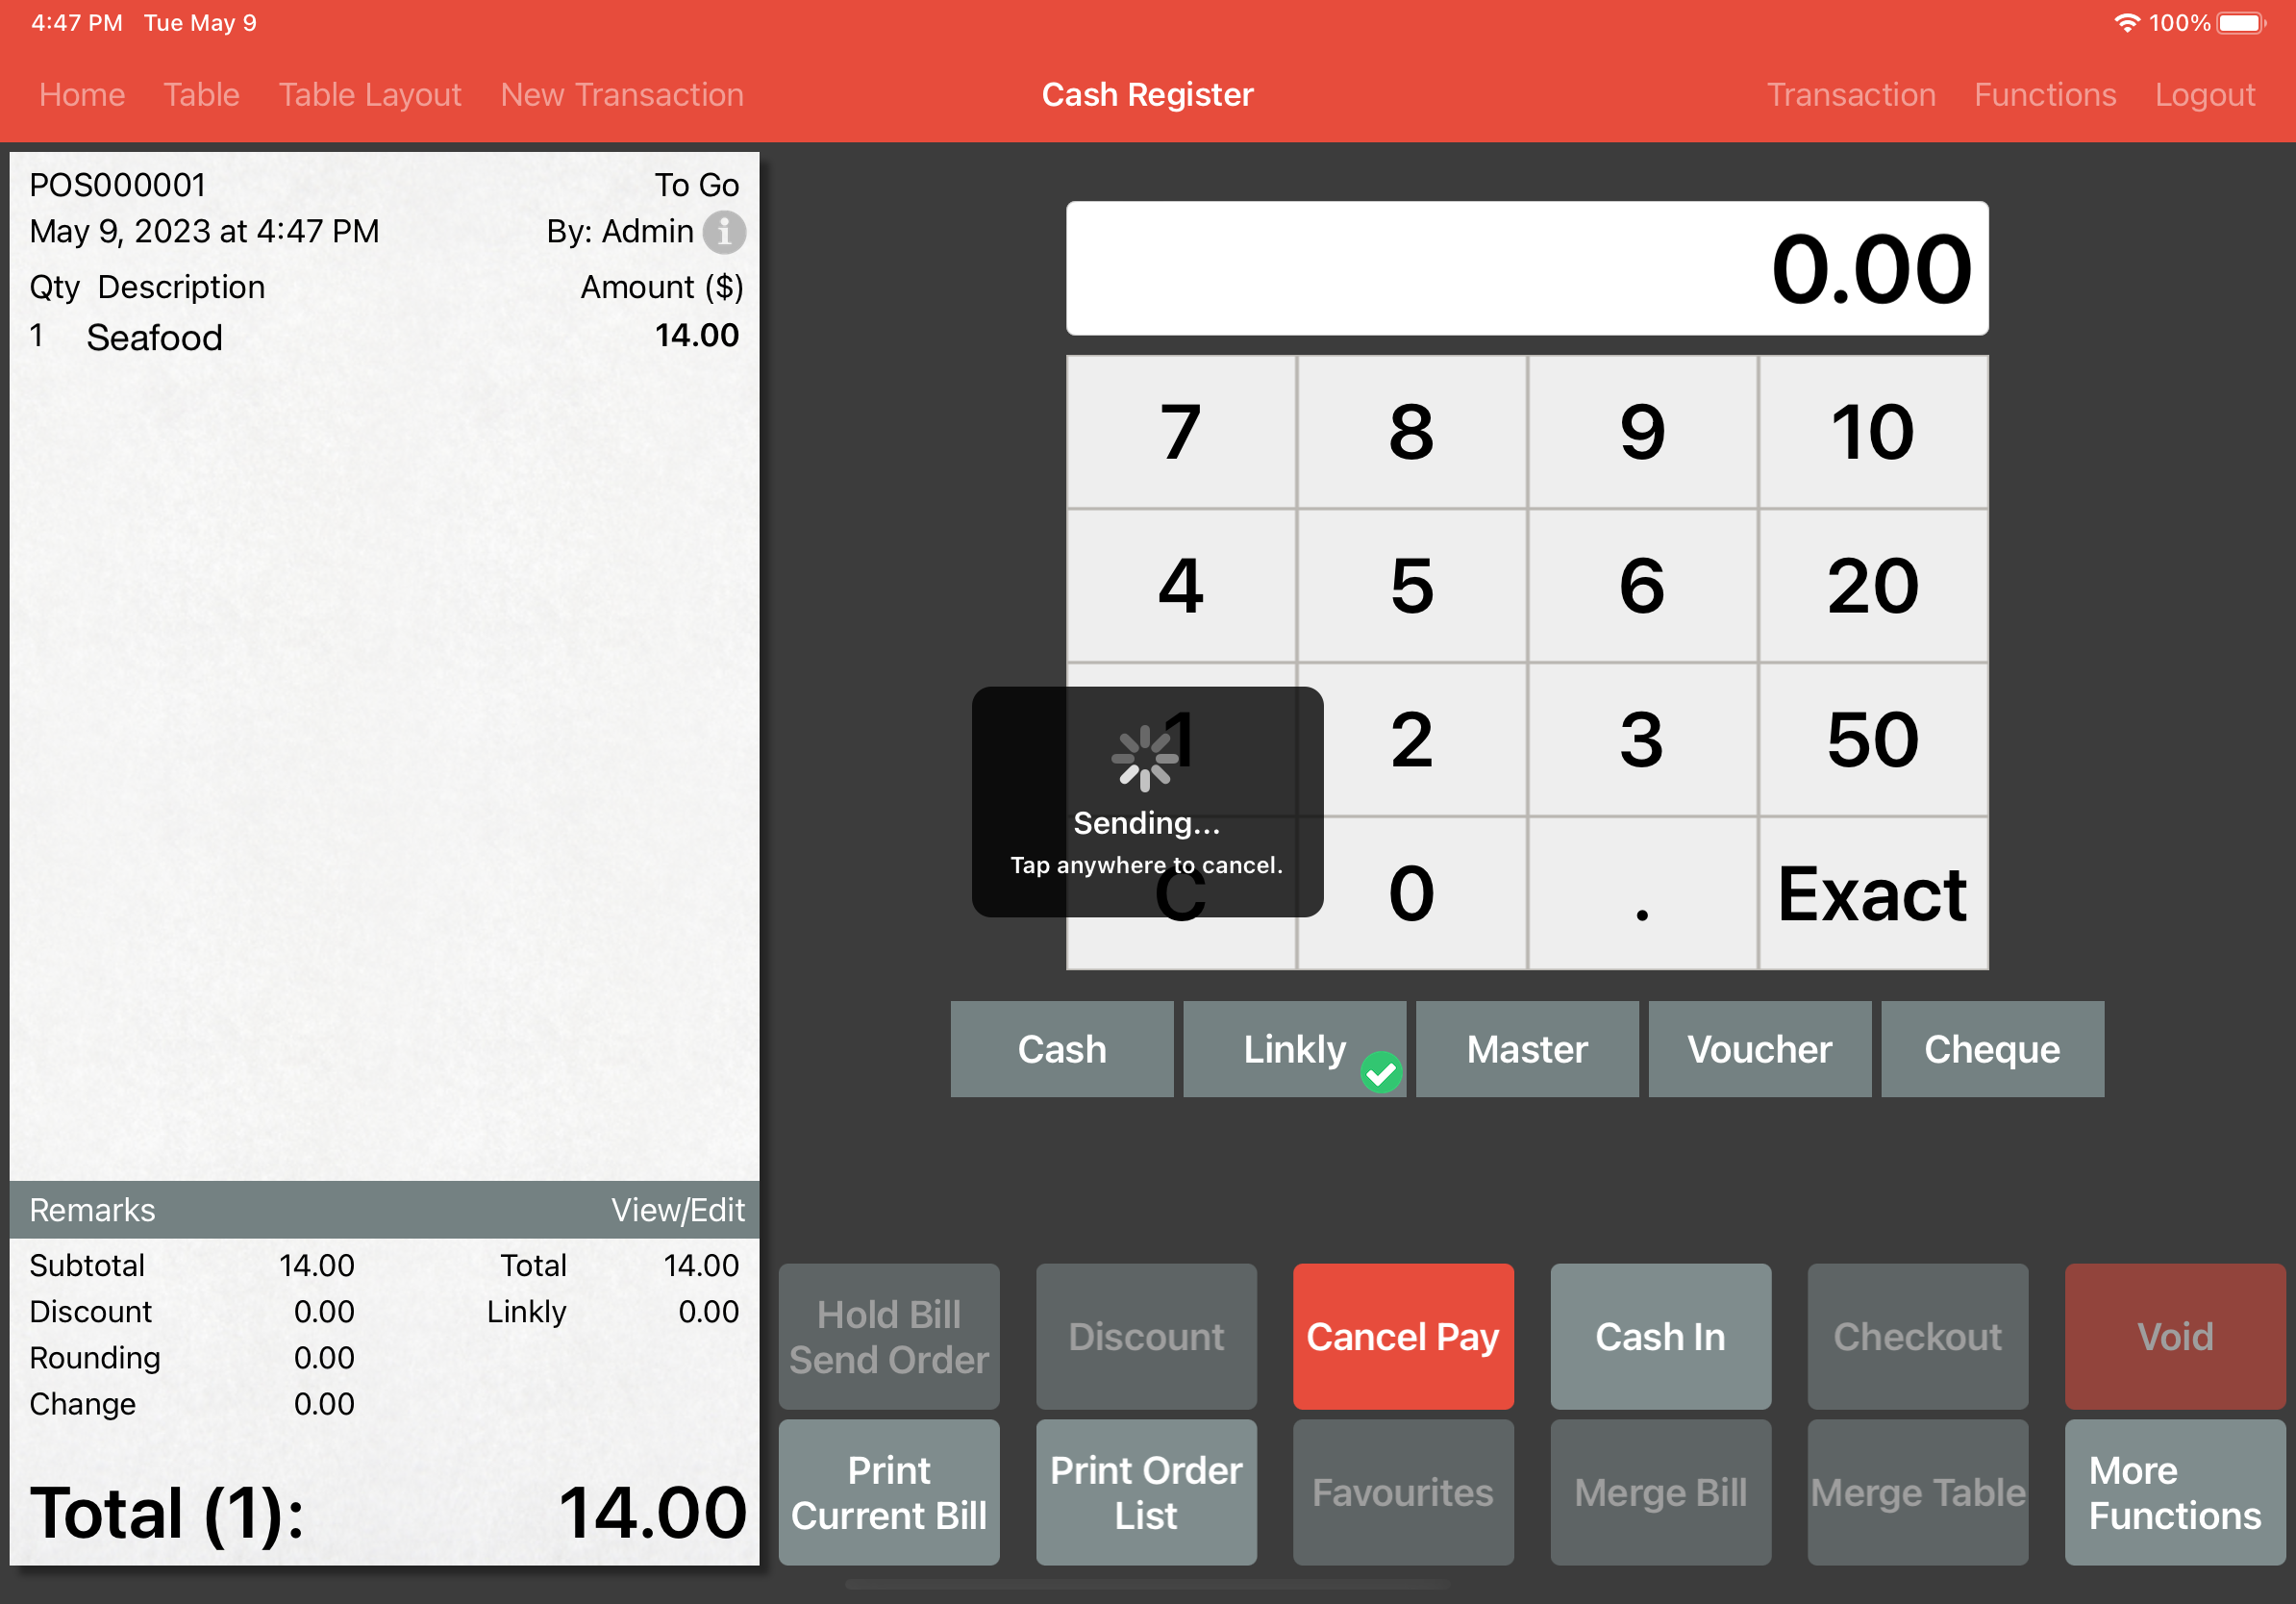
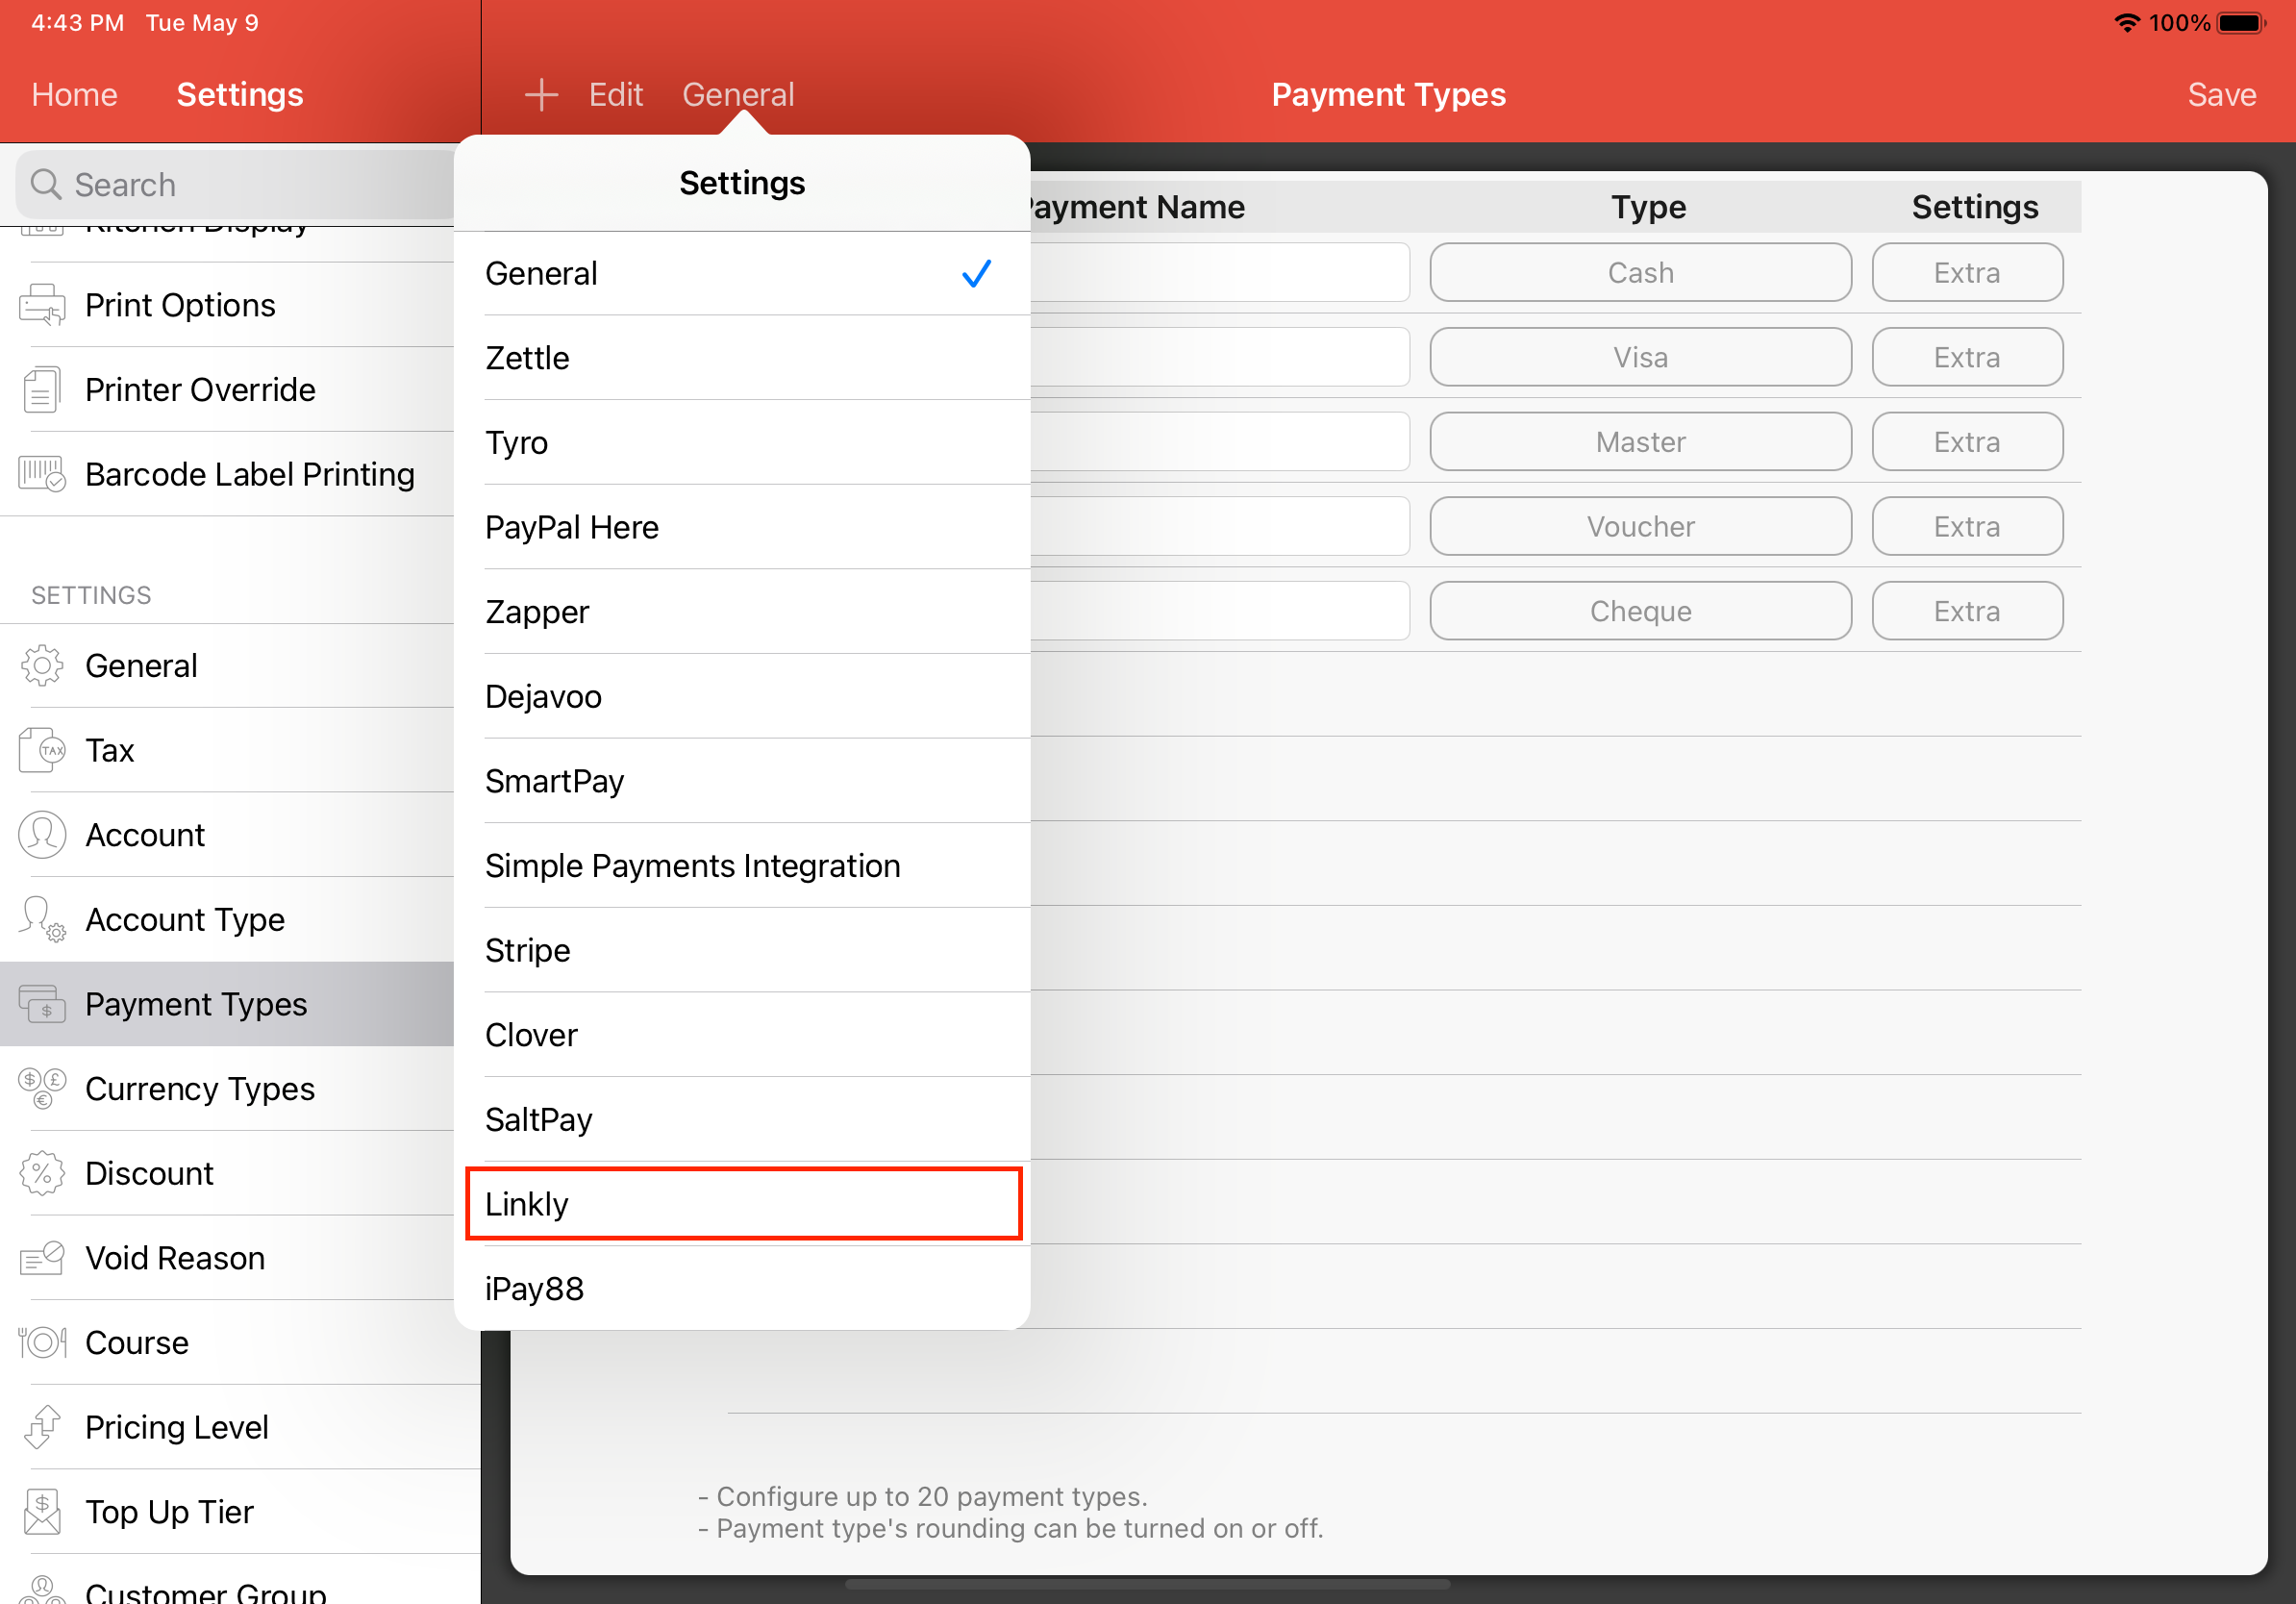
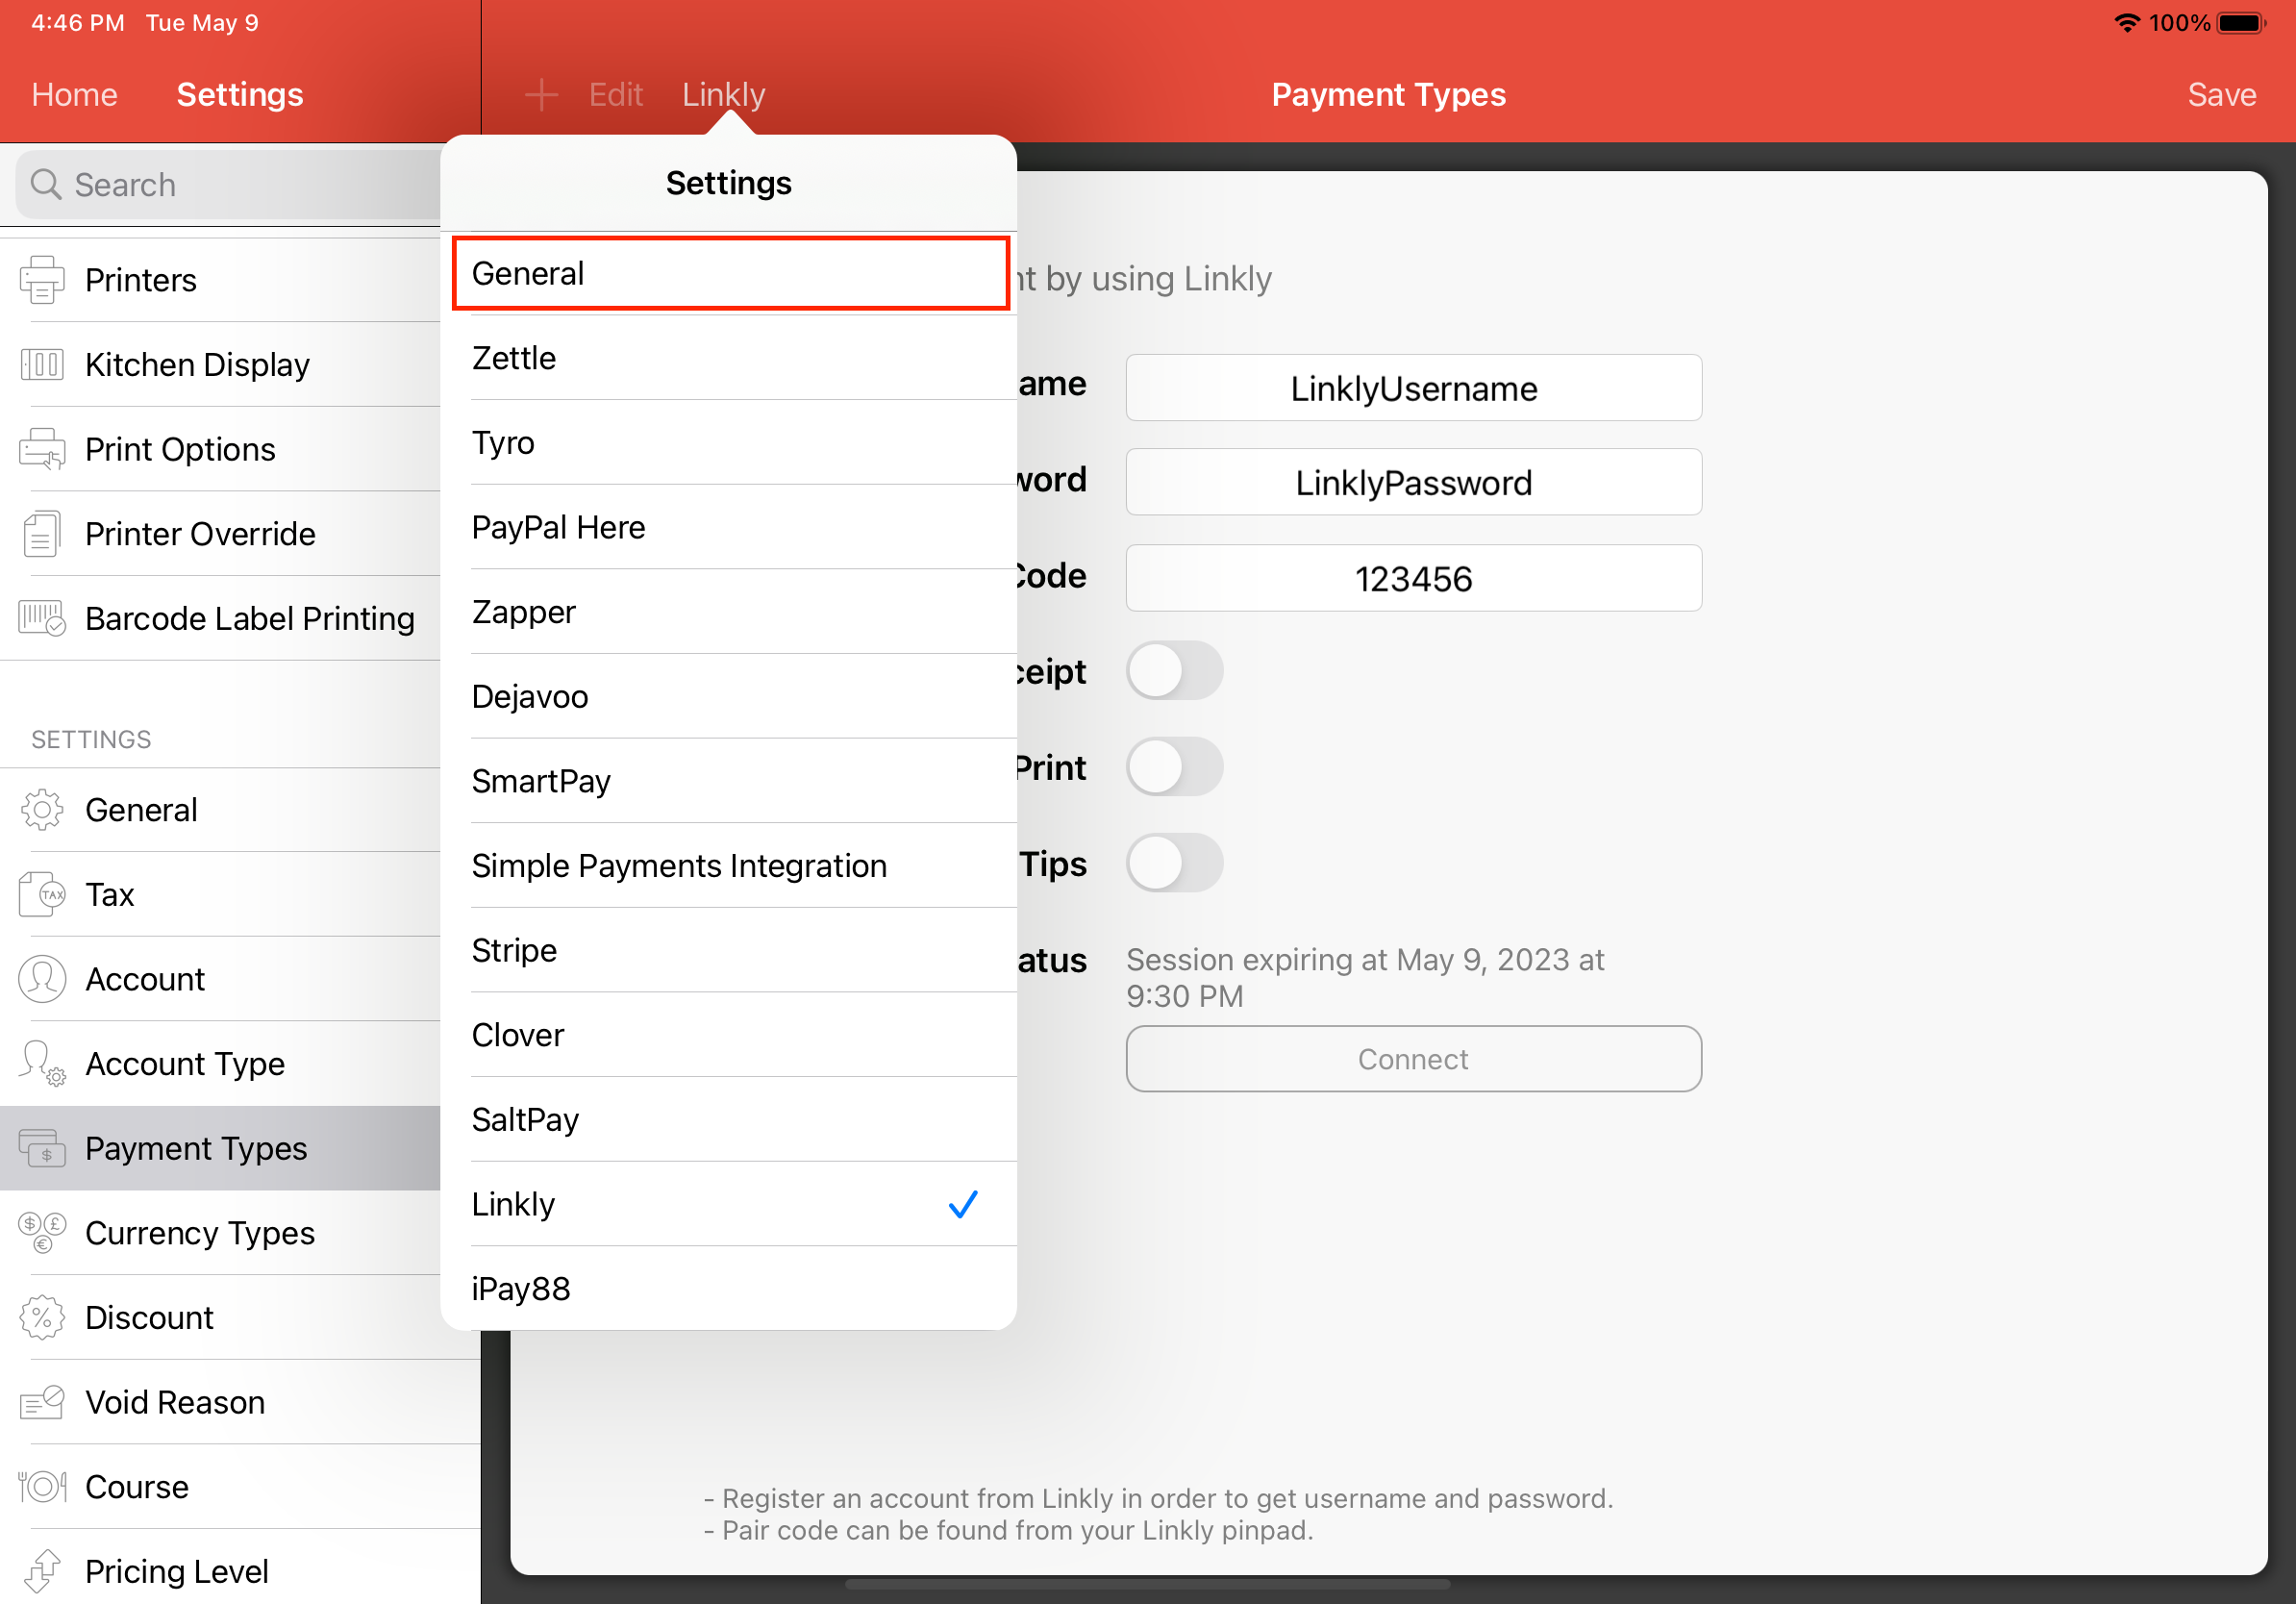
Linkly
In order to accept Linkly in person payments, you first will have to login with Linkly account and connect with the pinpad provided by Linkly.
On the app, start by going to Settings -> Payment Types -> General and select Linkly as shown below
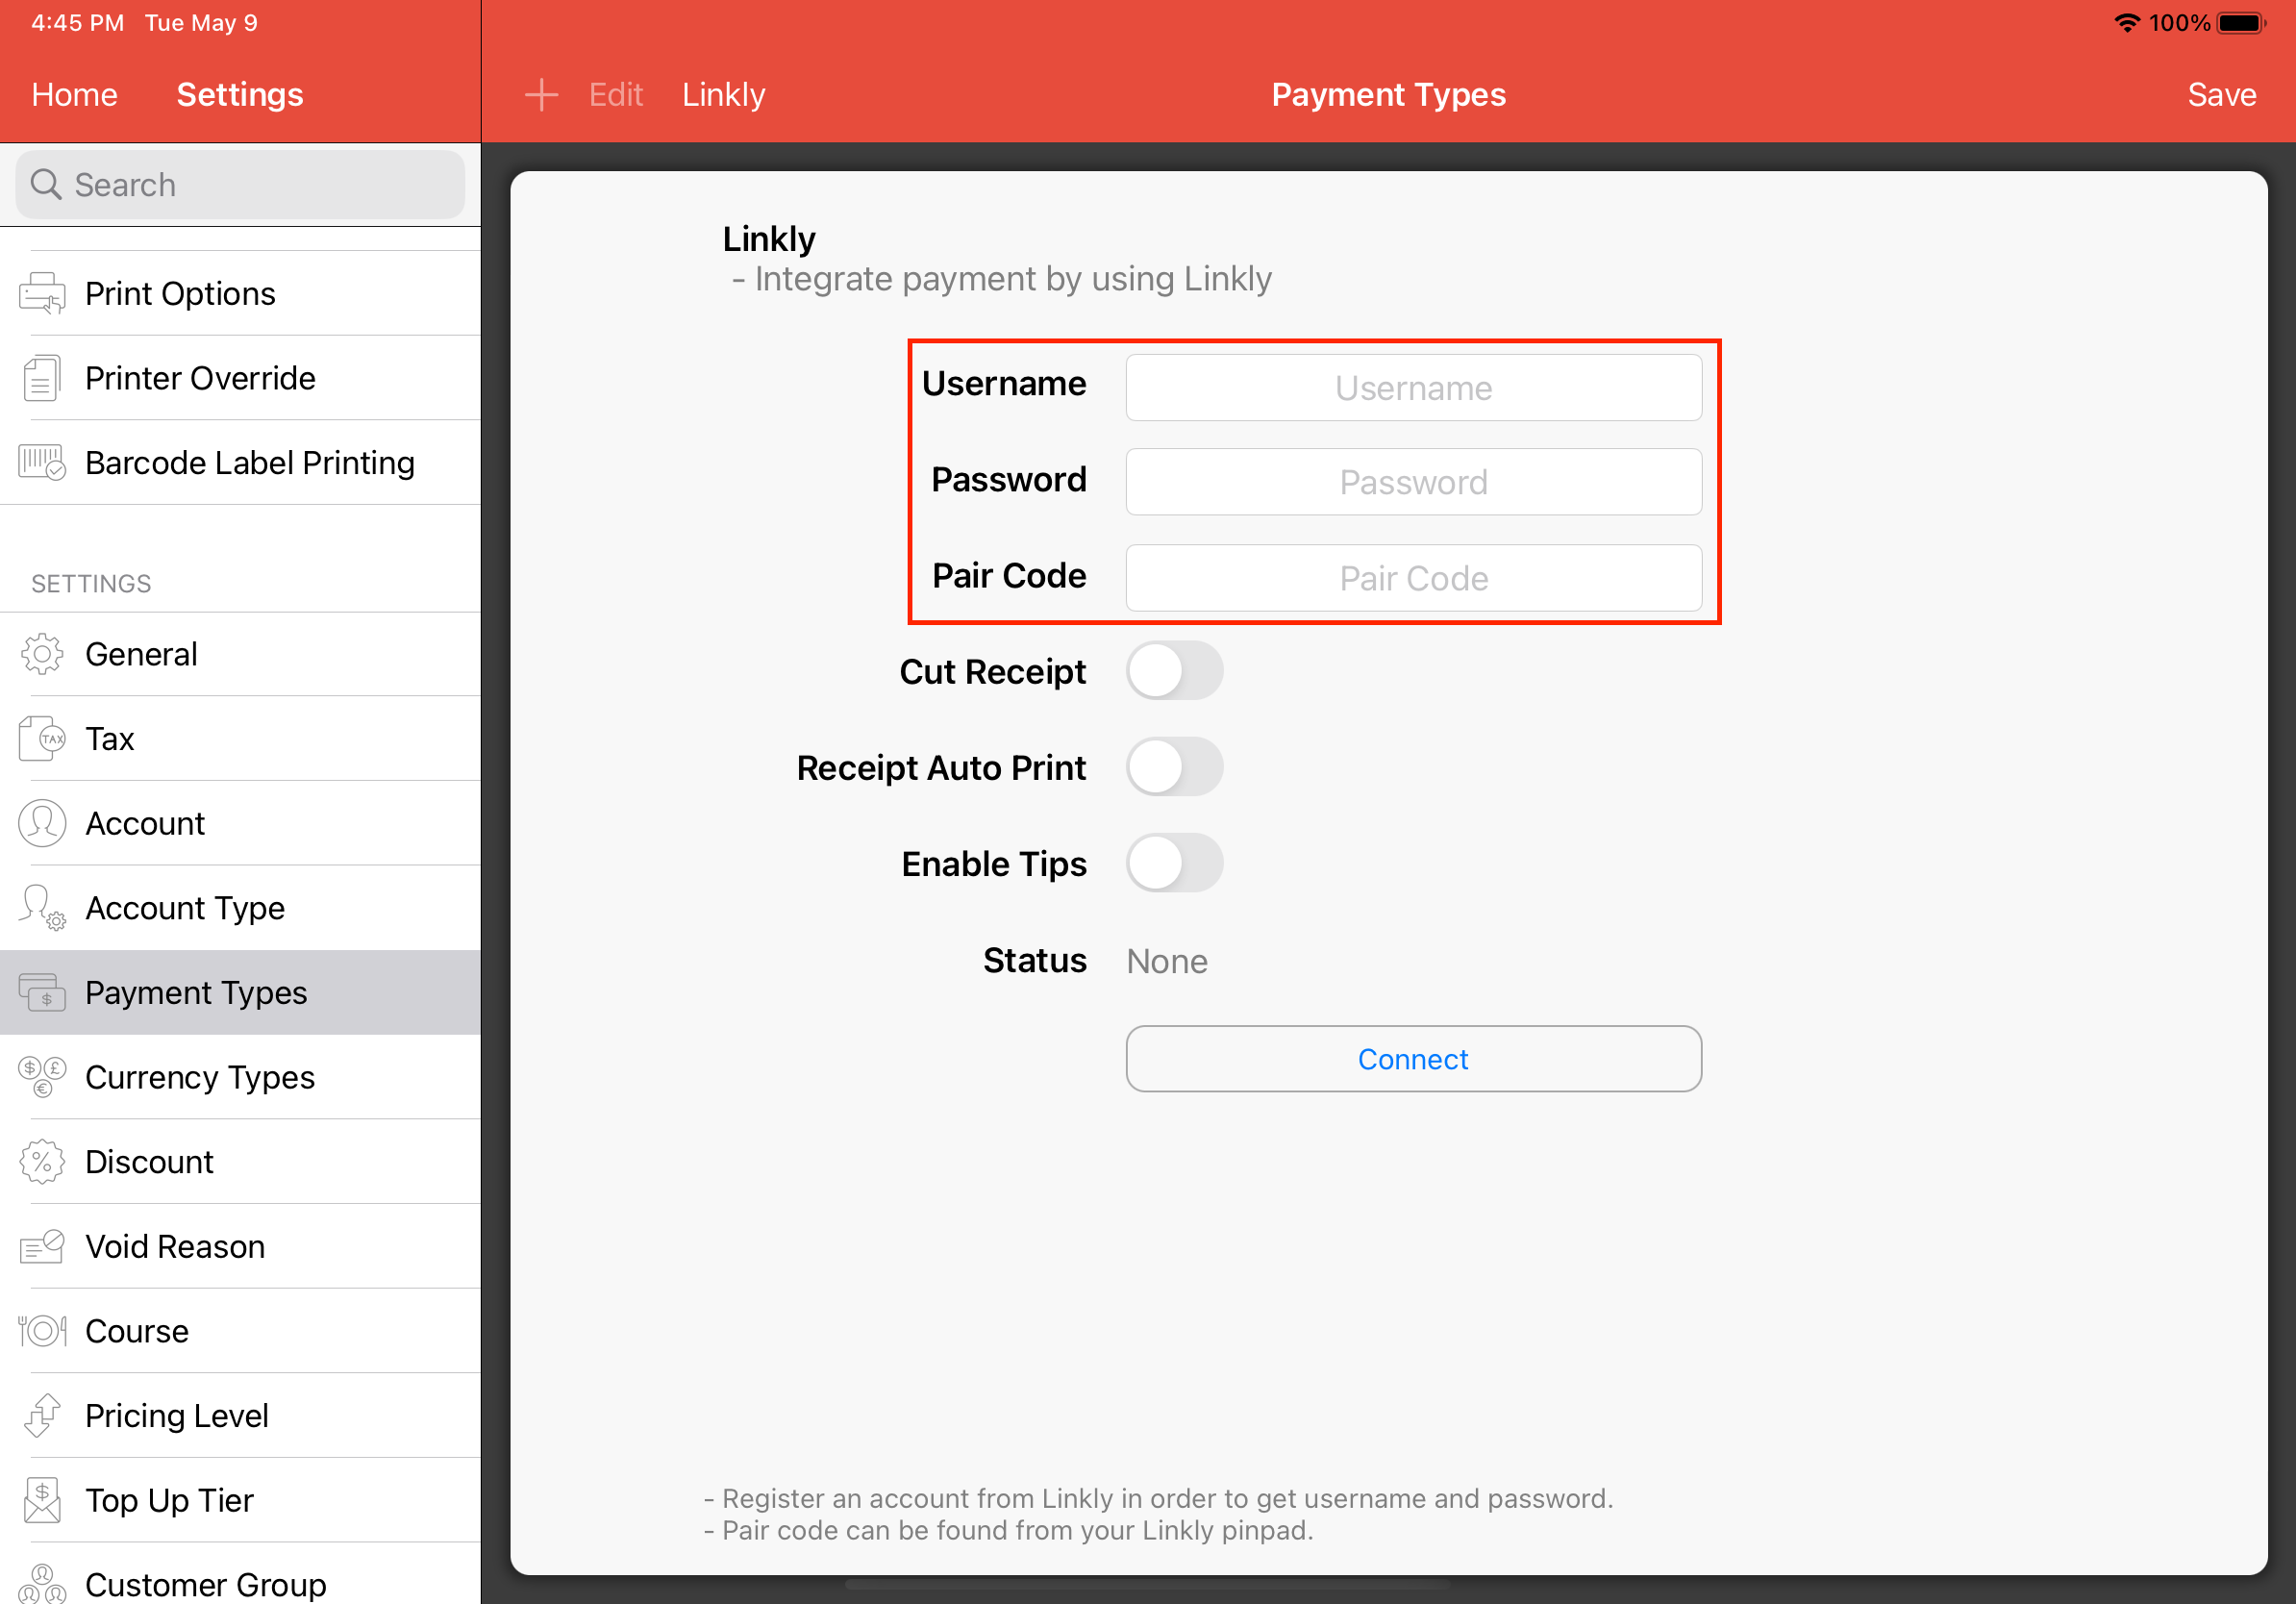
Upon selecting Linkly, you will see the required credentials such as username, password and paircode in order to connect to the Linkly pinpad.
If you do not have an account, you will need to register an account with Linkly before proceeding to the next step.
Pair code can be obtained from the pinpad provided by Linkly.
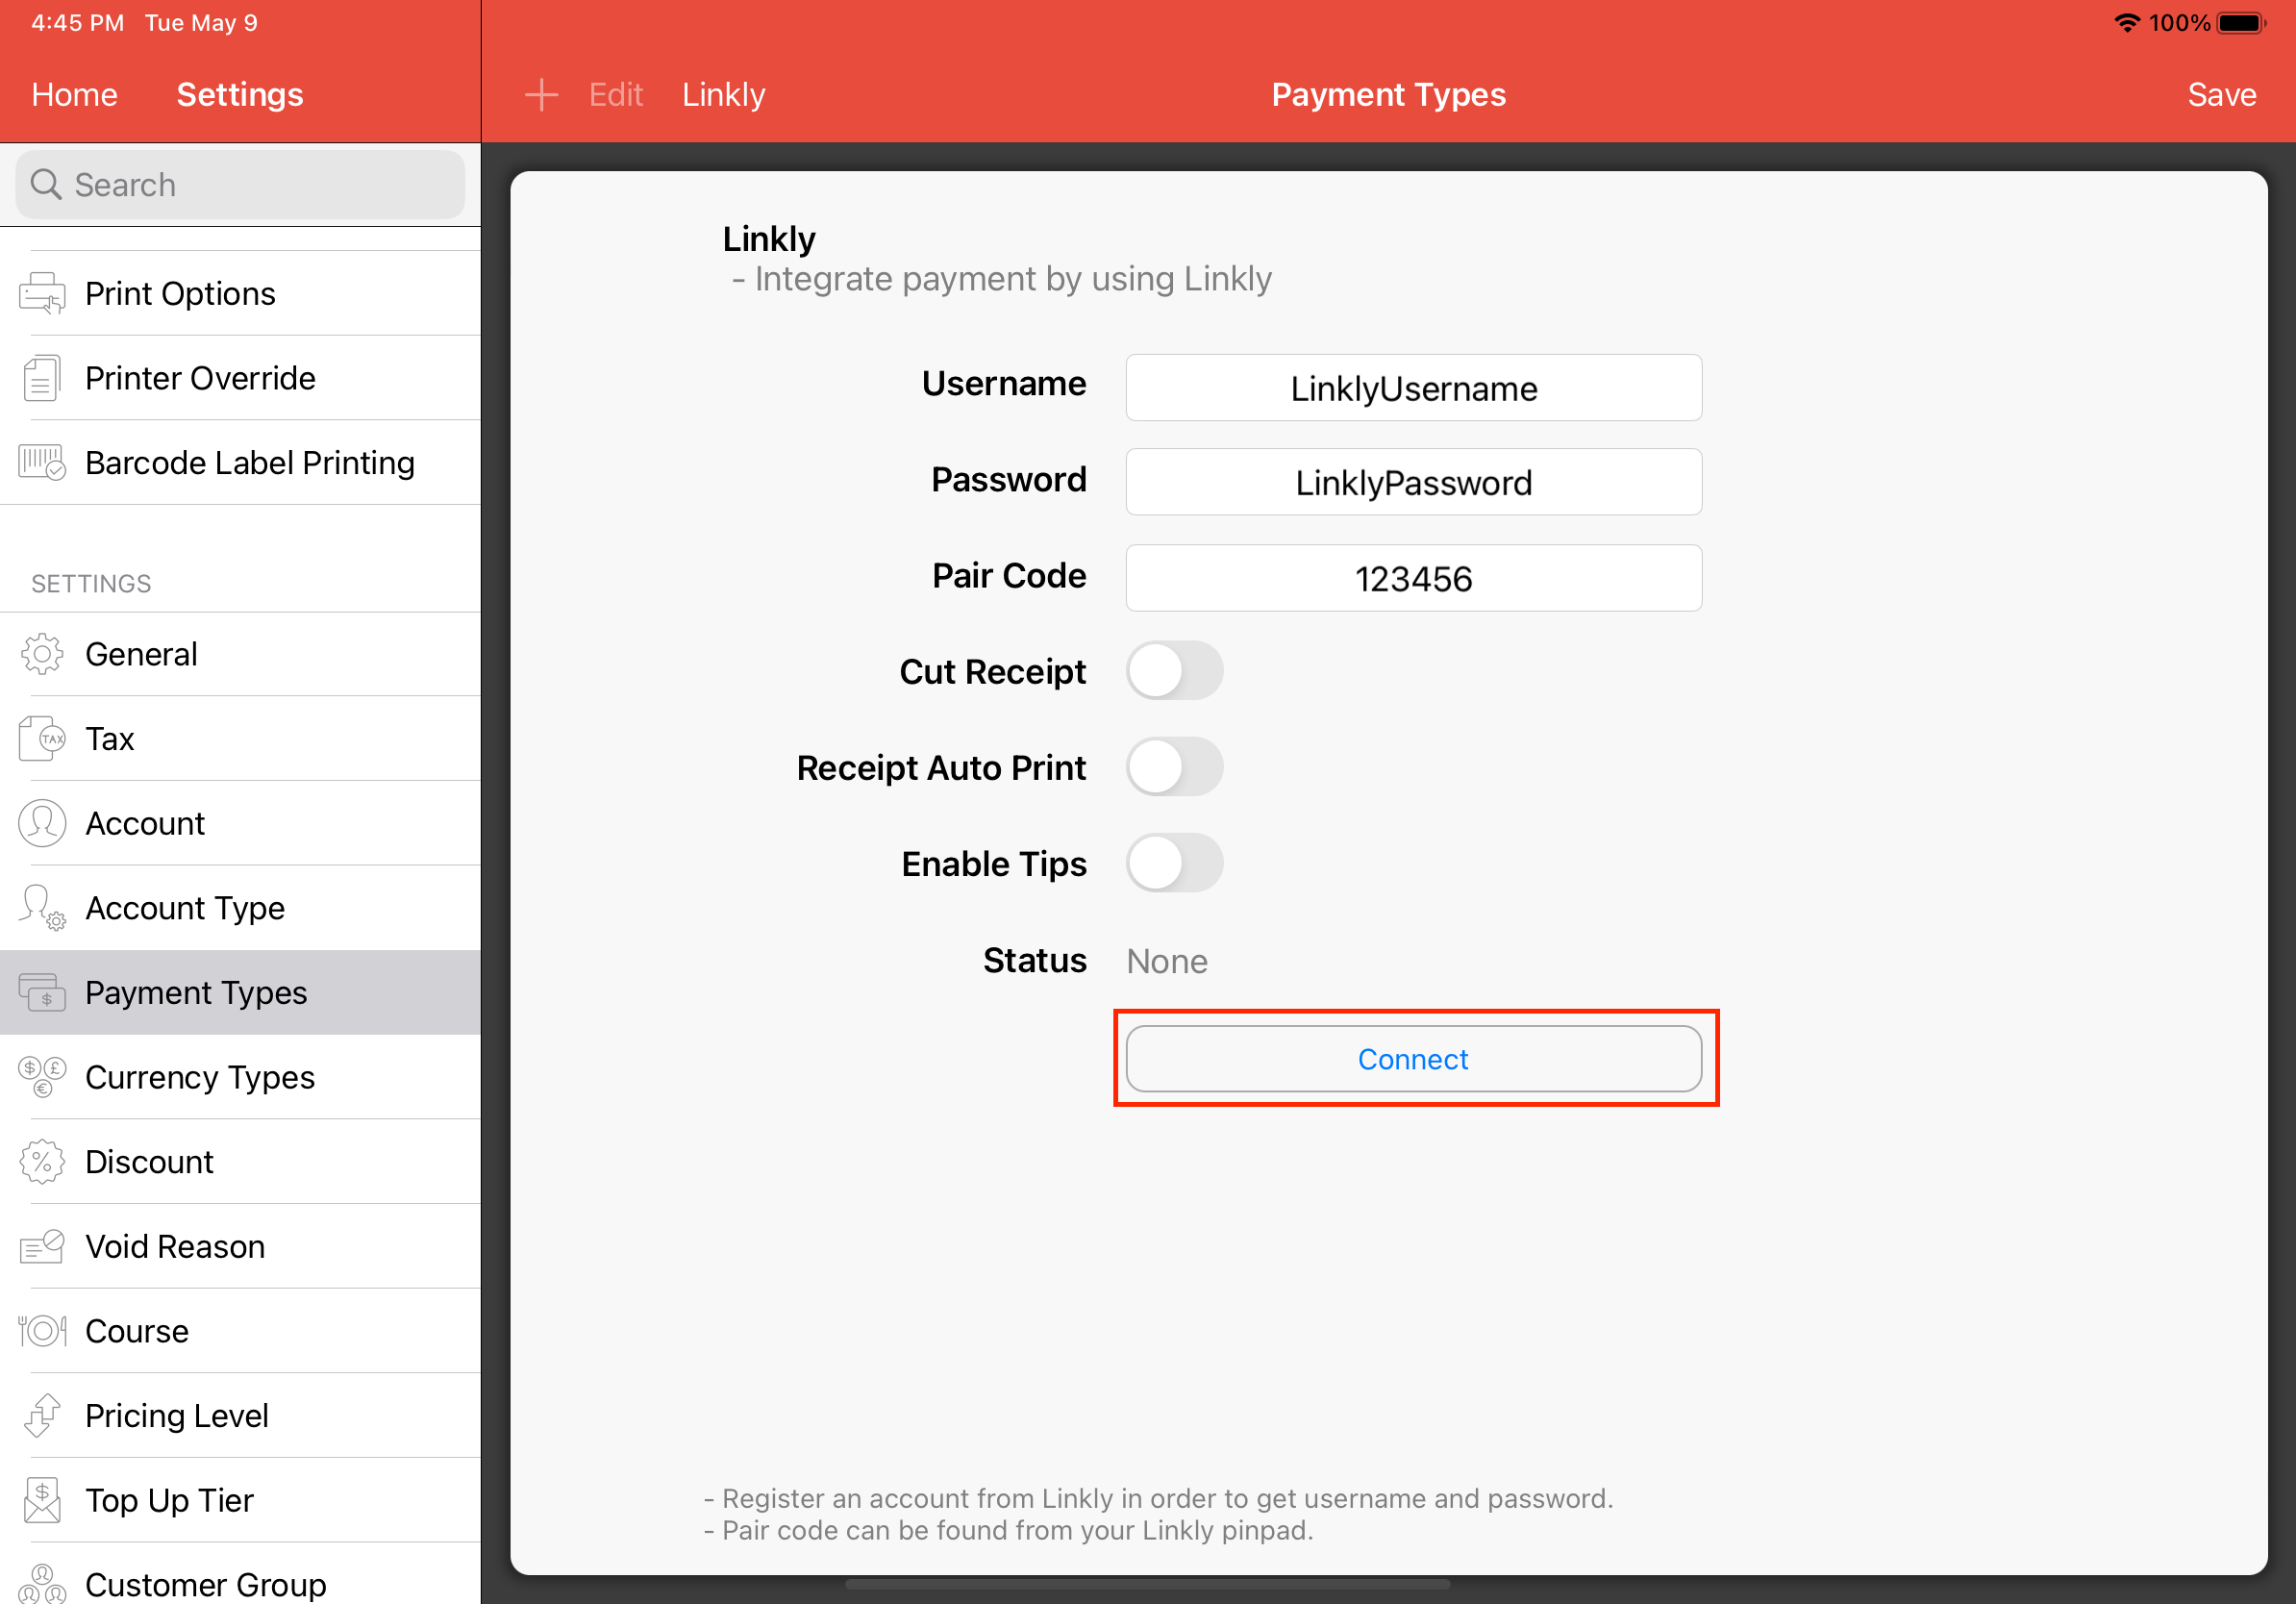
Click on Connect to connect to the pinpad terminal reader.
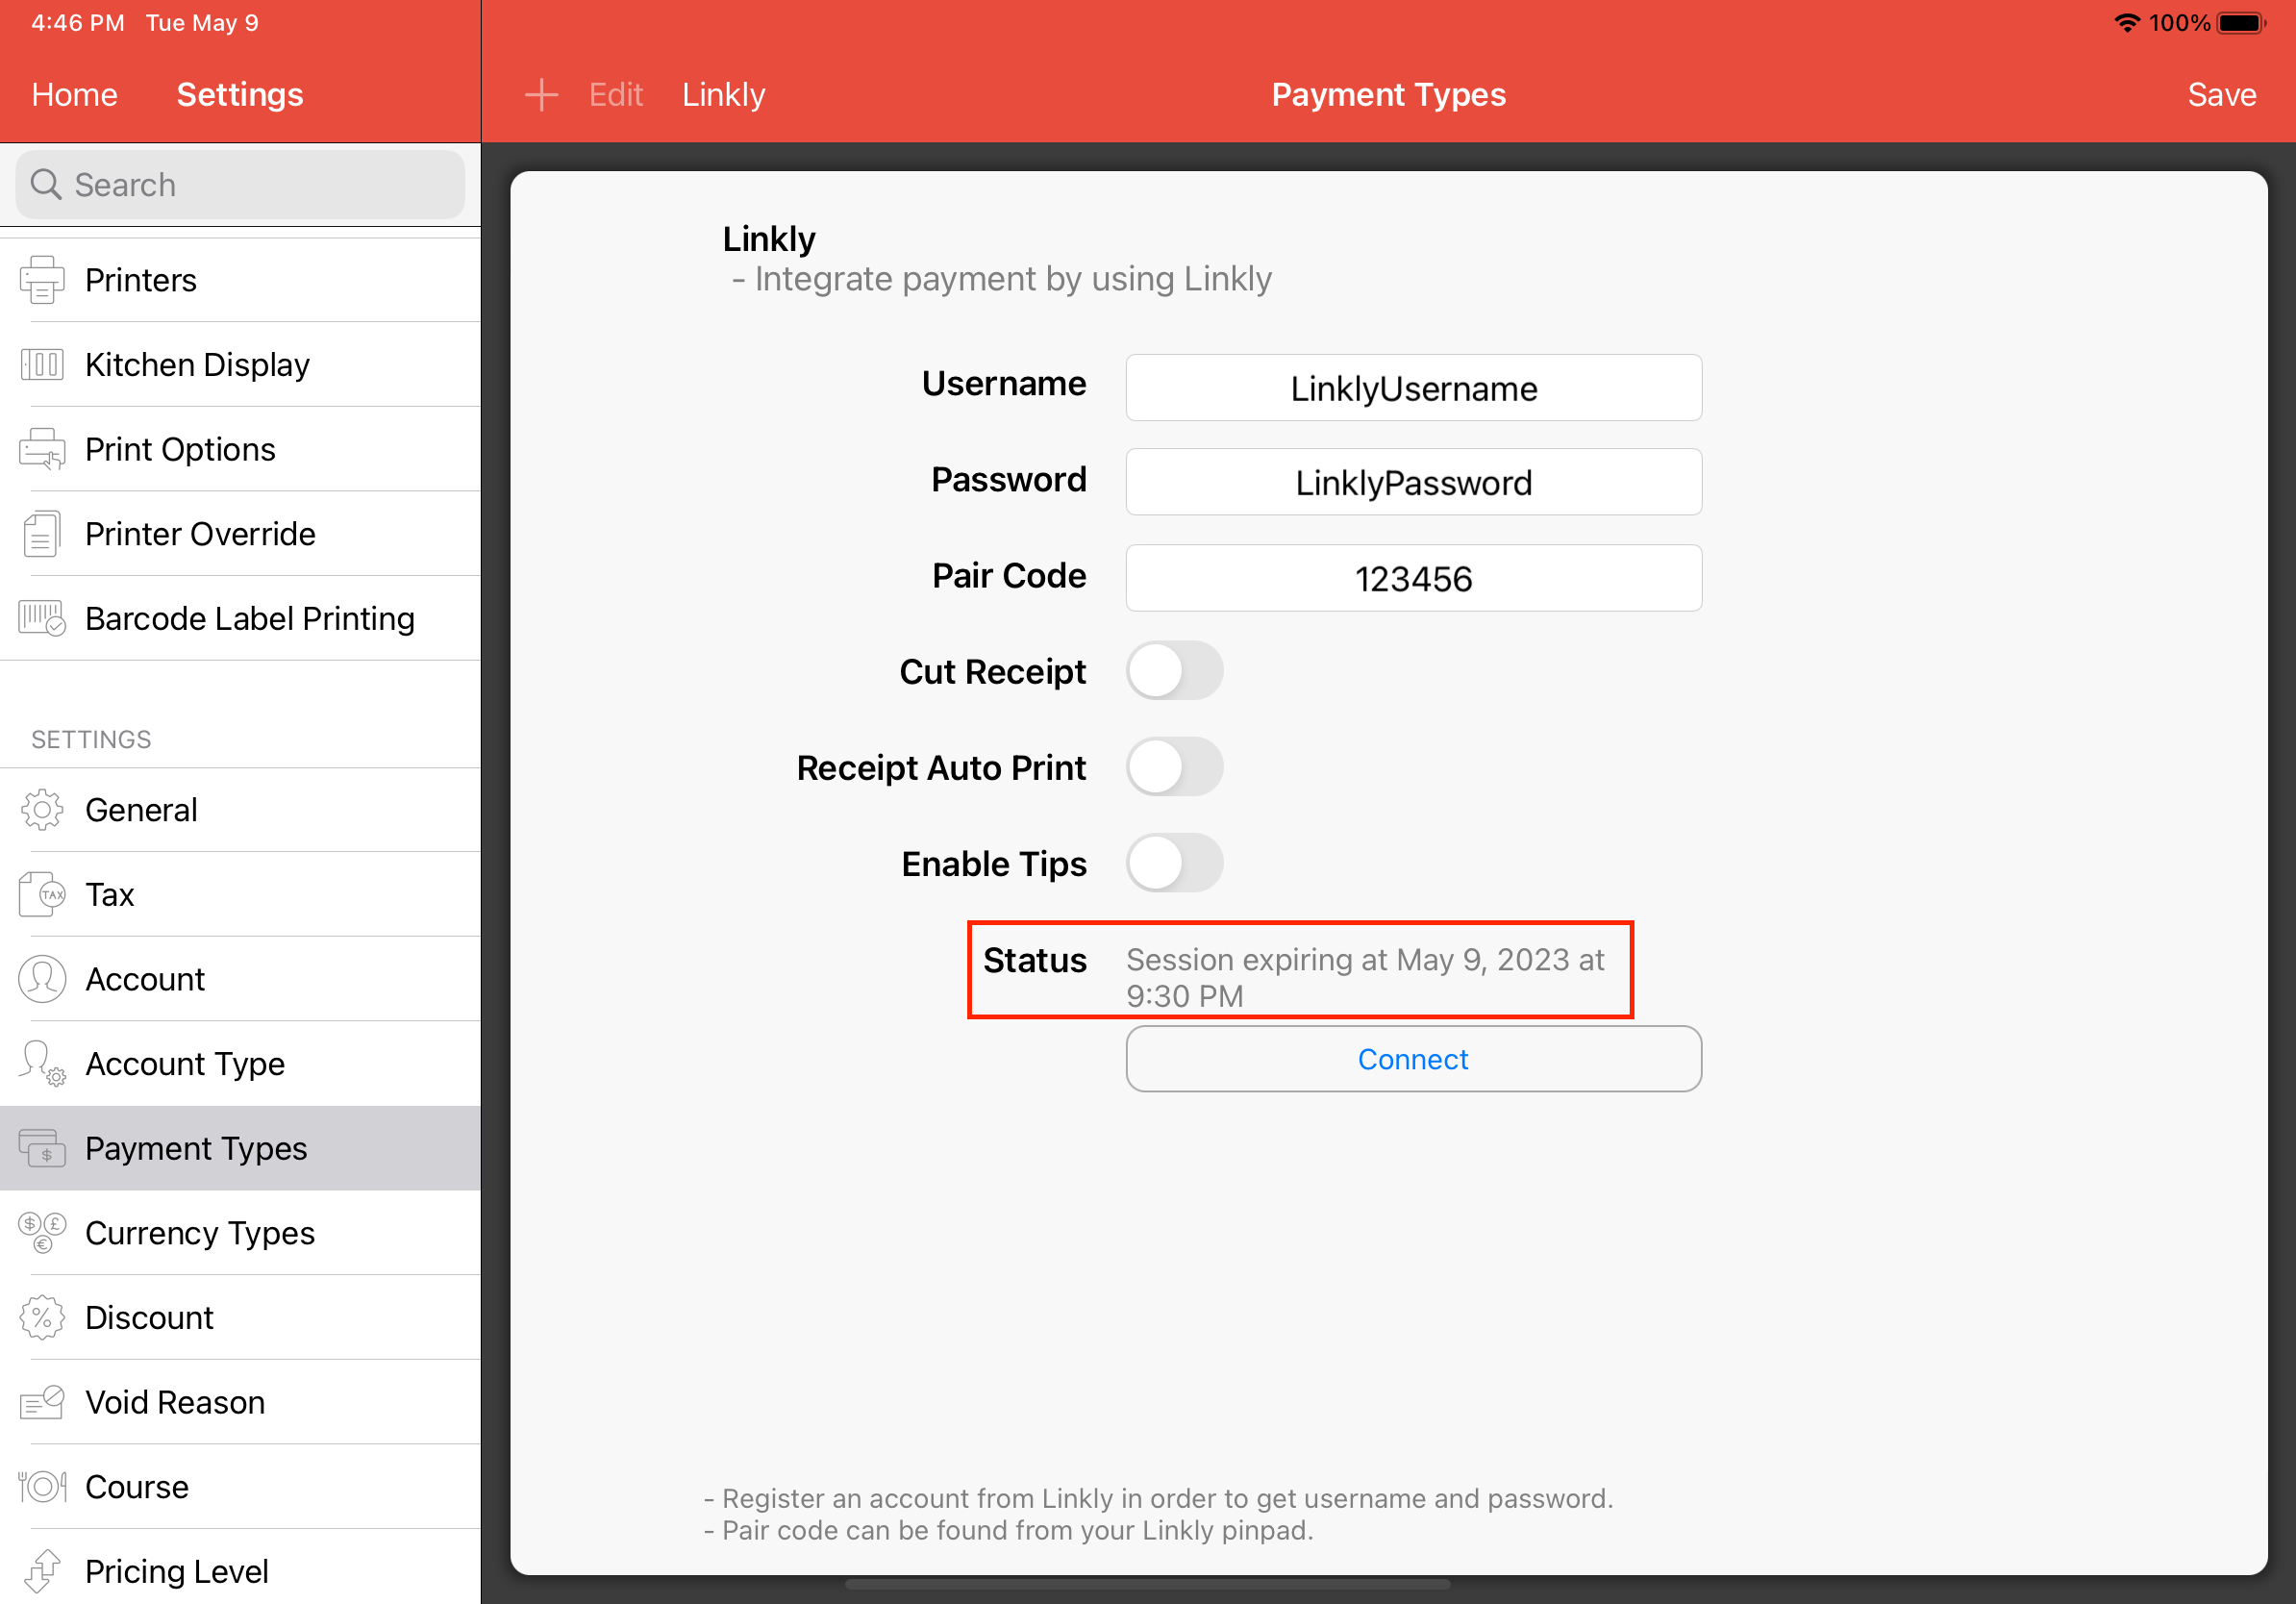
Upon succesful connection, the status will show the session expiry which is provided by Linkly. Please note that it will automatically reconnect upon expiry unless you reset/restart the pinpad and it no longer connected to our system.
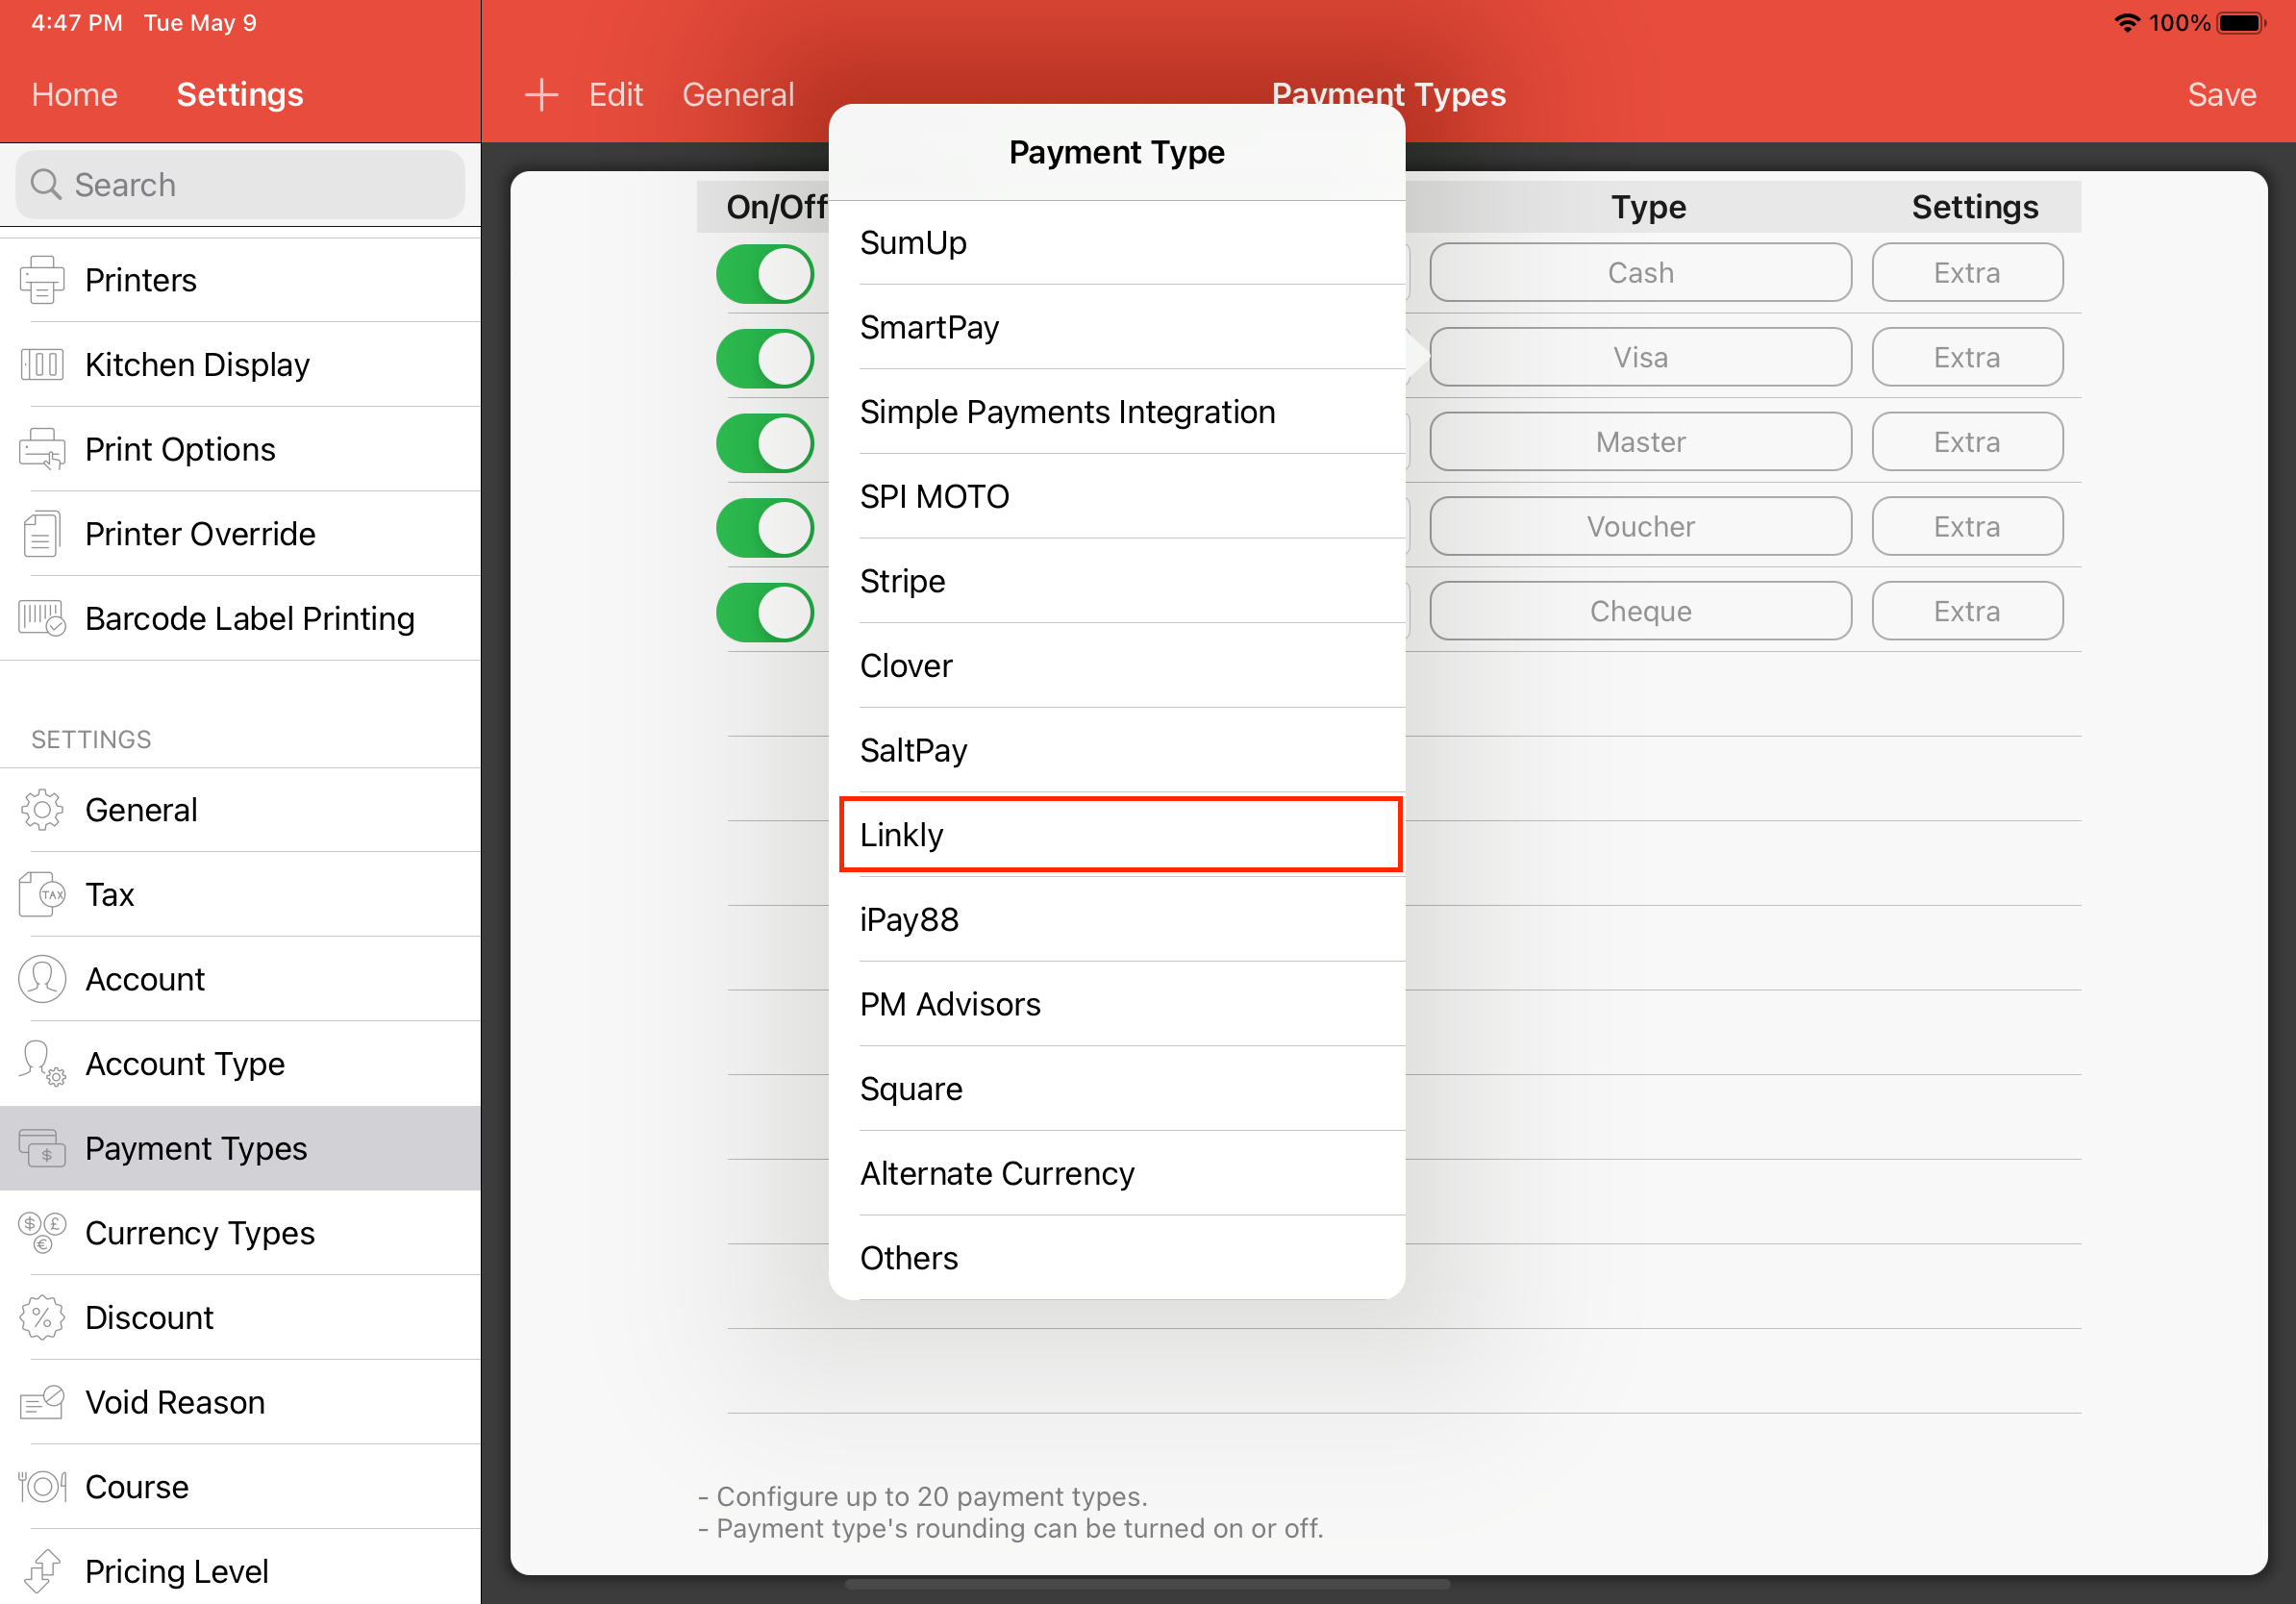
If pinpad is connected, proceed to General again to setup a payment with a type of Linkly.
Click on settings for the particular payment, and set the type to Linkly.
Now, going back to Cash Register, selecting Linkly payment should initiate the payment on your Linkly pinpad.
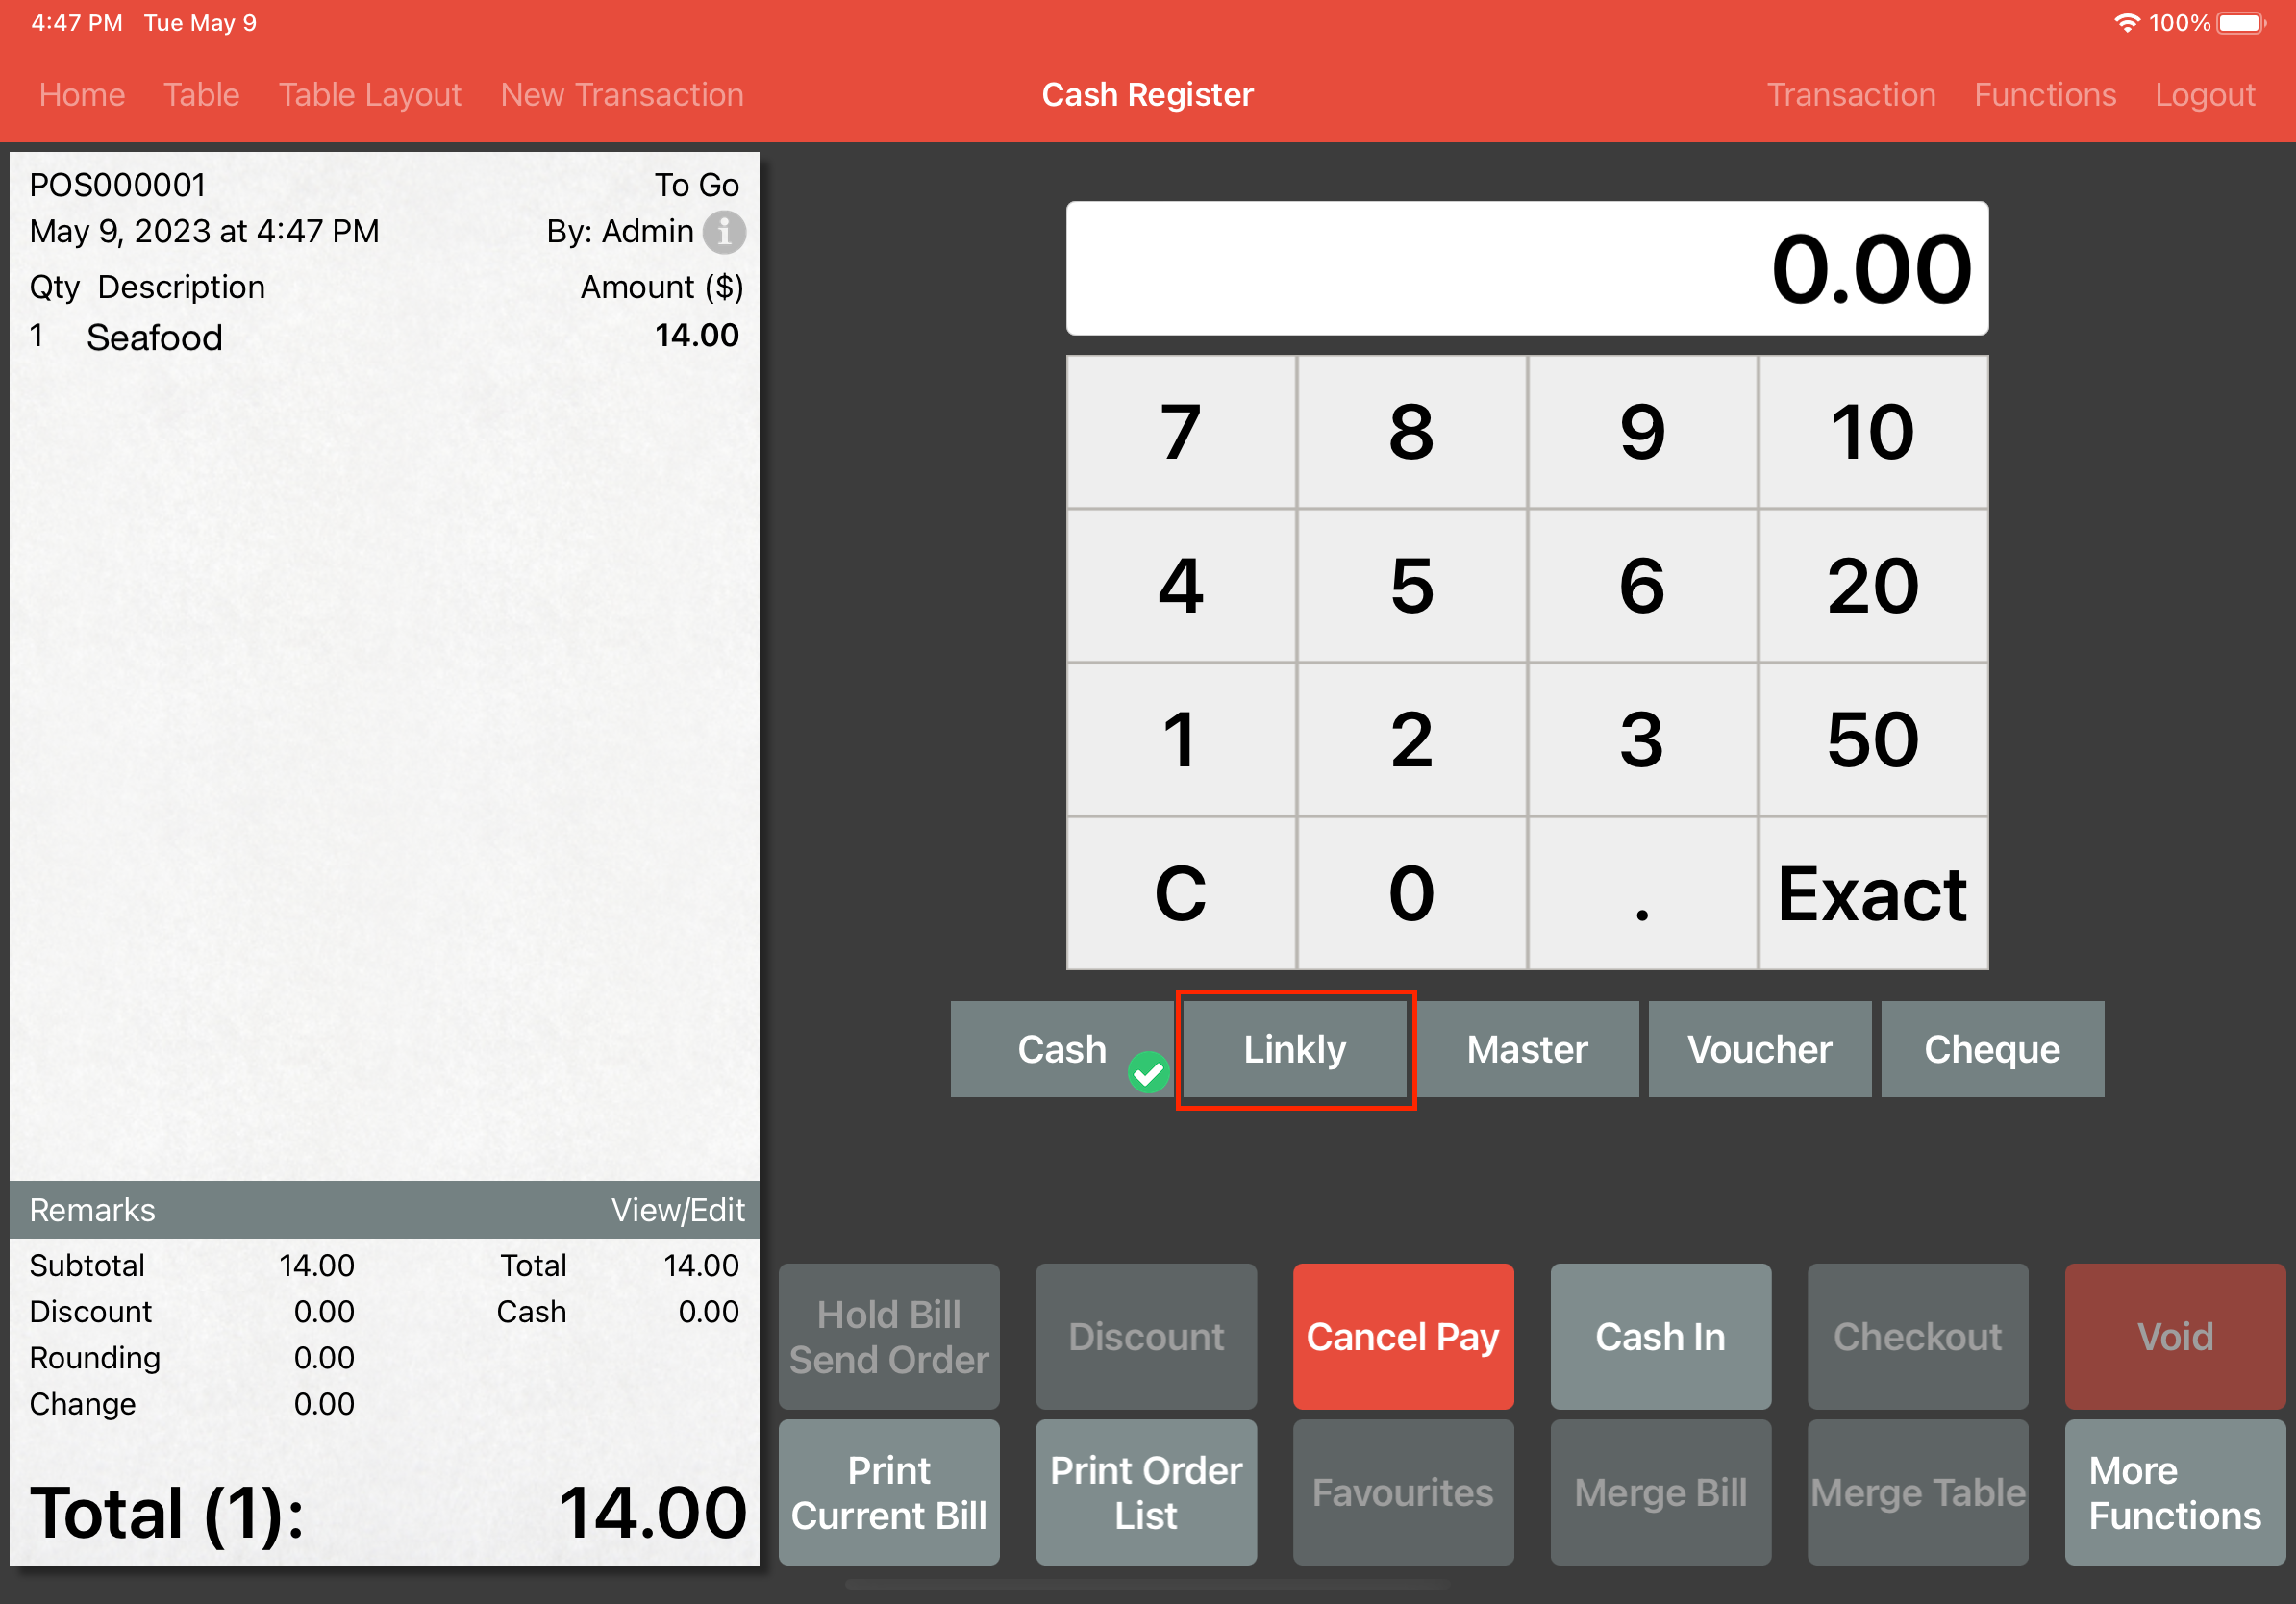
If the payment is initiated, you will see the loading icon being shown and your Linkly pinpad will be ready for payment.