Guide | MobiPOS > Online Ordering > Online Ordering Delivery
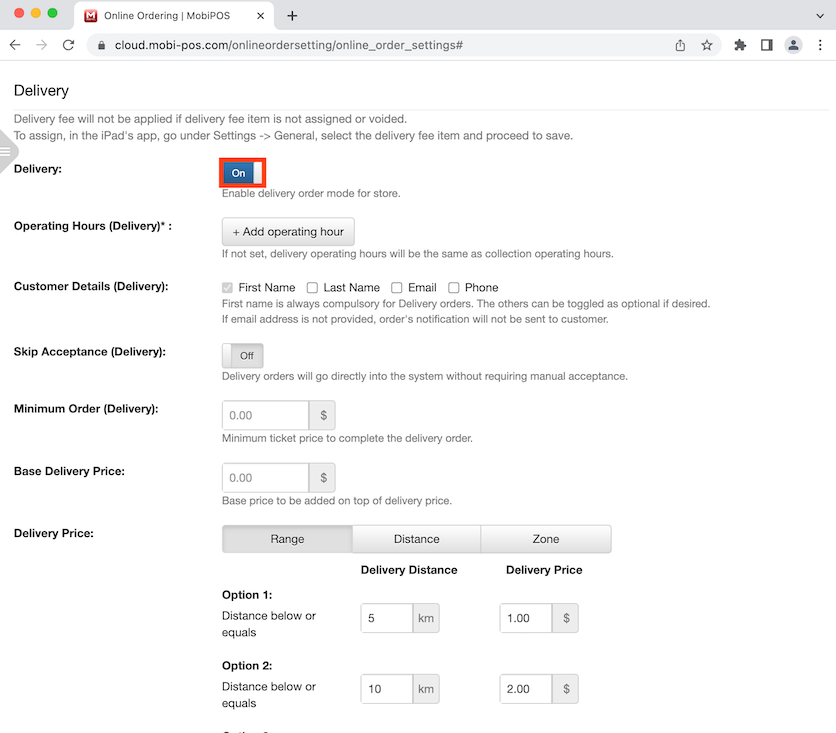
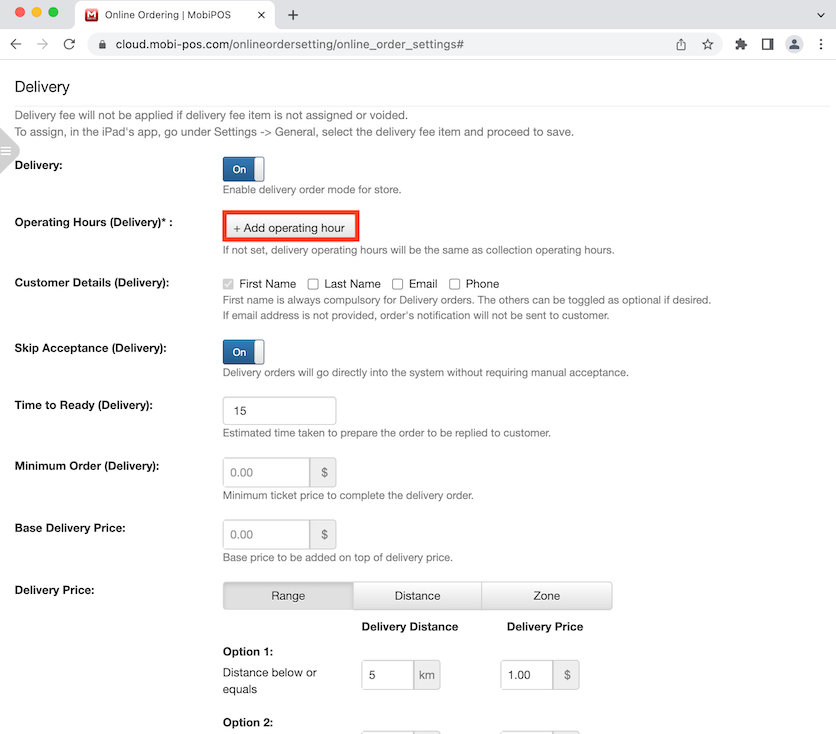
Delivery
Click to toggle on Delivery if you want to have delivery available as an order mode for the online store.
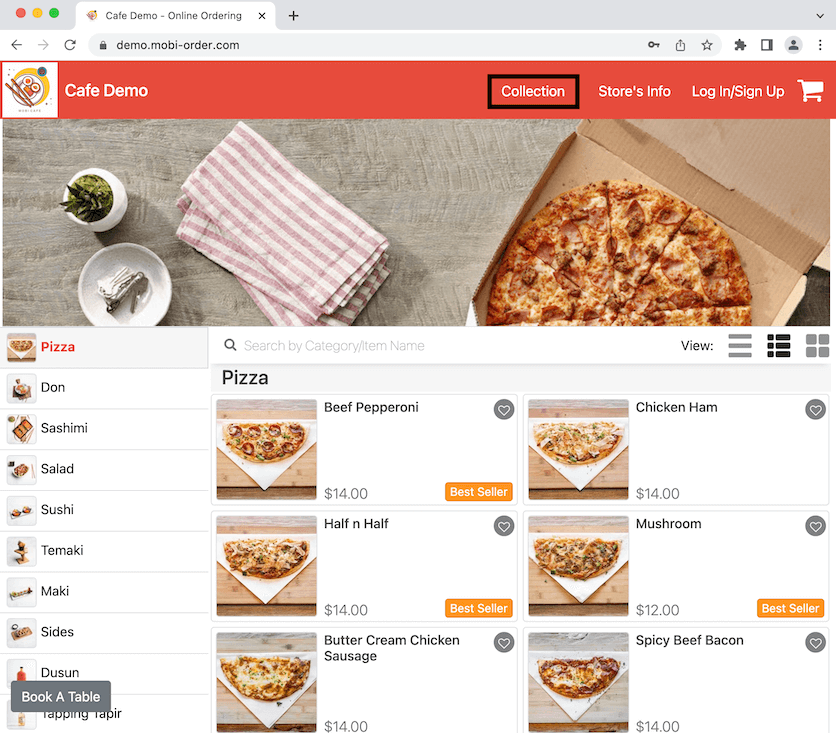
Go to the online store and click on Collection.
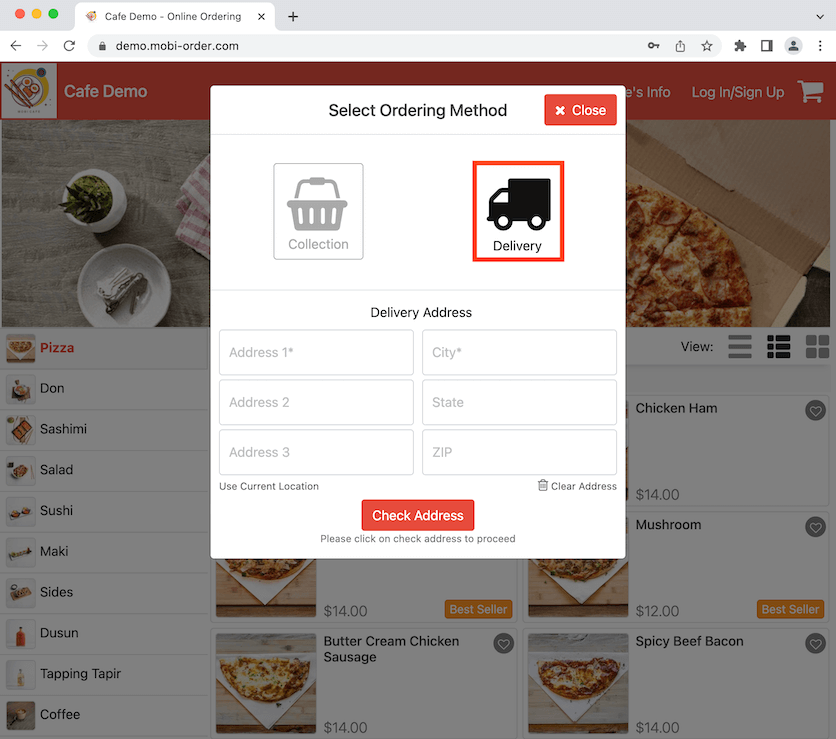
Now you can see select collection or delivery as the order mode. Fill in the delivery address and once it is confirmed, you can proceed with ordering.
Operating Hours
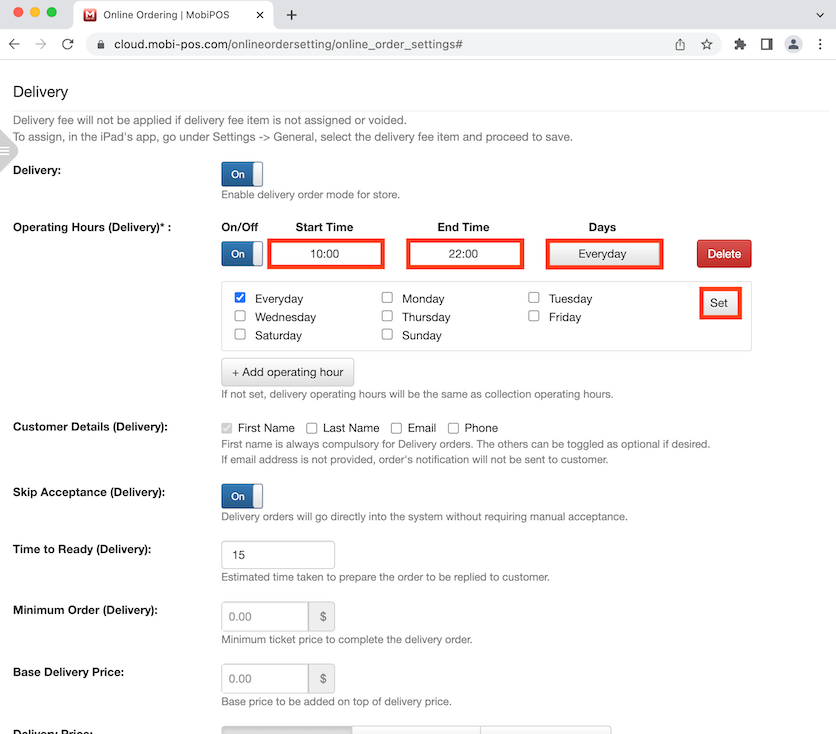
Click on +Add Operating Hour to set a time frame for delivery orders. Note that if there is no operating hour set for Delivery, then operating hour will follow collection time.
Select a Start Time, End Time and the Days for the operating hours. Multiple days can be selected. You can also set multiple operating hours. For example, if a business operates two shifts where they have a break in between, you can choose to not accept delivery orders during that time. Adjust the operating hours according to your preference. Once that is done, click Set.
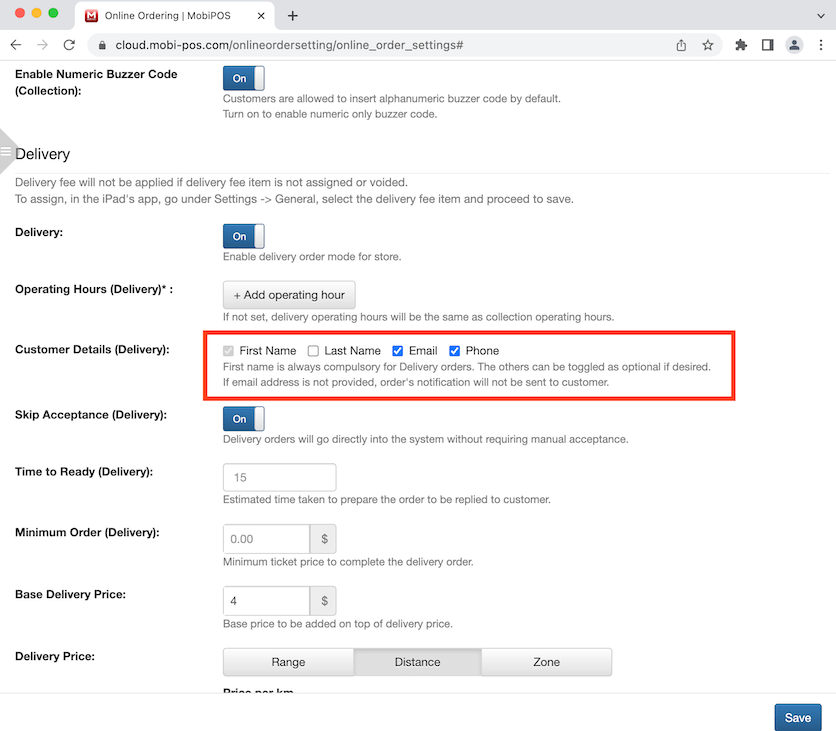
Customer Details
Click to tick the boxes for the information required when the customer is checking out then click Save. For delivery, email and phone are compulsory.
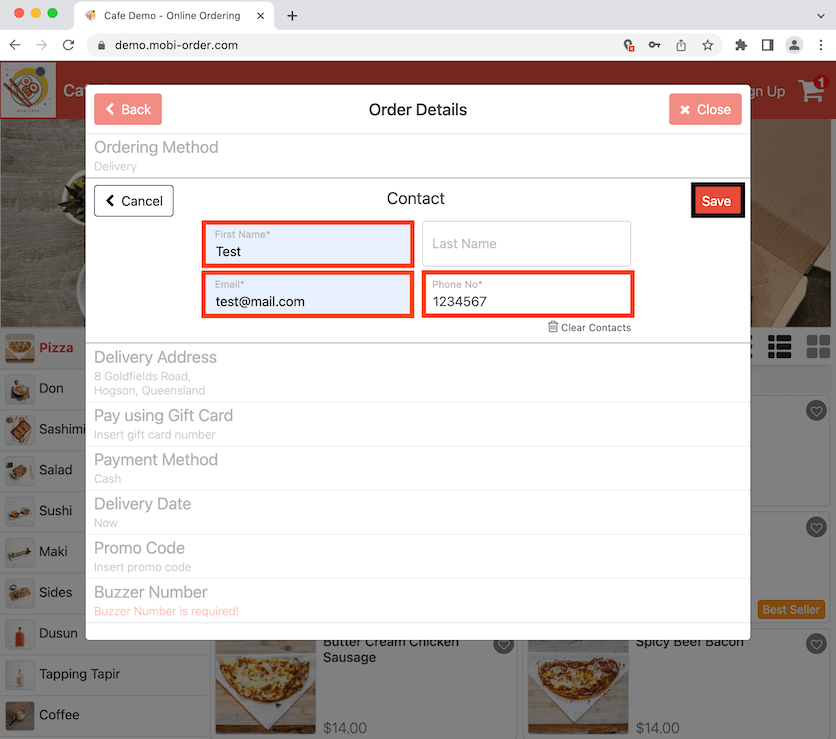
Go to the online store and add an item to the cart. Proceed to checkout and it will bring the you to Order Details where you are required to fill in the contact details. Click on the pencil icon.

Compulsory informations needed to fill in are marked with an asterisk. Enter all the necessary details then click on the Save button then click on the Next button to proceed with checkout.
Your contact details will show up in the bill. Click on Checkout to finalise your order.
Skip Acceptance
Toggle this on for delivery orders to be accepted without needing manual acceptance. If this is not turned on, a timer countdown will appear after checkout and the customer will need to wait for the business to accept or reject the order from POS.
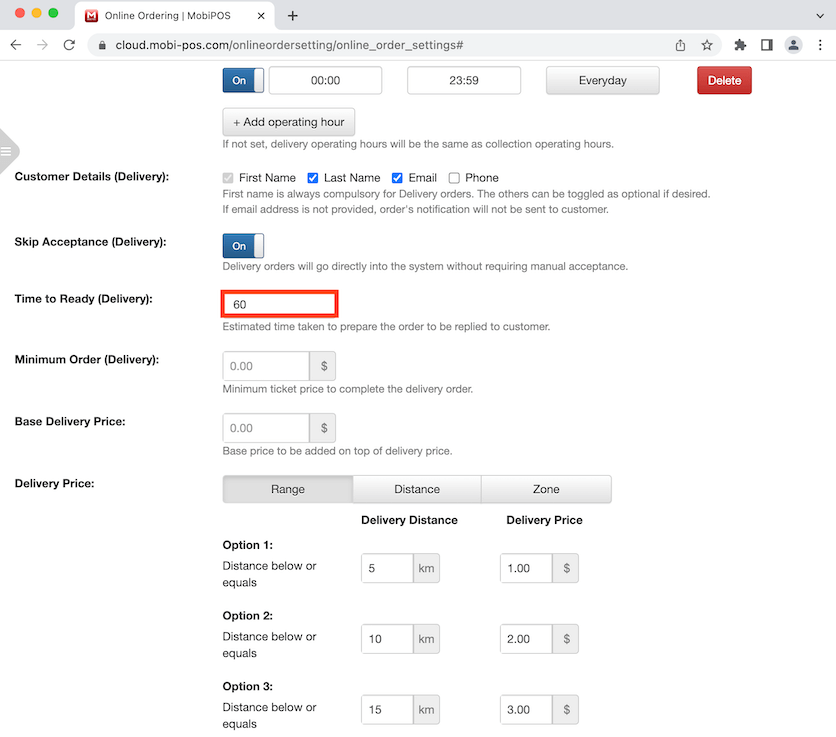
Time to Ready
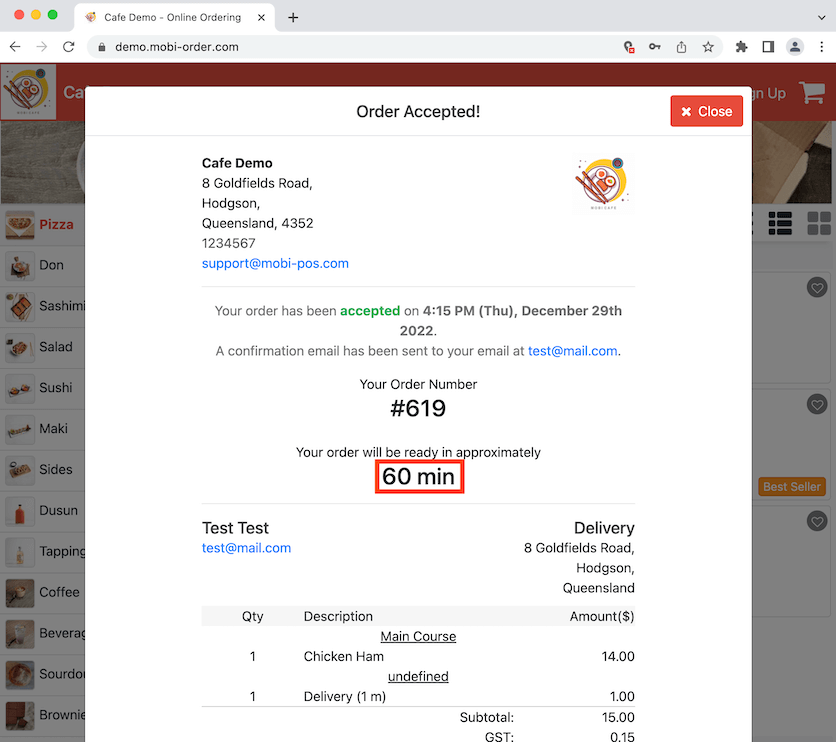
Enter an estimated time (minutes) for the order to be ready for delivery. In this case, we have entered 60 minutes. Click Save after.
Go to the online store and select an item then proceed to checkout. It will bring you to Order Summary where the bill is shown. Now the order is accepted and it shows the approximate time taken for the order to be ready for delivery.
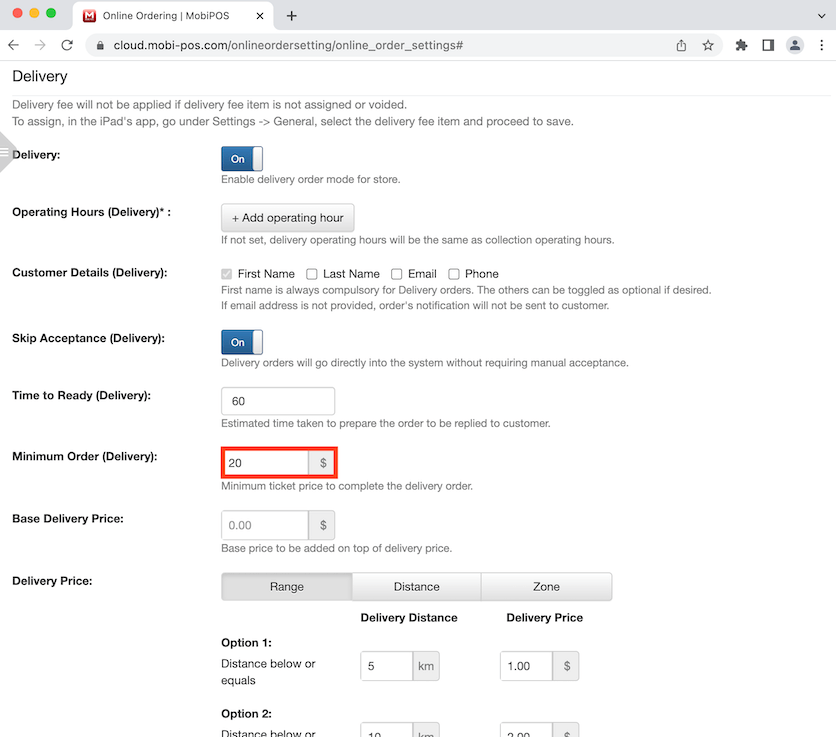
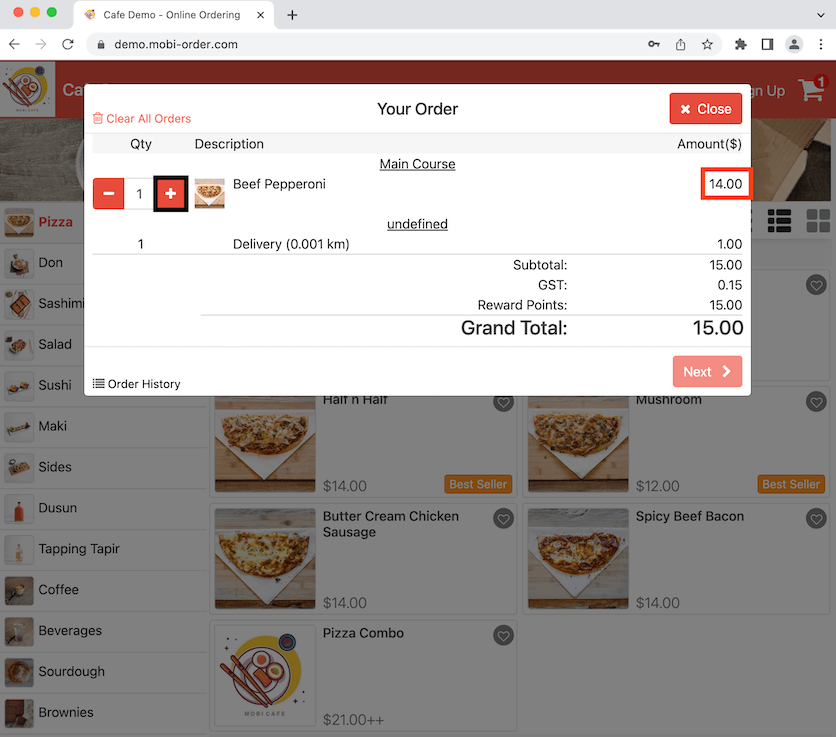
Minimum Order
Enter a minimum price for the bill to be entitled for delivery. $20 is entered as an example. Click Save after setting a price.
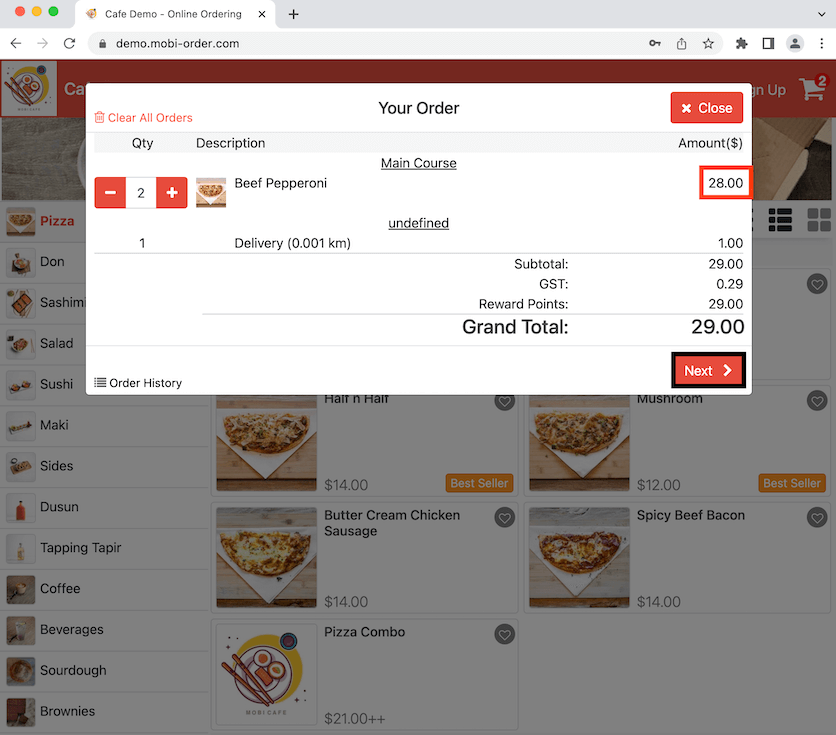
Go to the online store and order the items. This total bill for this order is only $15, thus delivery is not applicable. You will not be able to click on Next until the bill has a minimum order of $20. Close the order tab and add more items. In this case, we will add another quantity of Beef Pepperoni for the bill to reach $20.
Now the total bill is more $20 so delivery is applicable. You can now click on the Next button to proceed with checkout.
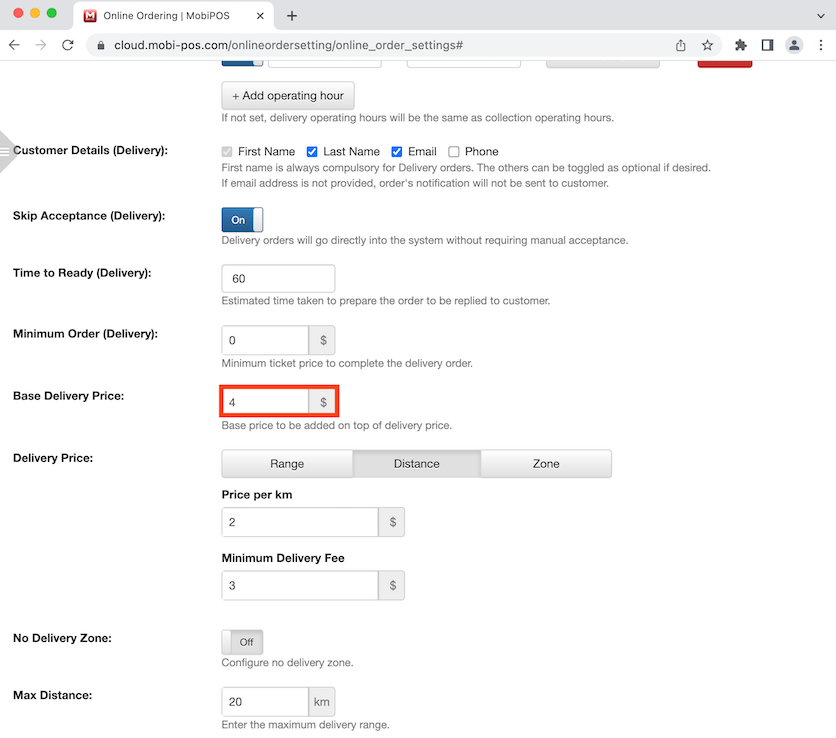
Base Delivery Price
Enter a base delivery price to be added on top of the delivery price regardless of their range, distance or zone. Click Save after entering the price.
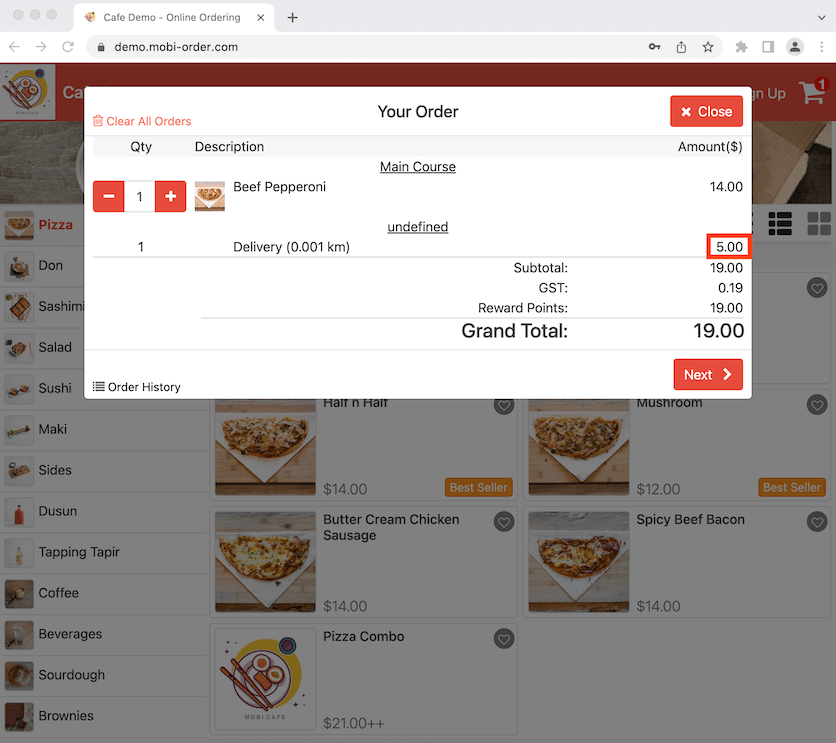
Go to the online store and add items to the cart. Proceed to checkout and it will bring you to your order where you can view the delivery price.
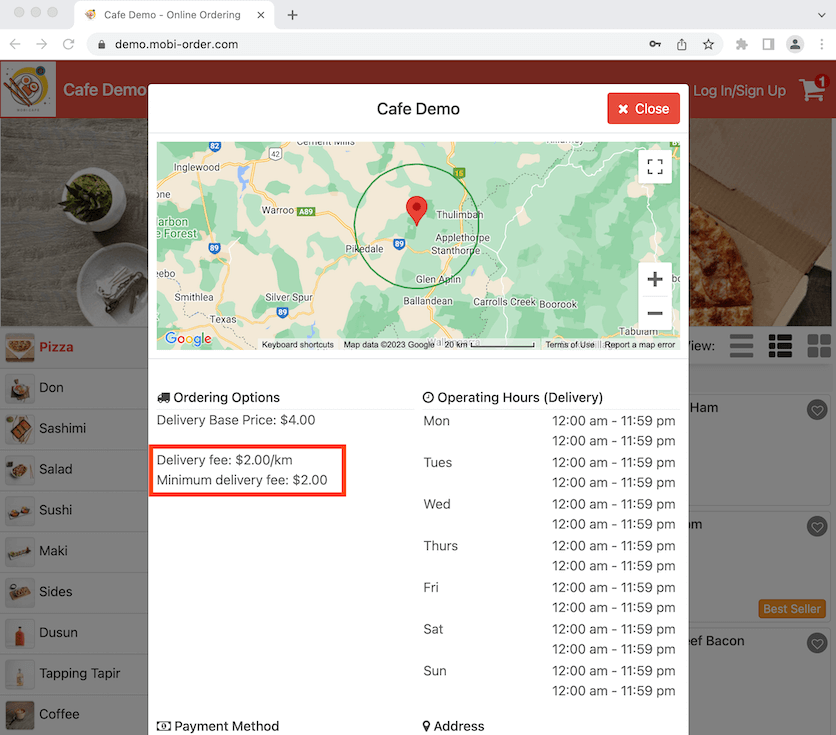
In this example, the delivery price from 0 to 1 km is $1.
$1 based on the distance plus the base delivery price of $4 totals up to $5, as shown in the example photo.
The base delivery price is applied automatically to the order during checkout.
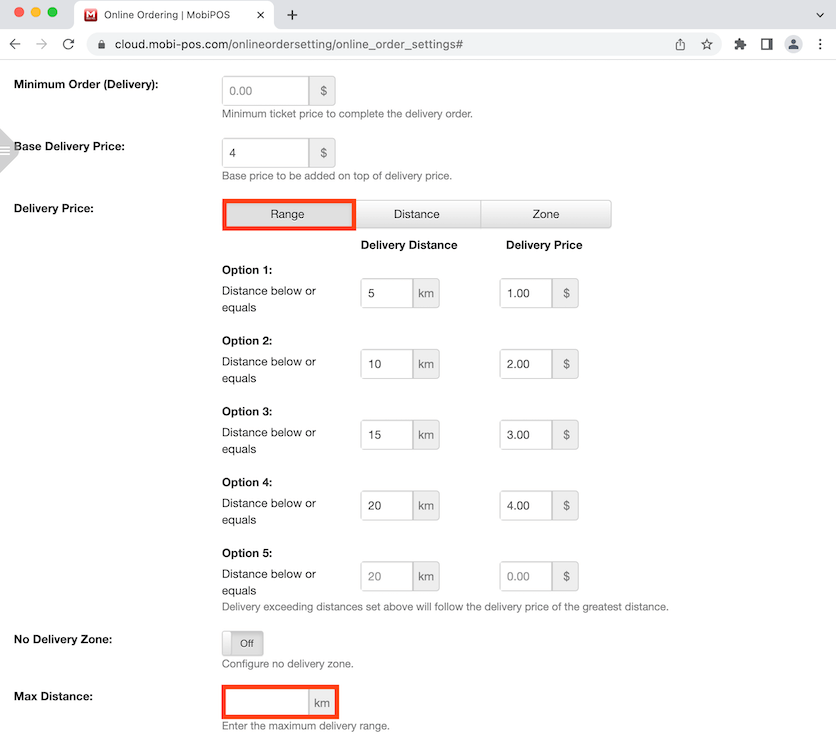
Delivery Price
There are 3 variables to configure the delivery price. You can only choose one setting to set the delivery price.
You can set the delivery price based on a certain range of distance under Range. In this example we have set a delivery order located within 0 - 5 km which charges a $1 delivery fee.
If a maximum distance is not set for delivery, the delivery price will be based on the furthest delivery distance you have configure in the options.
For example, the furthest distance we have set in Range is option 4, which is 20 km for a $4 delivery fee. If a delivery order is located further than 20 km, the customer will still be charged a $4 delivery fee. You can click on Max Distance to set the maximum delivery range. Note that, if this is set, orders beyond 20 km will not be accepted.
In Distance, you can set the delivery price per km and the price for minimum delivery fee. Customers can find the delivery fees information under Store's Info for their own reference.

Customers can find the delivery fees information under Store's Info for their own reference.
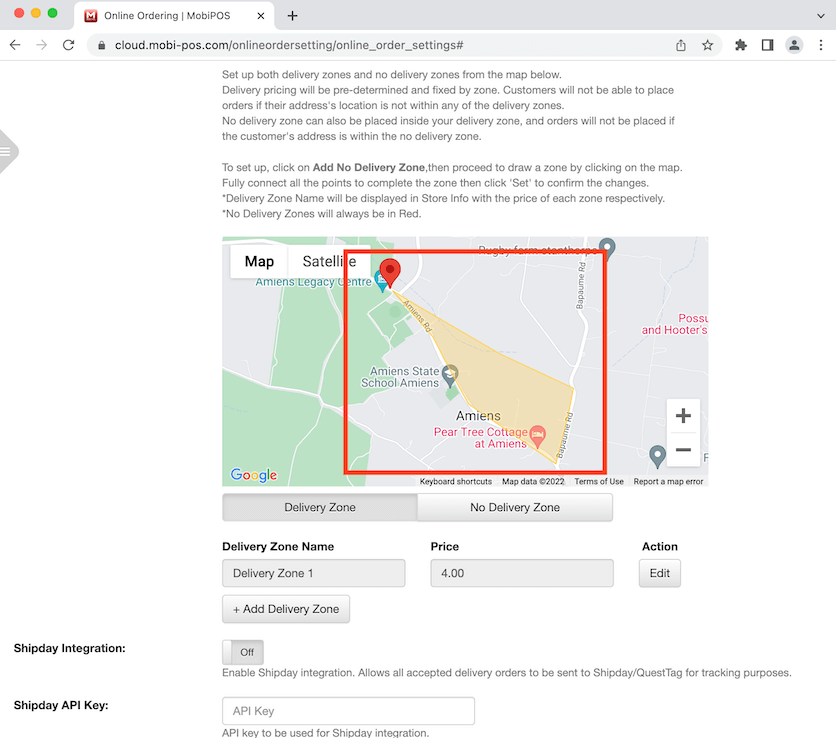
You can also set the delivery fees based on the Zone. Click on +Add Delivery Zone.
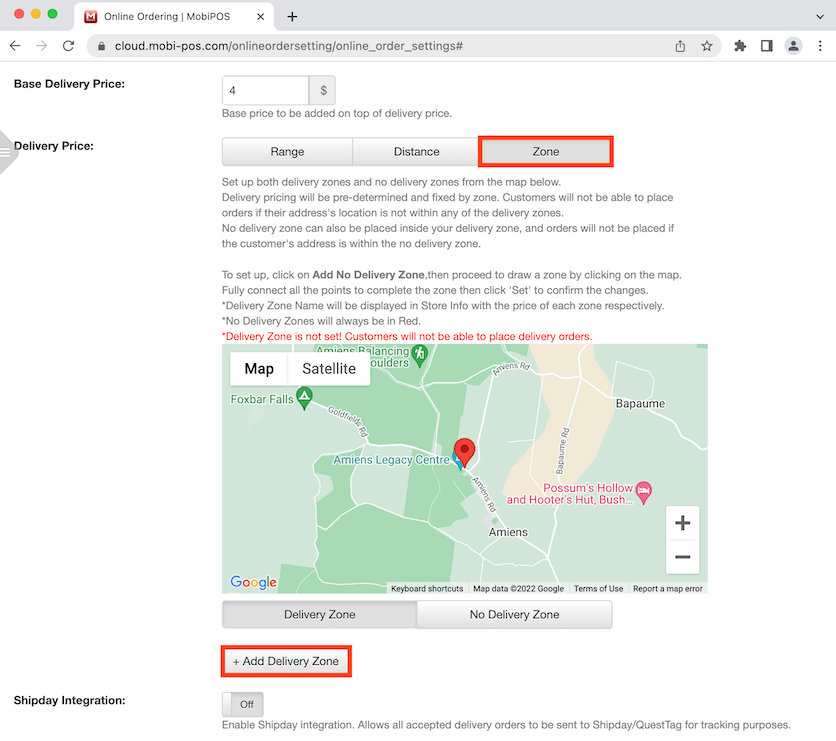
Insert a delivery zone name and the delivery price for that zone. After that, click on the map to draw the zone. Click on the map until all points are connected then click on Set. Click on Save to finalise all changes.
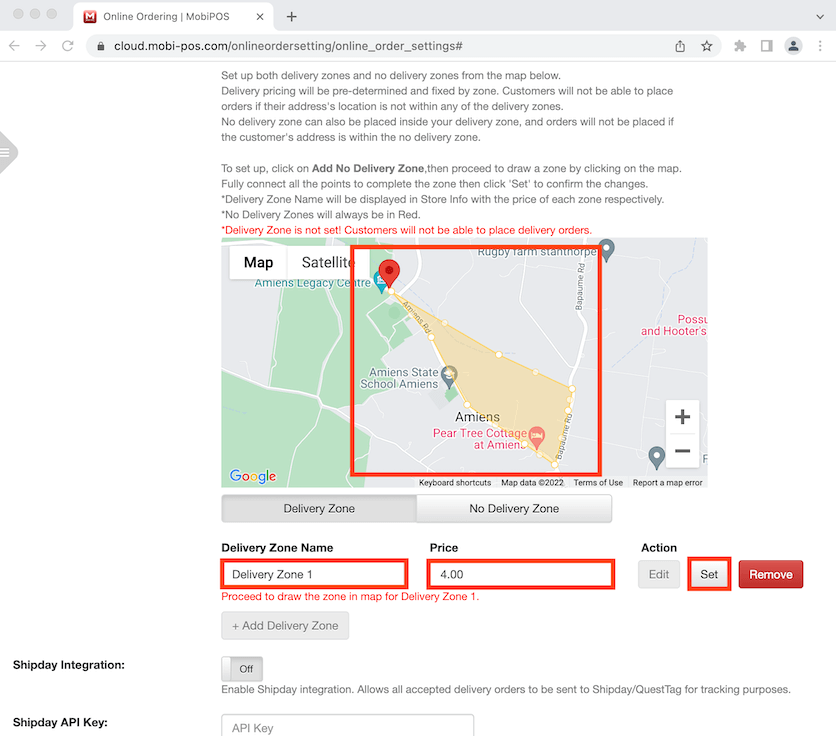
Once the delivery zone is set, all the points on the map will be gone. Note that all orders within that zone will now be charged the same fees based on the delivery price that you have set above. The delivery prices can also be found under Store's Info.
Continue reading below for No Delivery Zone.
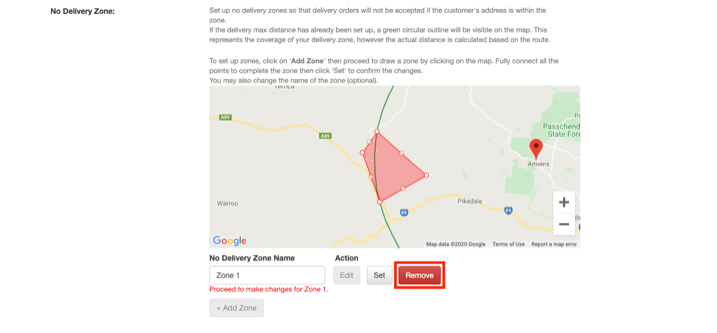
No Delivery Zone
Max delivery range is only able to calculate distance based on radius. Actual calculations may vary according to route availability. This function will allow you to configure no delivery zones within the max distance of your delivery range to ensure your driver will not cross the max distance threshold.
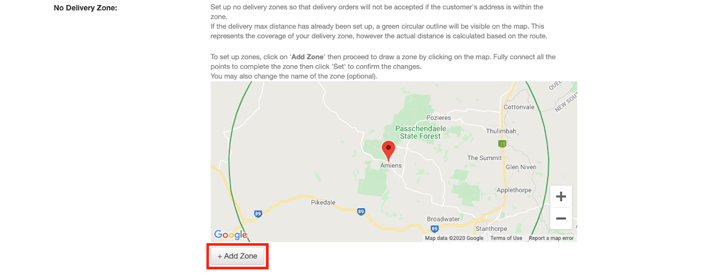
To set up a no delivery zone, click on +Add Zone.
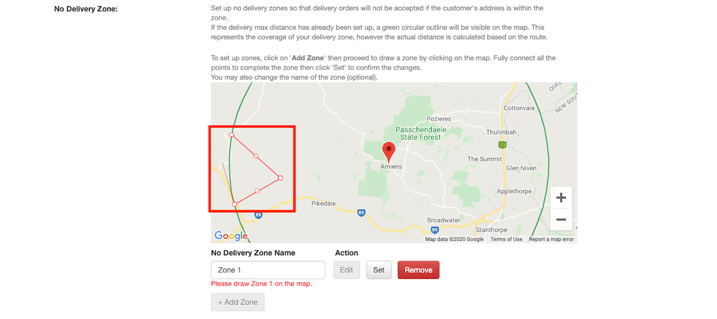
Your cursor will turn into a + sign, proceed to select the area by clicking and connecting the points to mark an area.
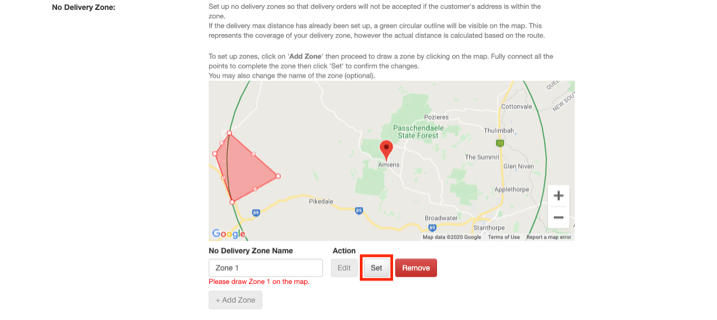
Once you are satisfied proceed to click on the Set button.
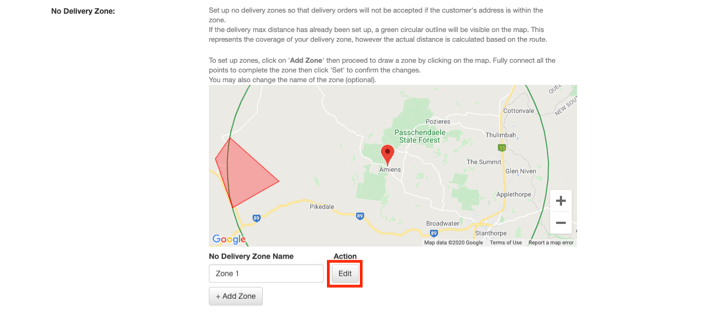
To remove a no delivery zone, click on Edit on a existing zone, then click on Remove.
Shipday Integration
Click to enable Shipday Integration to manage all accepted orders on Shipday app or website.
Shipday API Key
Enter the API key obtained from the your account on Shipday. You can click on the link and it will lead you to your account directly.
Speedyrider Integration/Lalamove Integration
Click to enable delivery integration and this will inform riders to pickup delivery orders at your store when they are ready to be collected.
Speedyrider API Key/Lalamove API Key
Enter the API key obtained from the your account.
Lalamove API Secret
Enter the API secret provided by your account.
Lalamove Configurations
Click to toggle on Live and you can manage the carrier type and market location for Lalamove delivery.
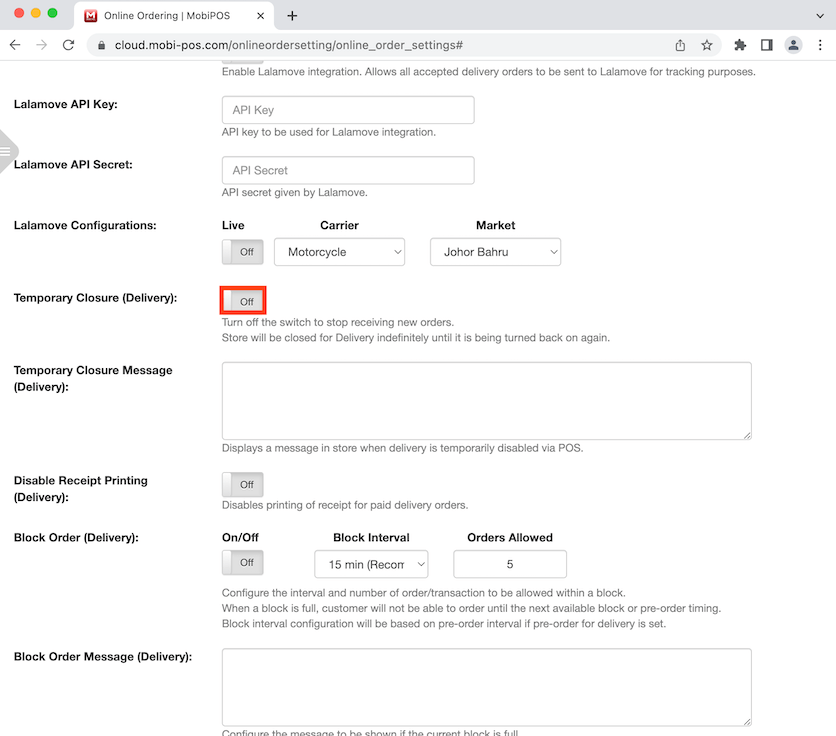
Temporary Closure
Temporary Closure is usually toggled on for online ordering so customers are able to select delivery as their preferred order method. Click to toggle off if do not want to receive new orders. This will be seen as a temporary closure for delivery until it is turned back on again.

Now temporary closure is toggled off. Click Save after.
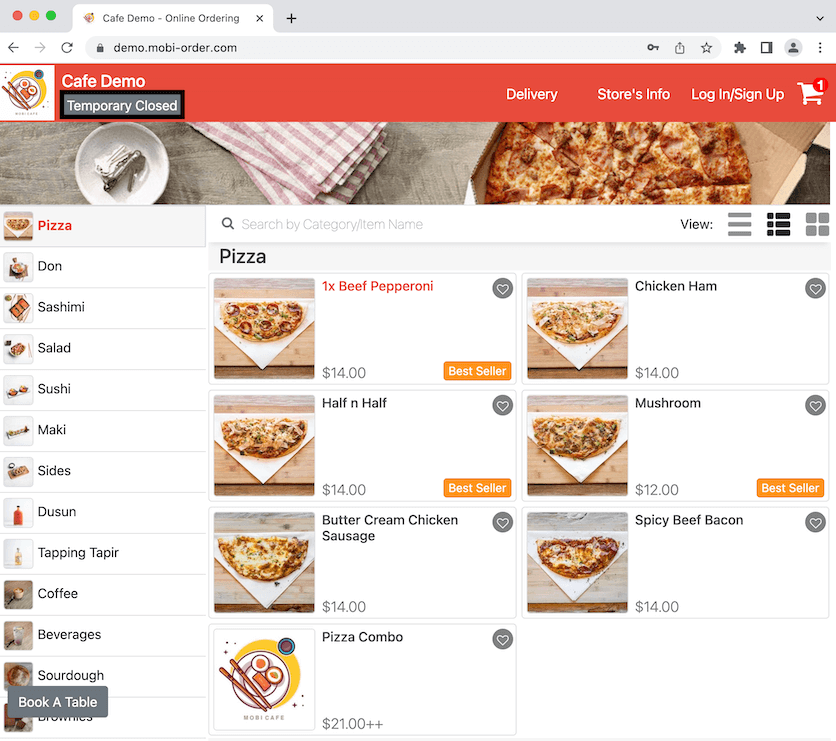
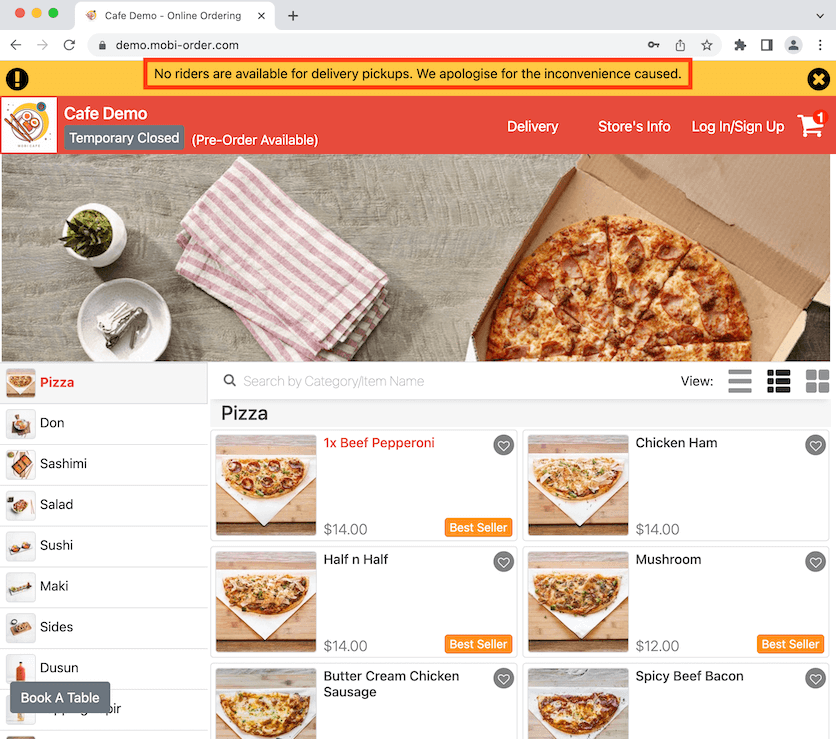
Go to the online store and you will see a sign saying "Temporary Closed" if your ordering method is set to delivery.
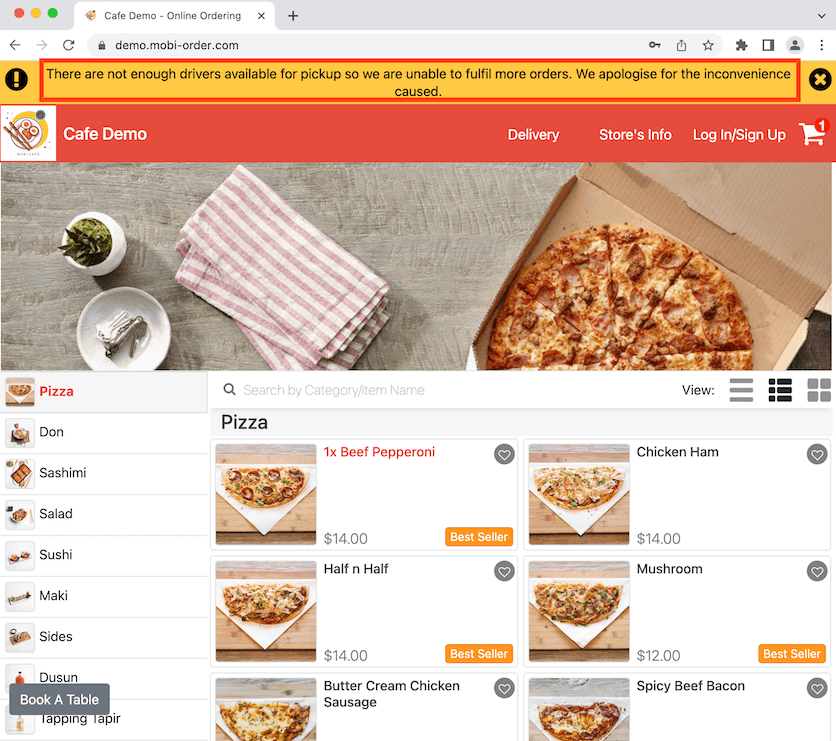
Temporary Closure Message
You can display a temporary closure message at the top of the page to inform customers that the business is unable to accept any orders for collection. Enter your message then click Save.
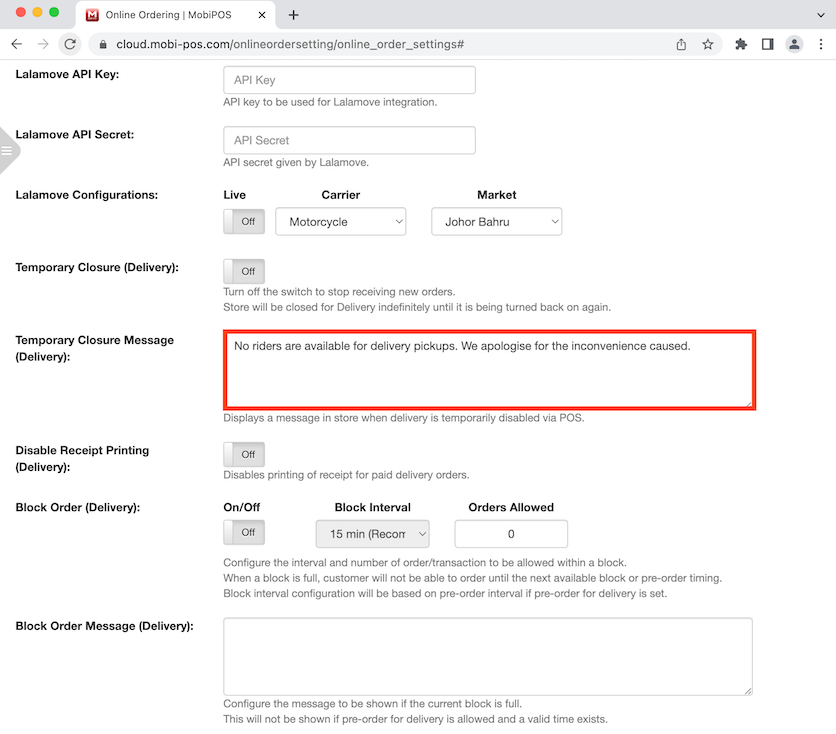
Go to the online store and you will see the message being displayed at the top of the page.
Disable Receipt Printing
Toggle this on to disable receipt printing for delivery orders for POS.
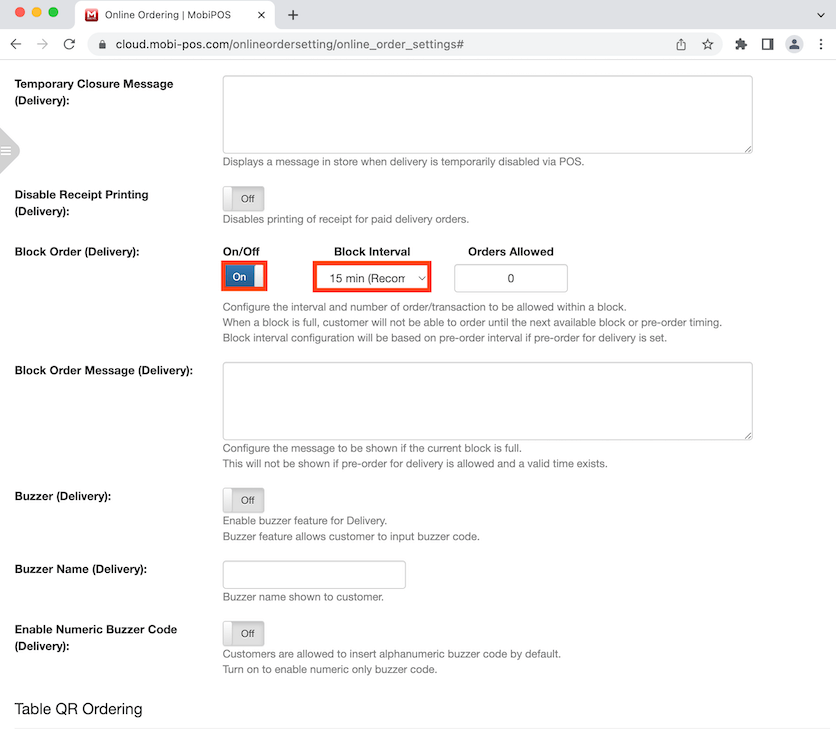
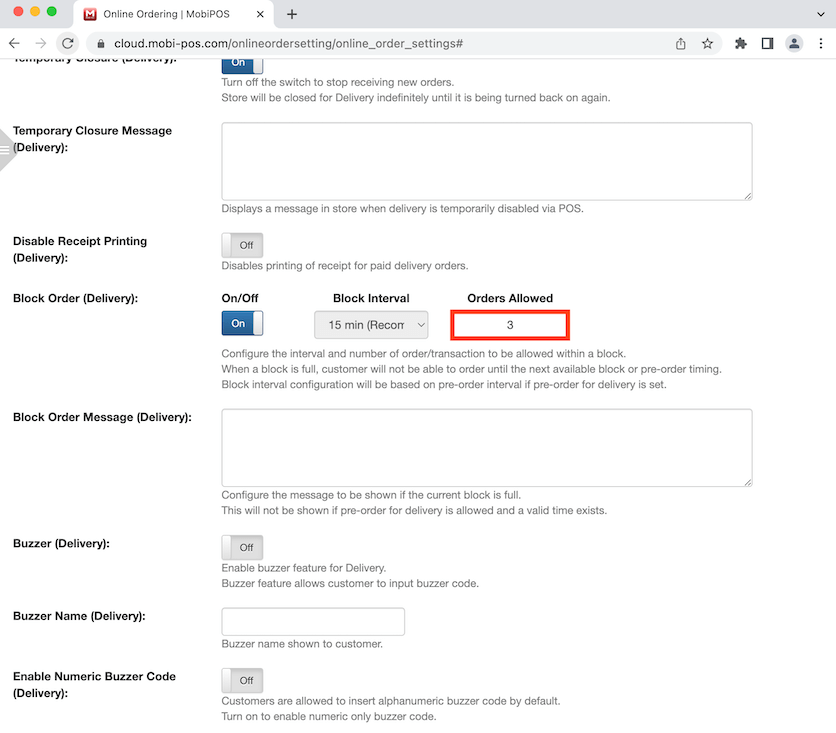
Block Order
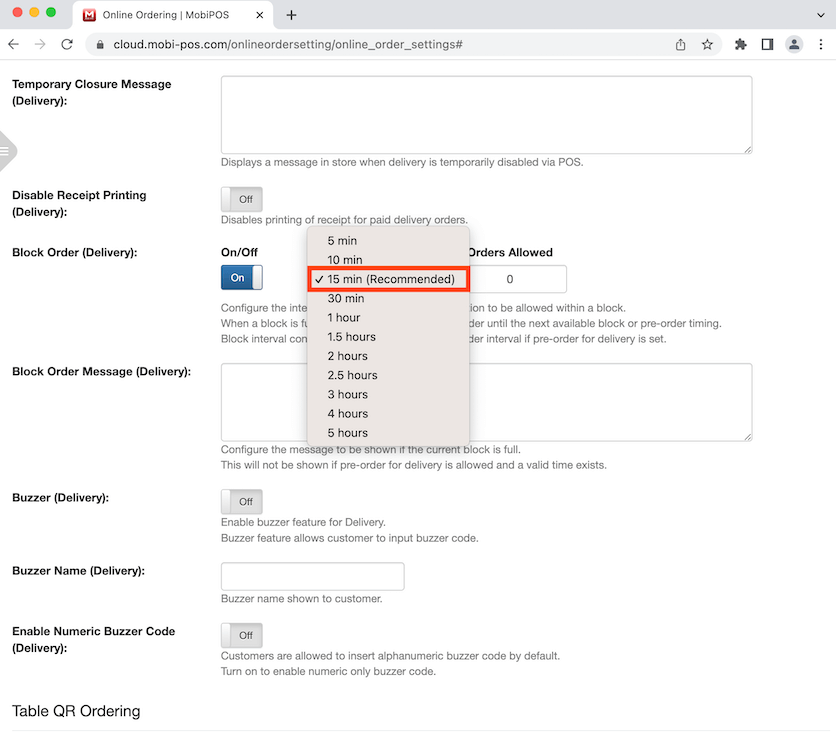
Click to toggle on Block Order and this allows you to configure the time block interval for a set number of orders allowed during that duration.
For example, if the block interval is set to 15 minutes and orders allowed is set to 3, it means the business can only accept a maximum of 3 orders every 15 minutes. When the maximum order is reached, the next customer is unable to make an order.
Click to select a time then click anywhere else on the screen to continue.
Enter an amount for orders allowed during the time block interval then click Save.
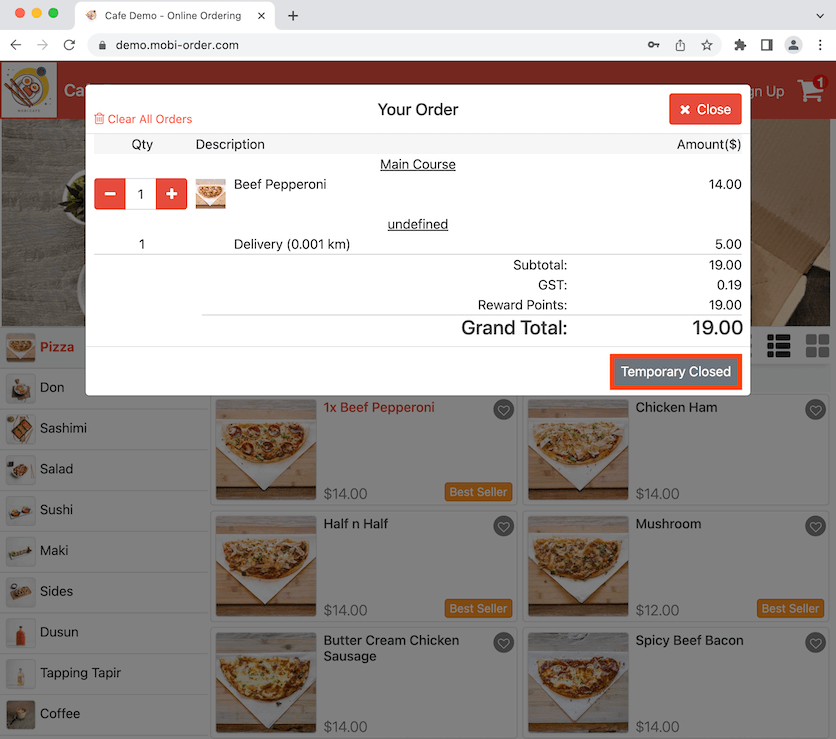
If pre-order settings for delivery is disabled, there will be a self-generated message being displayed at the top of the store to inform customers that the current slot is full after the maximum order is reached within 15 minutes. Refer to Block Order Message below if you want to edit your own message to display on the online store.

There will also be a sign saying "Temporary Closed" when you click on the cart. This means you cannot proceed with checkout.
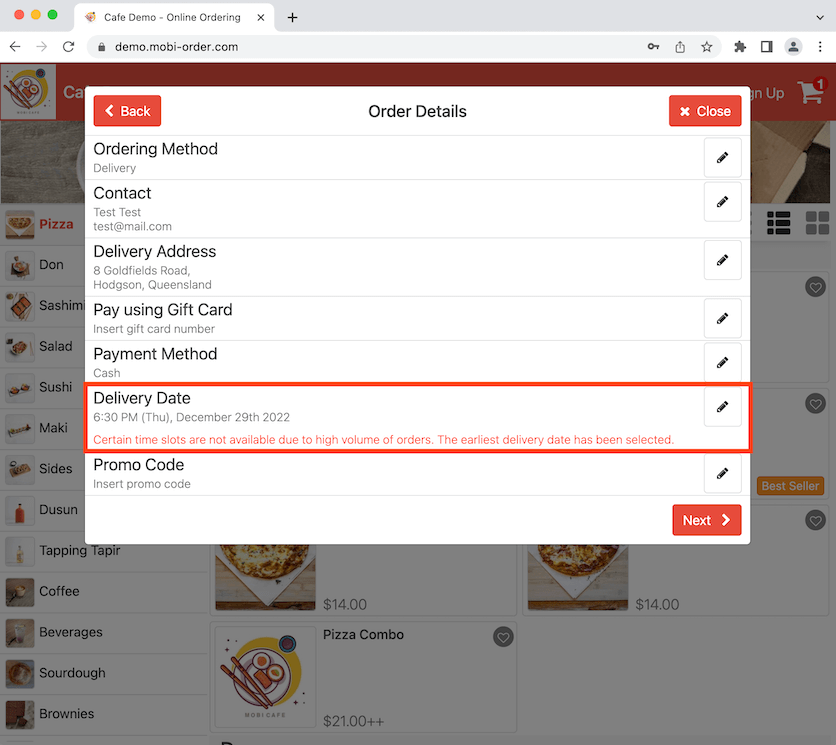
However, if the pre-order settings is enabled for delivery, you are able to make an order for the next available delivery date and time instead as shown in the photo. You can click on the pencil icon to change the collection time and date.
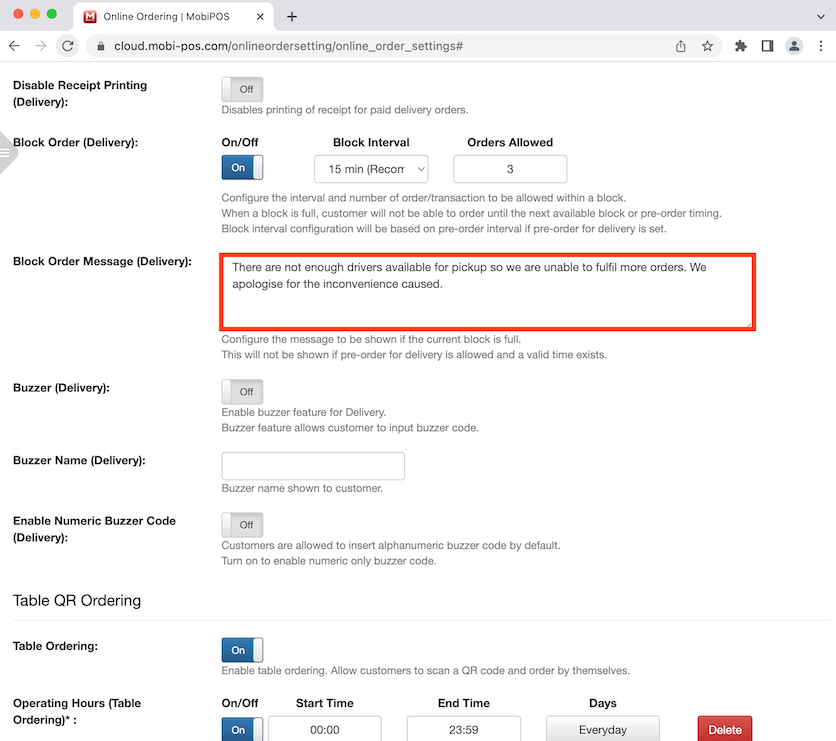
Block Order Message
You can display a message at the top of the page to inform customers that the business is unable to accept new orders at the moment.
Note that if the pre-order settings is enabled for delivery, Block Order Message will not be shown because customers can choose the next available date and time for pre-order. After entering the message, click Save.
Go to the online store and you will see the message being displayed at the top of the page.
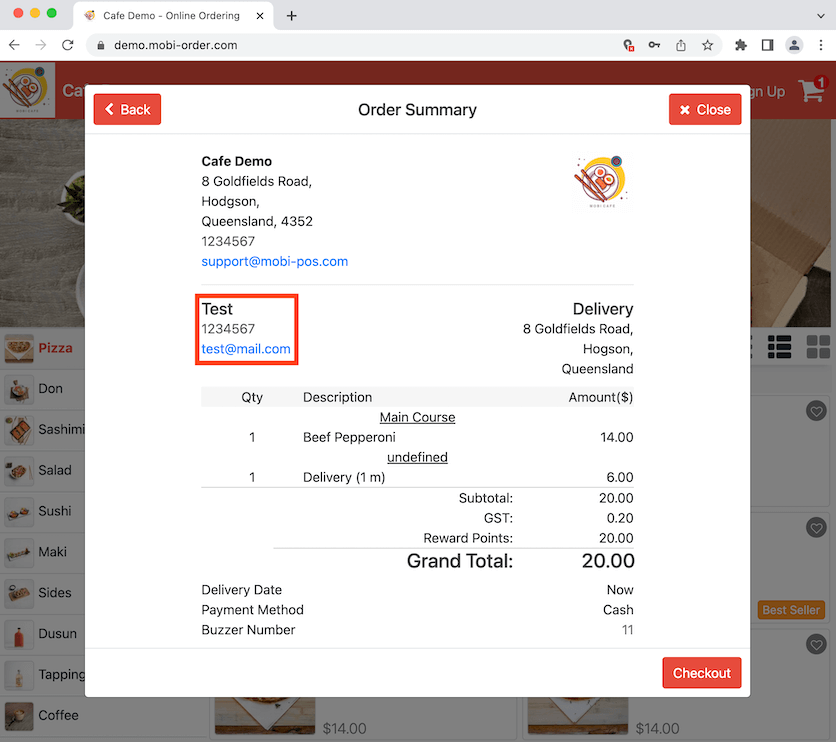
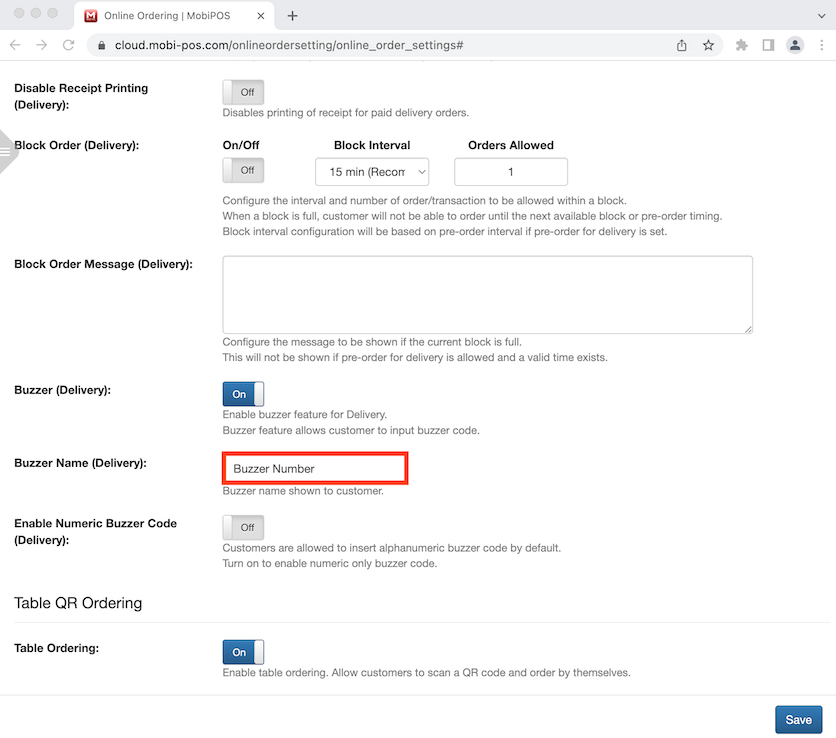
Buzzer
Click to toggle on and this allows you to insert a Buzzer Code during checkout.
Buzzer Name
Insert a Buzzer Name if you have the Buzzer function enabled then click Save. This can be anything as long it can be used as a buzzer identifier for delivery.
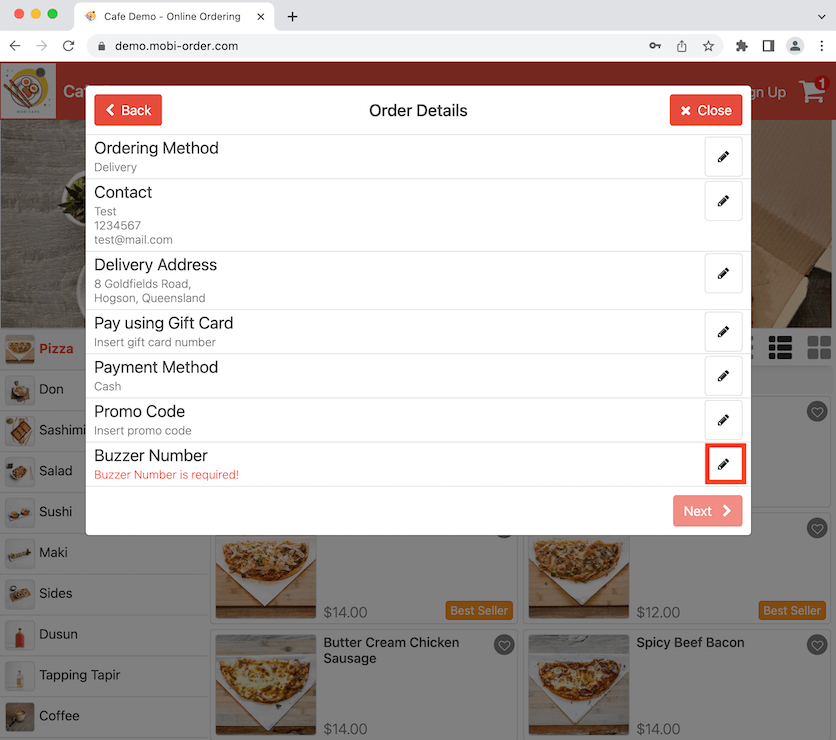
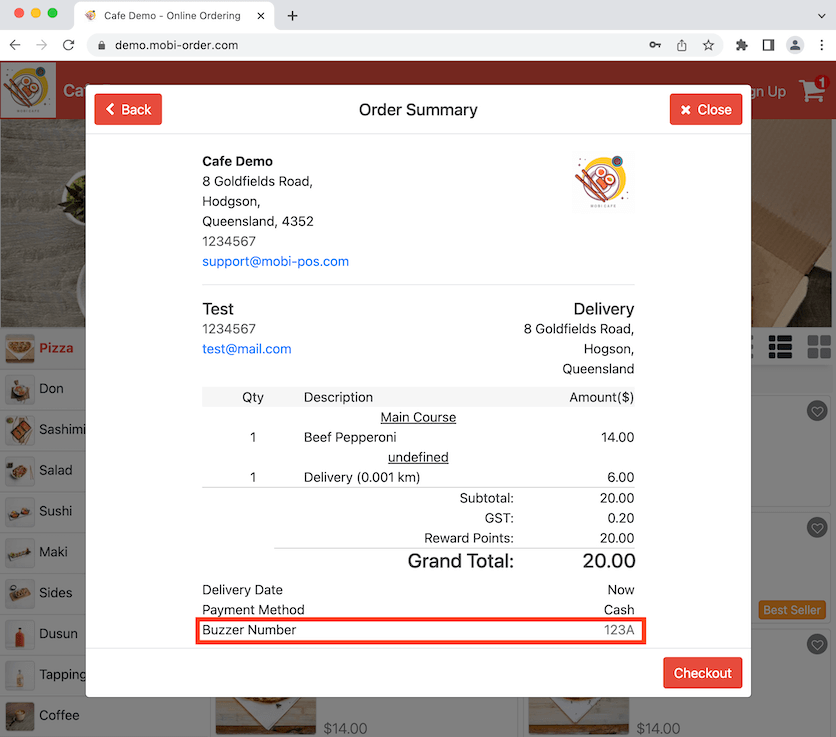
Go to the online store and add items to your cart. Proceed with checkout and it will bring you to Order Details where you are able to fill in the Buzzer Number. Click on the pencil icon.
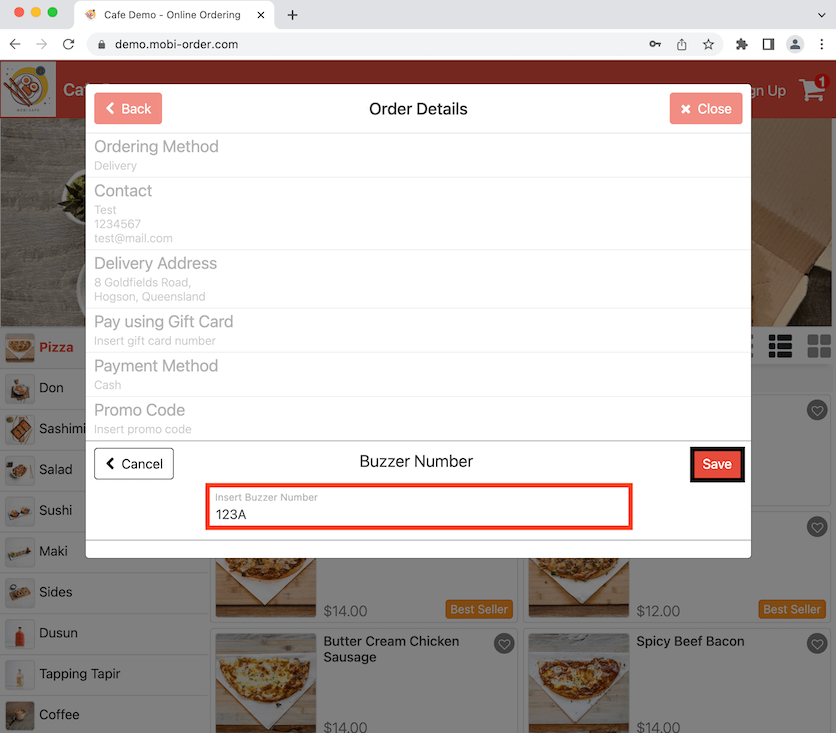
Enter the Buzzer Number then click Save.
The Buzzer Number is applied. Click Next to continue.

It shows the buzzer number on the bill. Click on Checkout to finalise the order.
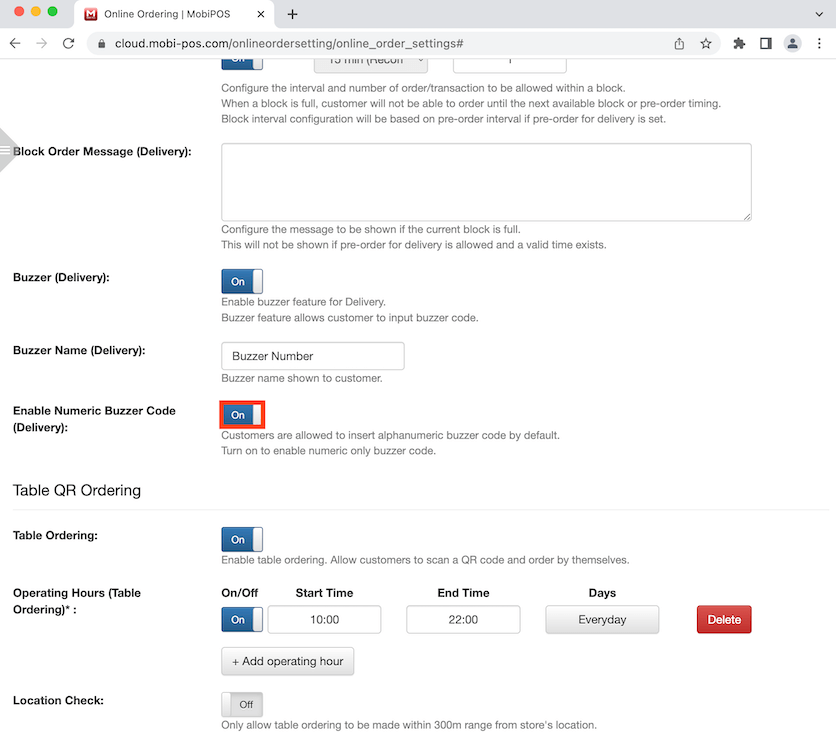
Enable Numeric Buzzer Code
This only allows numerical codes to be entered as a buzzer code during checkout. This is to avoid customers entering the wrong buzzer code which may consists of alphabets or mistaking it for the remark column. Click to toggle on then click Save.