Guide | MobiPOS > Cash Register > Functions
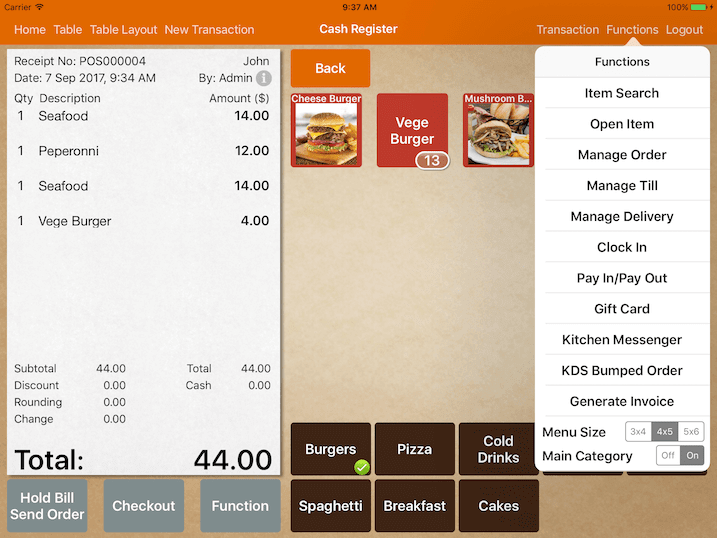
Functions
A list of functions that can be accessed in the cash register.
Item Search
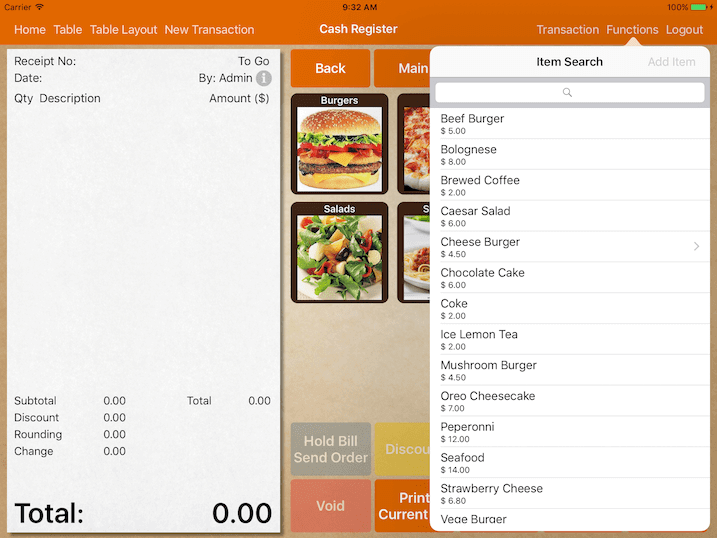
Item search gives you a quick search for the item name.
An item with modifier is marked with an arrow beside.
Open Item
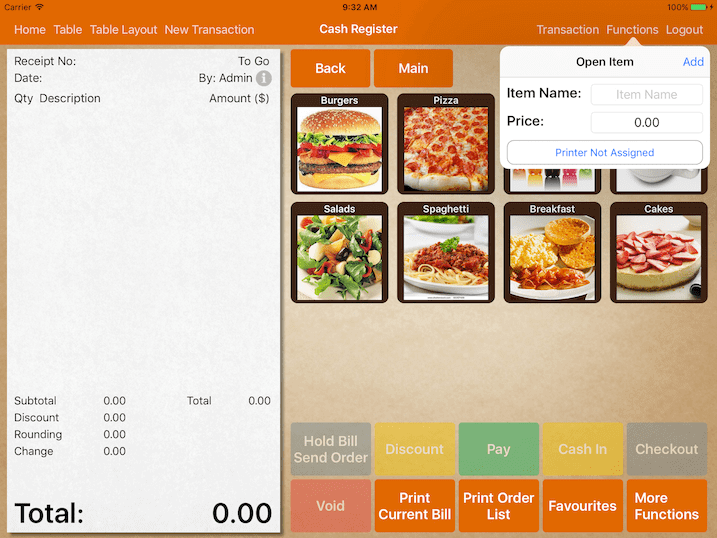
For miscellaneous items, you could use the open items.
Assign the kitchen printer if the item has to be sent to the kitchen.
If tax is set up, you will be able to configure the tax for this open item.
Delay Printing
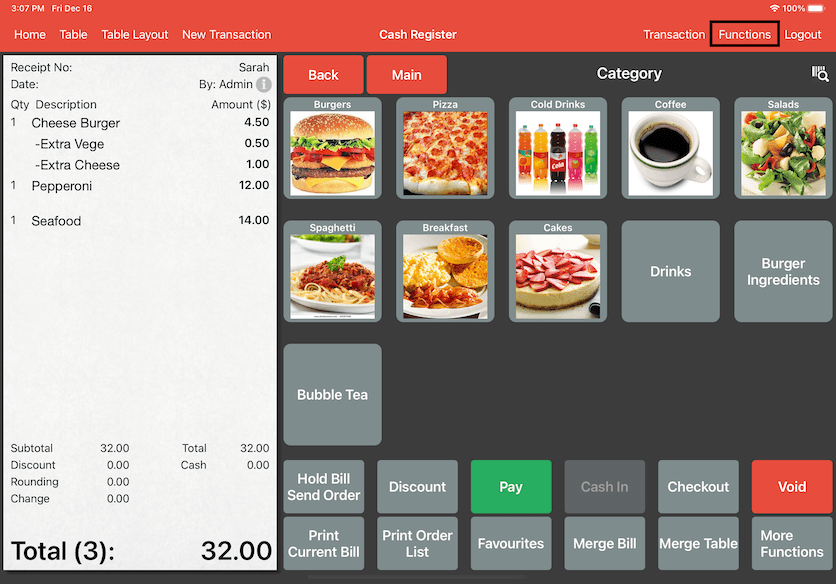
Delay printing allows orders to be printed at a scheduled time. For example, a customer named Sarah has called the restaurant to pre-order food for dinner at 7:00PM. Since it is too early for the order to be sent to the kitchen now, we need to delay the printing of the order.
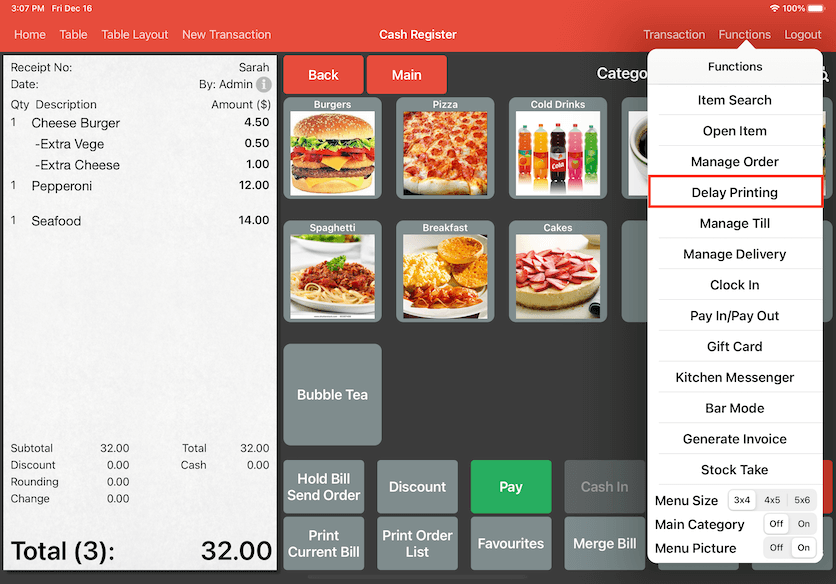
This is Sarah's order in the example photo. We need to select a time for the order to be printed for the kitchen. To do this, select Functions on the top right.
Click on Delay Printing.
There is a keypad for quick delays of order ranging from 5 to 60 minutes. Simply click on the minutes to delay your order.
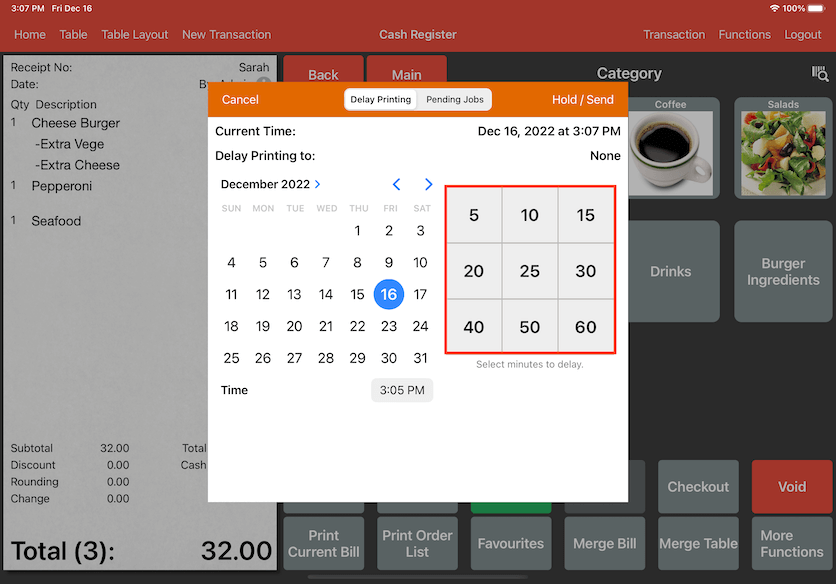
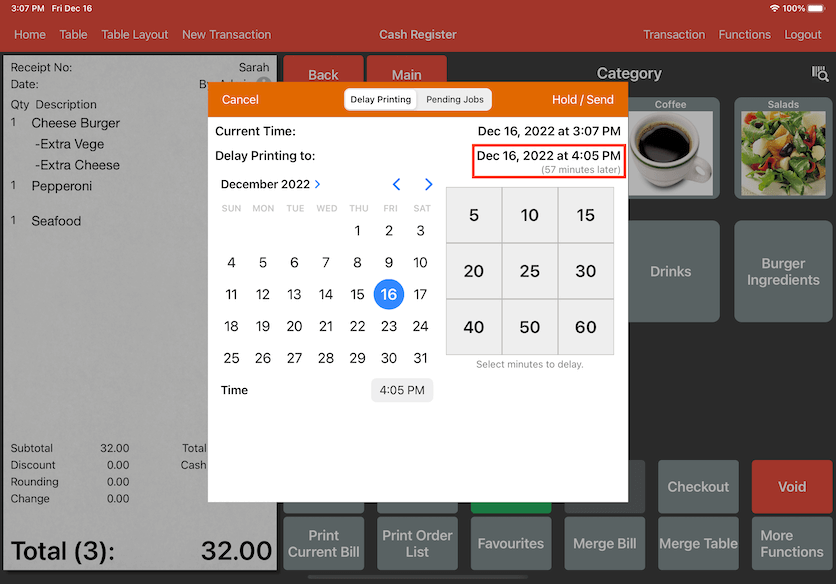
After clicking on the minutes, the time for Delay Printing will show up.
However, Sarah have requested the food to be served at 6:30PM and the kitchen needs time to prepare the food, so we can delay the printing time to 6:30PM by setting it manually.
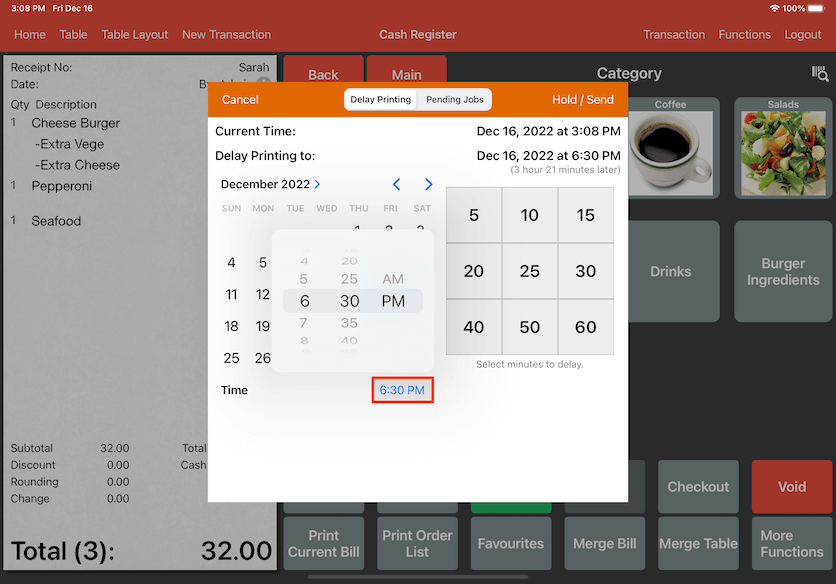
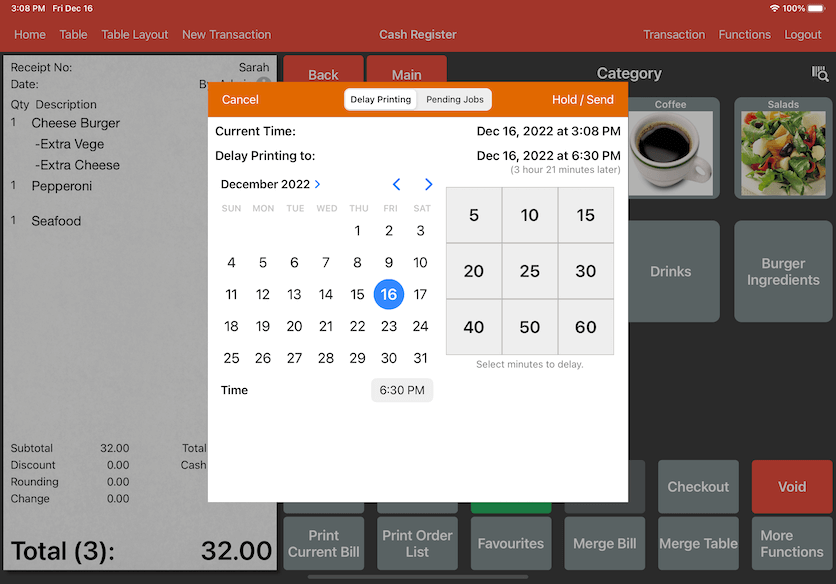
The Delay Printing time is now set to 6:30PM. You can also change the date by clicking on the calendar. After you're done setting the time, click Hold/Send on the top right.
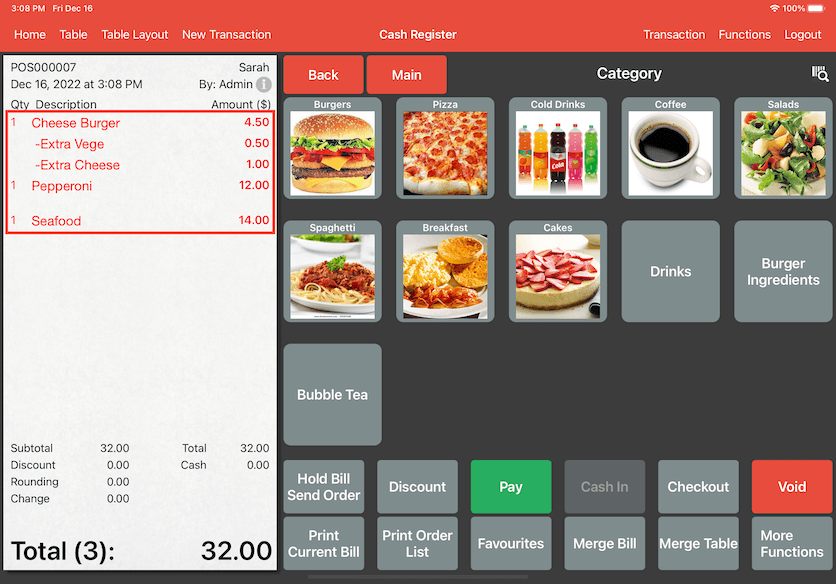
The items in red means the order is being held and will not be sent to the kitchen until it reaches the scheduled delay printing time.
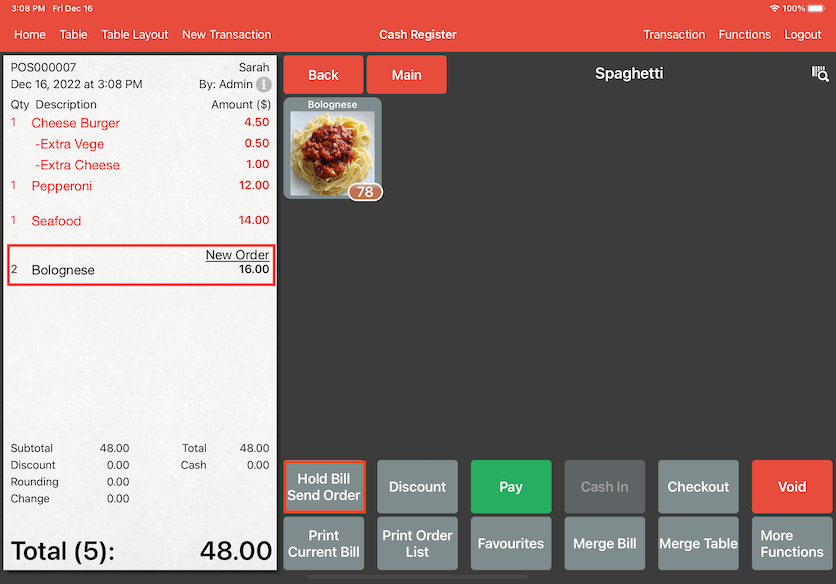
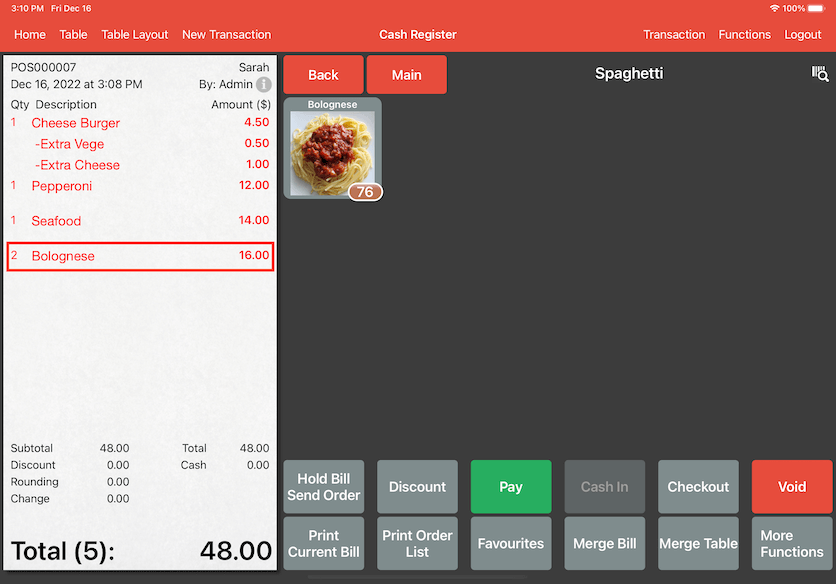
Even though the order is held from being printed, you can still add new items to the existing order. In this case, Sarah called the restaurant again to add more food to the current order and she wants them to be served at 7:00PM as well.
Order the items and they will show up in black. Click on Hold Bill Send Order to manage the new order.
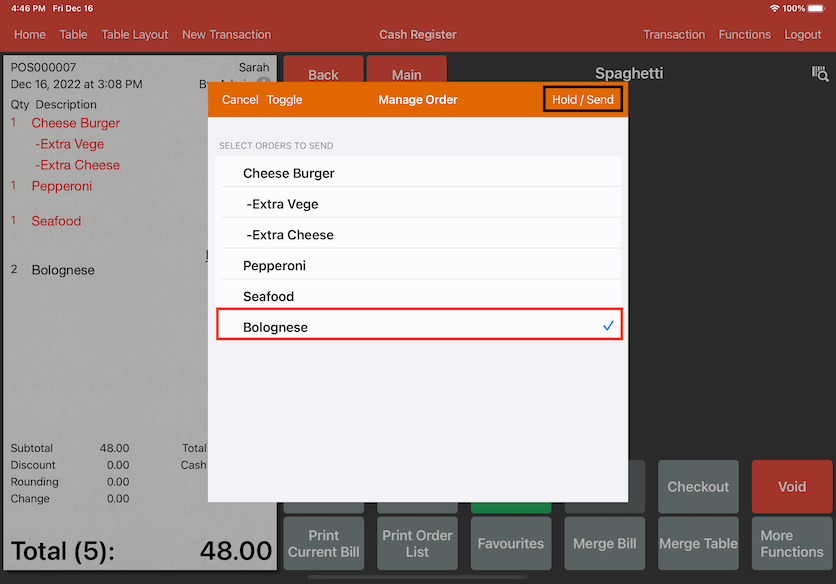
Click to untick Bolognese then click Hold/Send on the top right. By doing so it means Bolognese will also be printed alongside with the initial orders that were scheduled at 6:30PM.
But if you choose to tick the item (Bolognese) and click Hold/Send, this means the item will be printed immediately and kitchen will start preparing the food.
Now it shows the item (Bolognese) in red, indicating delay printing alongside all the initial order.
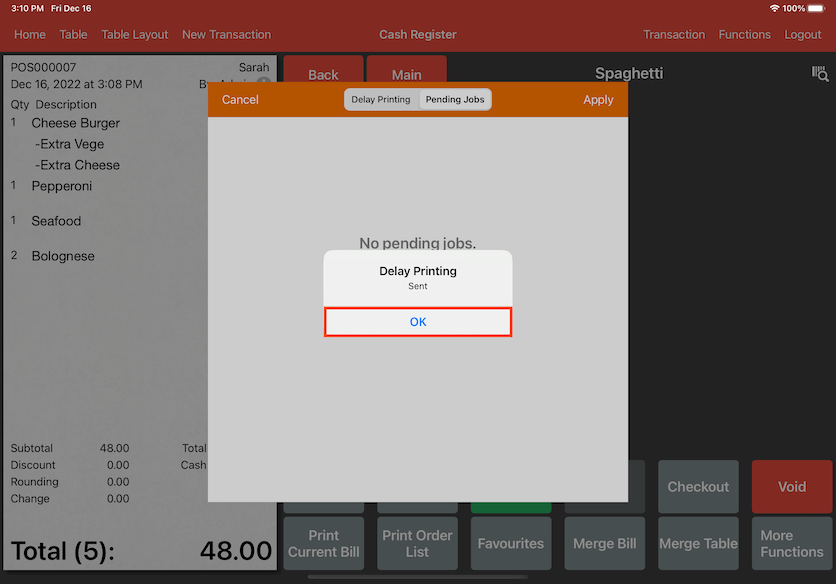
Given another scenario where Sarah decided to cancel dinner at the restaurant but opted for food collection instead. She will be coming to collect the food in 30 minutes.
The kitchen will need to start making the food now so we can choose to print the order immediately. Click on Functions and select Delay Printing again. Click on Pending Jobs and the transaction will show up.
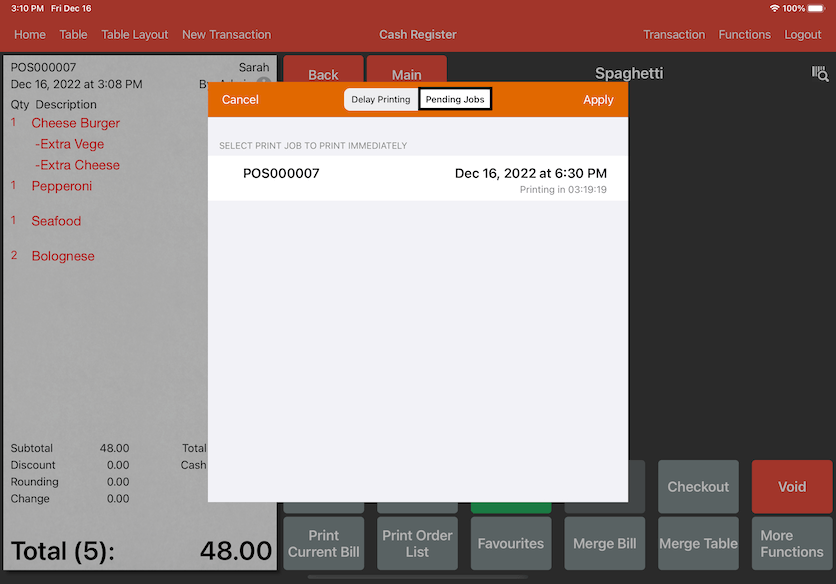
Click on the transaction and a tab will pop up. Click Yes to confirm immediate printing.
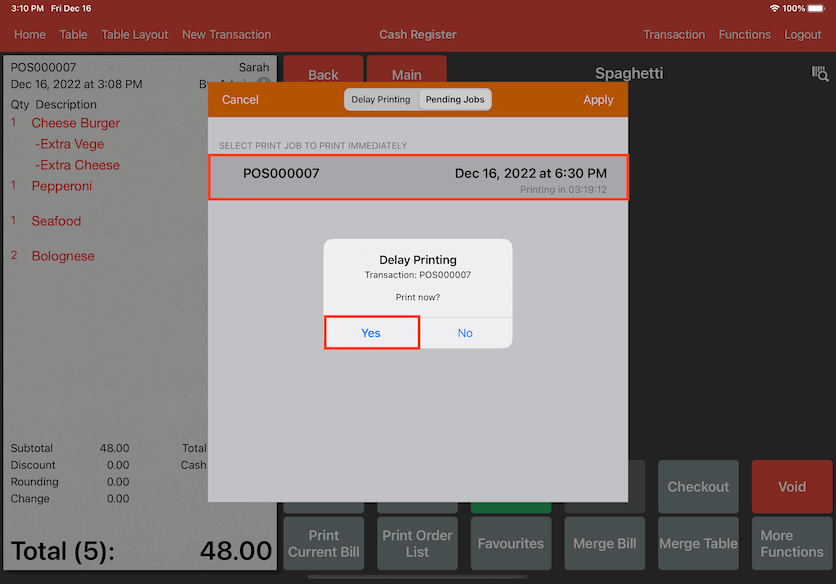
The order has now been sent to the kitchen. Click OK to continue.
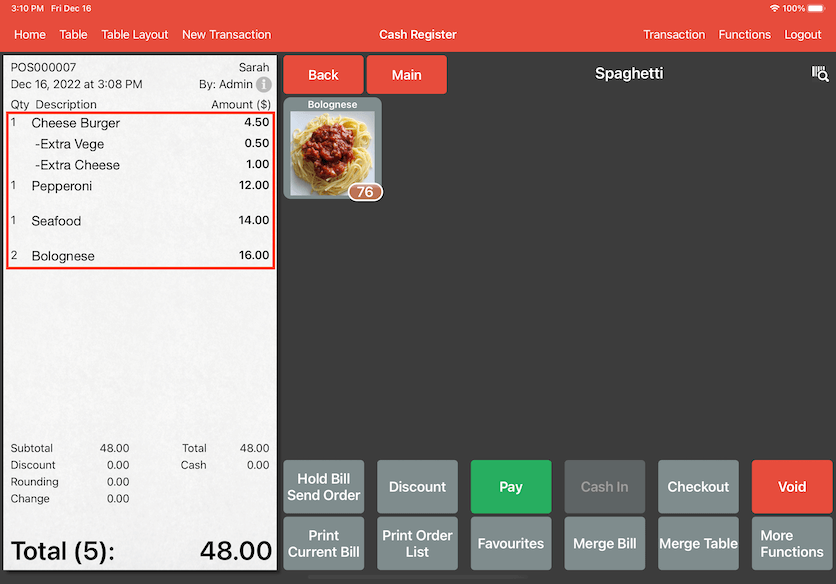
The items will no longer show up in red and the kitchen has received the order.
Manage Order

For an order that has not been sent to the kitchen, you could choose which order to be sent.
For example, you could key in all customer orders but only fire the appetizers first.
The order that has not been sent to the kitchen will be marked as red.
Manage Till
This feature allows the users to track the cash flow in the drawer.
In a normal operation situation, staff should specify the amount of the cash they hold in the opening till.
At the end of the day, after calculating all the cash they have in the drawer, they will key in
the amount in the closing till.
This allows the system to calculate the variance comparing to the actual cash sales.
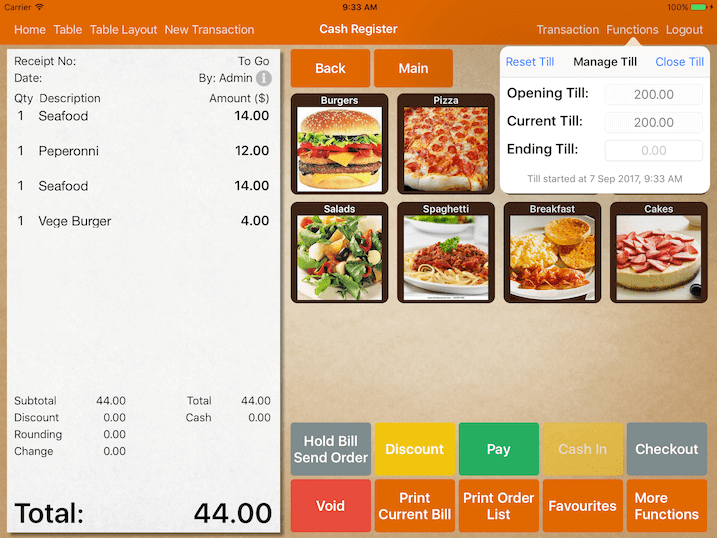
To use this feature, go to Cash Register -> Functions -> Manage Till.
Next, the user will need to insert the "Opening Till" amount, then click on "Set" at the top right corner as shown below.

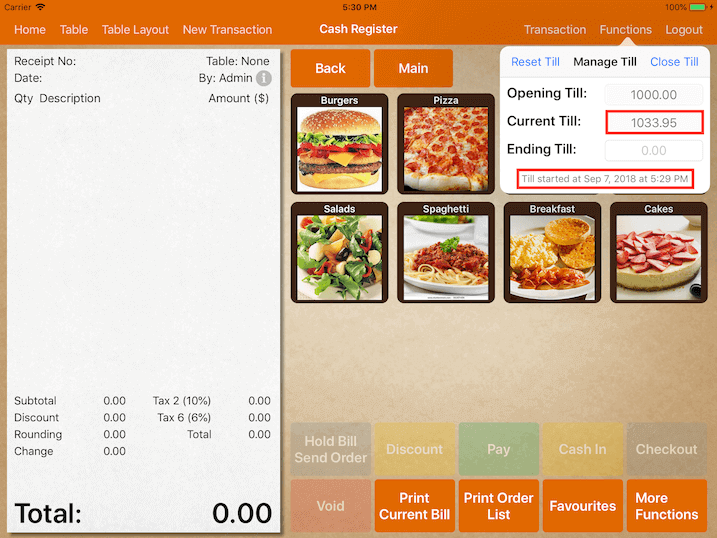
If your opening till is $1000.00 and you just close a cash sale of $33.95, the current till amount
will be as shown below.
The time when the till starts is shown as well.
At the end of the shift, the staff is required to close the till by inputting the ending till amount
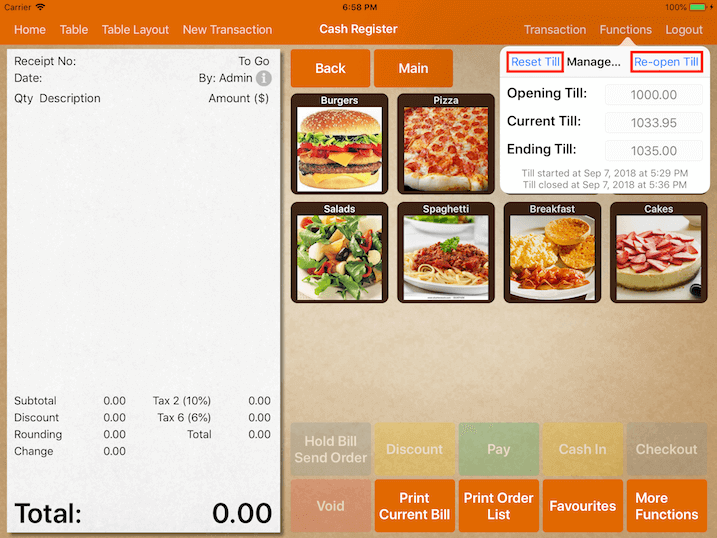
at the "Ending Till" column, then select "Close Till" at the top right corner as shown below.

Based on the example above, in the Z reading report, it will show a positive variance of $1.05.
After closing the till, user can also re-open it by selecting "Re-open Till" at the top right corner as shown below.
Upon re-opening the till, the "Ending Till" column will be cleared off as if the till was not closed before.
If the user wishes to restart the till again, you can click on "Reset Till" as shown below.
Reset till clears off the entire shift record.
Do note that the user will need to open till at the start of the day or before any transaction is closed.
Current till amount that is shown will only include transactions that are closed after the till is opened.
All the sales or transactions that happened before setting up "Opening Till" will not be recorded under the till section.
Example:
Staff is given $1000 to start the day (10:00 a.m.). However, staff did not open the till and they proceeded with the transactions.
By 10:30 a.m. they have received $200 in sales, and they realize they did not open the till.
If they proceed to open the till at $1000, the current till amount will be incorrect.
As the till will only calculate cash sales that are done after 10:30 a.m., missing out on the transactions before,
showing $1000 as the current till amount.
The correct way is, they should recalculate what is in the drawer, which is $1200, then enter that as the opening till amount.
Or else they would have to change their iPad date to 10:00 a.m. then key in $1000 as the opening amount.
Then adjust the device back to the actual time.
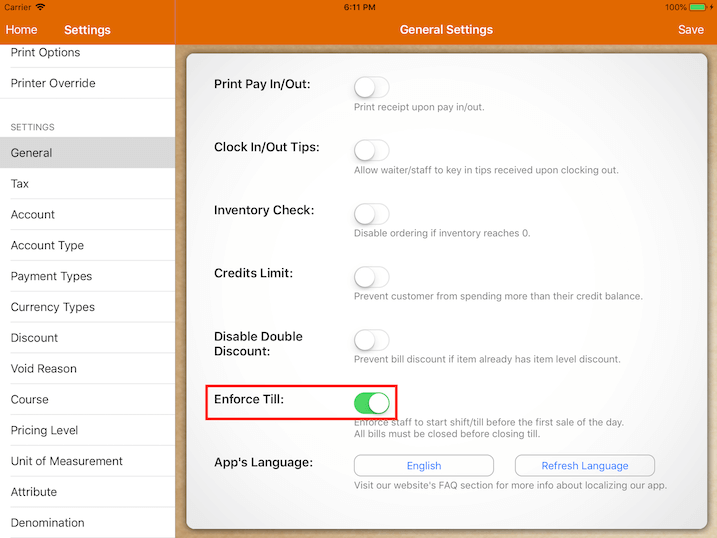
To prevent this from happening, Enforce Till should be turned on.
To enforce staff to start the shift or till before the first sale of the day,
go to Settings -> General -> scroll all the way down and enable Enforce Till.
Upon enabling Enforce Till, "Opening Till" must be set up before the first transaction, and all bills must be
closed before closing till.
Do note that Enforce Till can only be enabled in the Main POS.
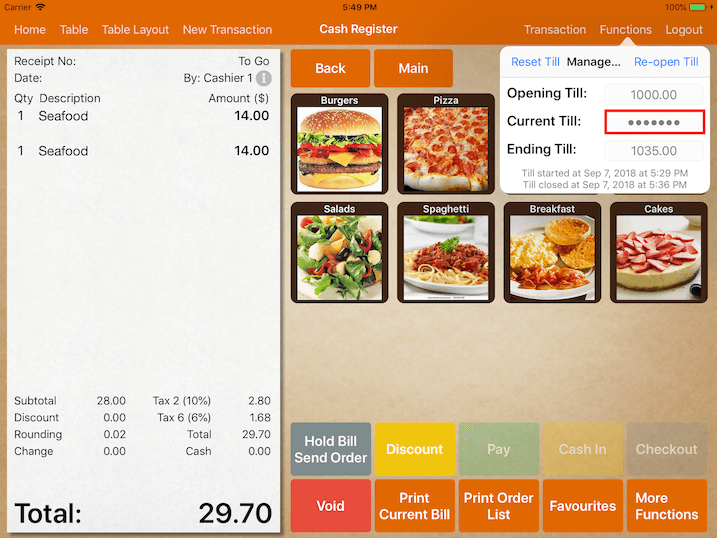
In the screenshot shown above, the current till amount is shown when the user manages till.
Only users logged in with super admin privilege will be able to see the current till amount.
Non-super admin should only see masked figures as shown below.
This will prevent staff from pocketing extra cash that is received.
If you have multiple terminals, manage till feature can also be used to track each individual drawer.
User needs to first connect each terminal to the main POS.
To understand device pairing, you can read more about it
here.
In order to manage till individually, terminal ID has to be keyed in under Settings ->
Terminal -> Terminal ID.
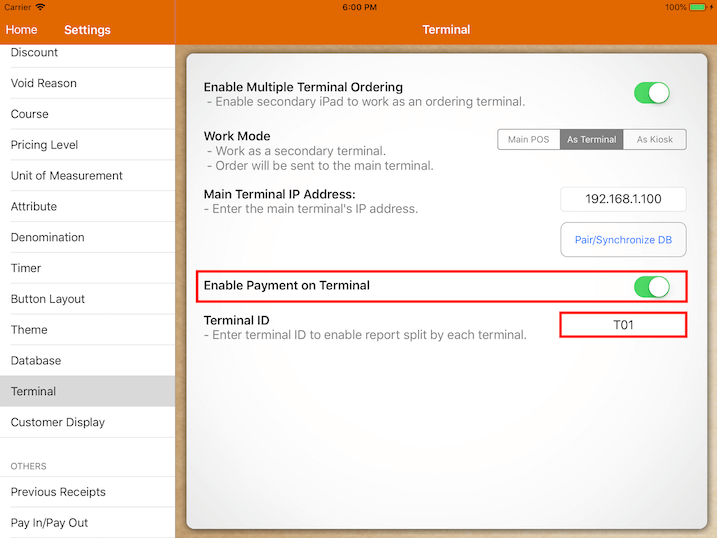
If the terminal ID is keyed in, both the main POS and the terminal are required to manage
their own till and only transactions that are closed in this terminal
will be taken into consideration for this terminal's till.
If the terminal ID is blank, the cash till of the terminal will act as one along with the main POS.
It will combine the transaction for both the terminal and the main POS.
Manage Delivery
Manage delivery gives you an overview of all your delivery transaction.
You could assign a driver for each of the transactions based on the location and delivery time.
Clock In/Clock Out
If the logged user has not clocked in, Clock In will be displayed.
If the logged user has clocked in, it will display their clock in time and Clock Out will be displayed.
Users can only clock in for themselves, and they can clock in/out multiple times a day.
Pay In/Pay Out
With Pay In/Pay Out, you can manage your cash that is deposited or removed from the cash drawer.
Use a negative value for cashing out.
Kitchen Messenger
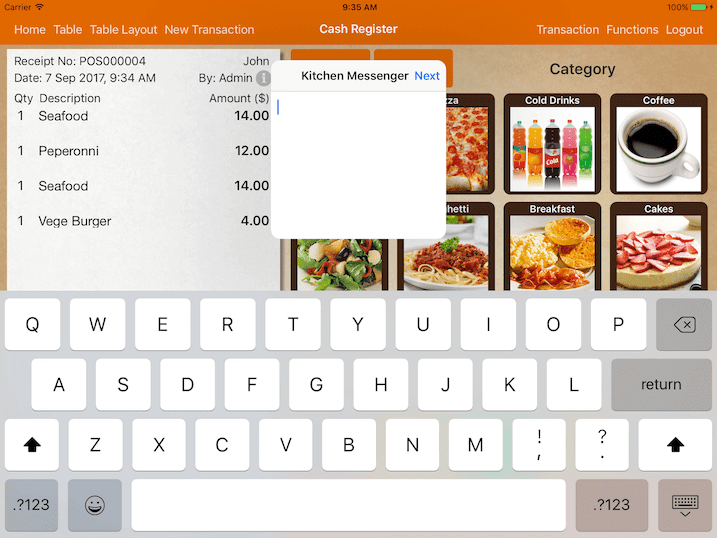
Using any device, you could send a message to the kitchen printer or kitchen display app.
The kitchen printer will print out a docket with the message sent while the kitchen display app shows an alert.
You could send a message to multiple printers/kitchen displays at once.
KDS Bumped Order
If Notify POS when the bump is turned on in the kitchen display system, POS will receive the notification.
This allows you to check the previous bumped orders.
Generate Invoice
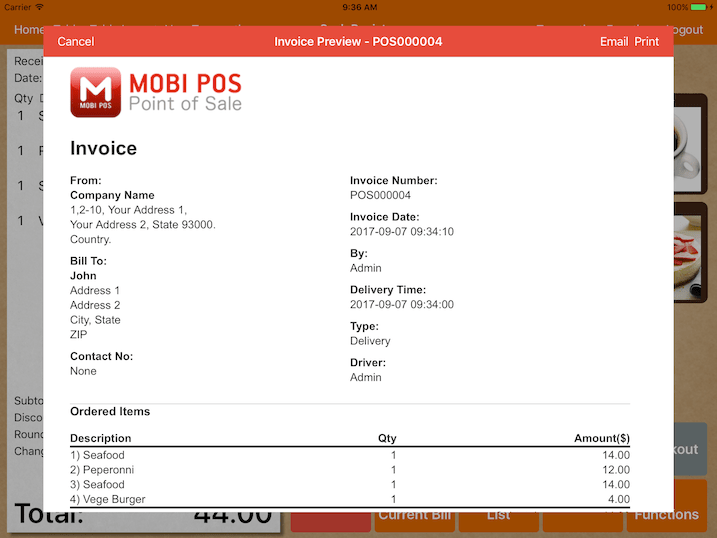
Generate an invoice for the selected bill. You may print or email to your customer.
The invoice can be printed to AirPrint supported printers only.
Menu Size
Adjust the size of the menu buttons. 3x4, 4x5, or 5x6 without a product thumbnail.
Category Display Type
Off - The main category will be displayed on the menu. Function buttons will be shown below the menu.
Use this option if functions are accessed frequently.
On - The main category will be displayed under the menu which enables quick switching between categories.
In order to access all functions, click the Function button that is located below the receipt.