Guide | MobiPOS > Kitchen Display System > KDS Settings
KDS Settings
This guide explains the settings of the Kitchen Display System.
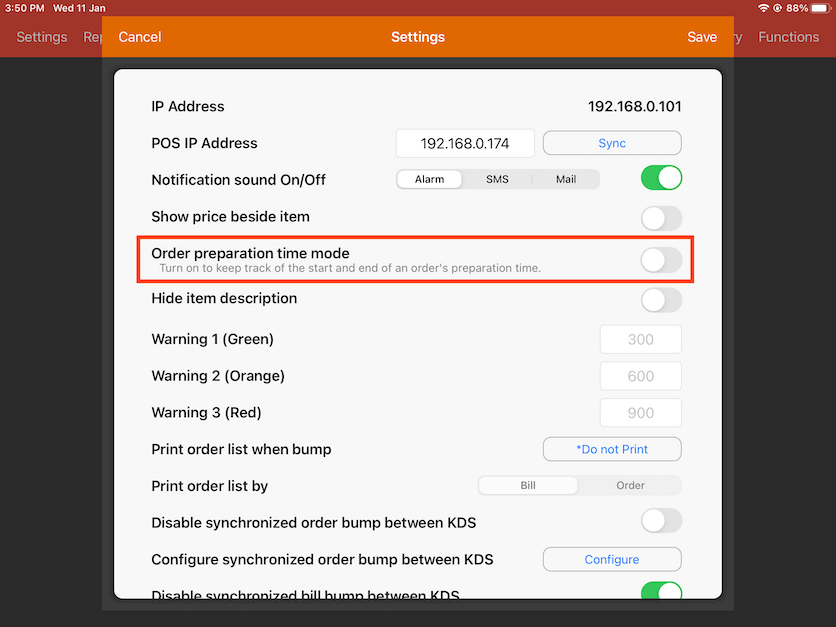
Below is a screenshot of KDS Settings Part 1.
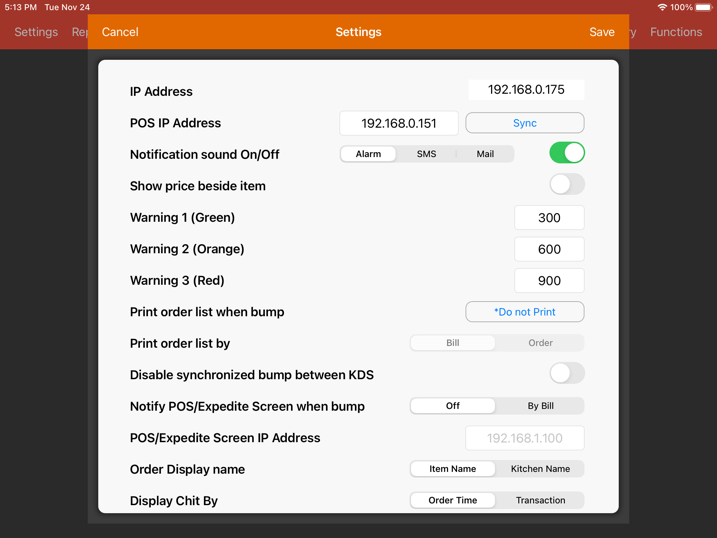
IP Address
The current IP Address of your device.
POS IP Address
The current IP Address of your main POS device that your KDS is synced to.
Notification sound
Adjust the method of the notification and also to turn the sound on and off.
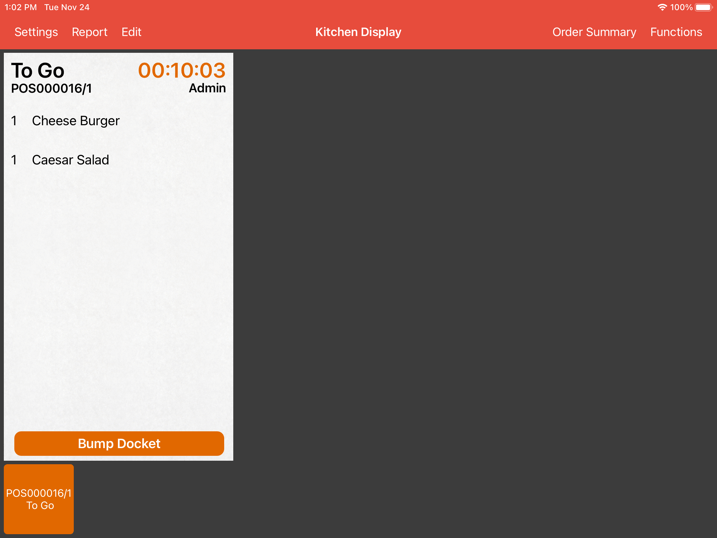
Warning 1 (Green)
Adjust the time when the order alert is normal (green colour).
The recommended setting is 300 seconds.
Warning 2 (Orange)
Adjust the time when the order alert turns slightly critical (orange colour).
The recommended setting is 600 seconds.
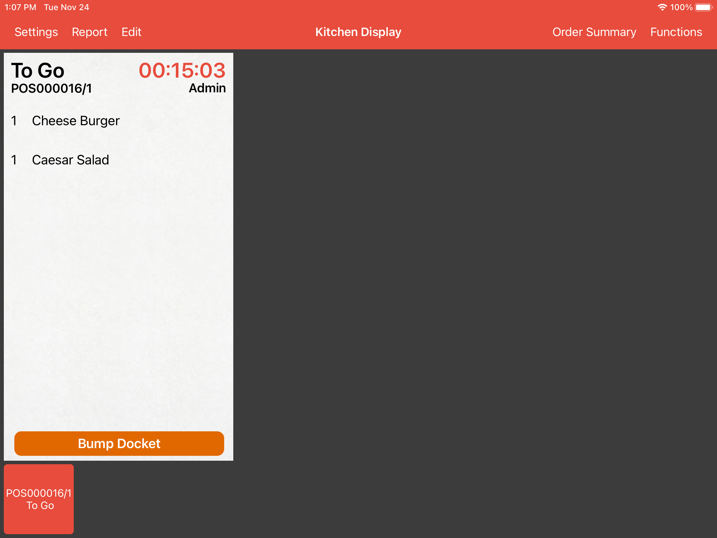
Warning 3 (Red)
Adjust the time when the order alert turns critical (red colour).
The recommended setting is 900 seconds.
Print order list when bump
This enables users to print an order list upon bumping an order.
Printer has to be assigned in order for this to work. Sync with main pos to retrieve the list of available printers.
Print order list by
Print order list can be toggled between “Bill” or “Order”.
Selecting “Bill” will print all the orders together into a single order list.
Selecting “Order” will print orders individually into multiple order lists.
Order Time Preparation Mode
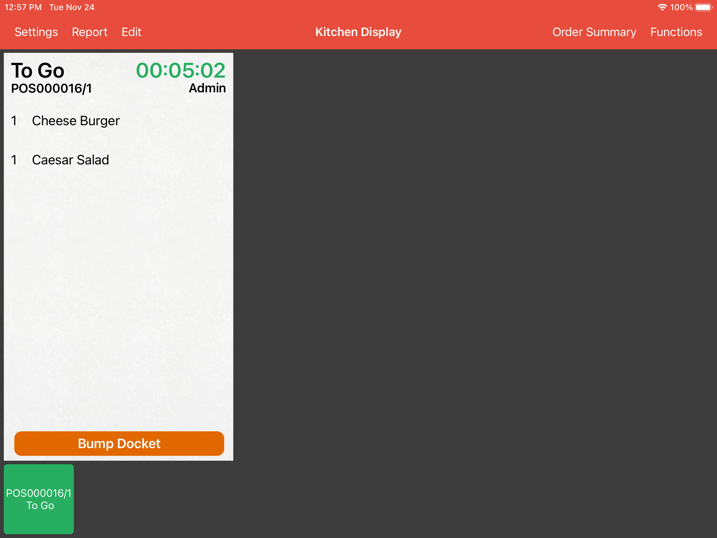
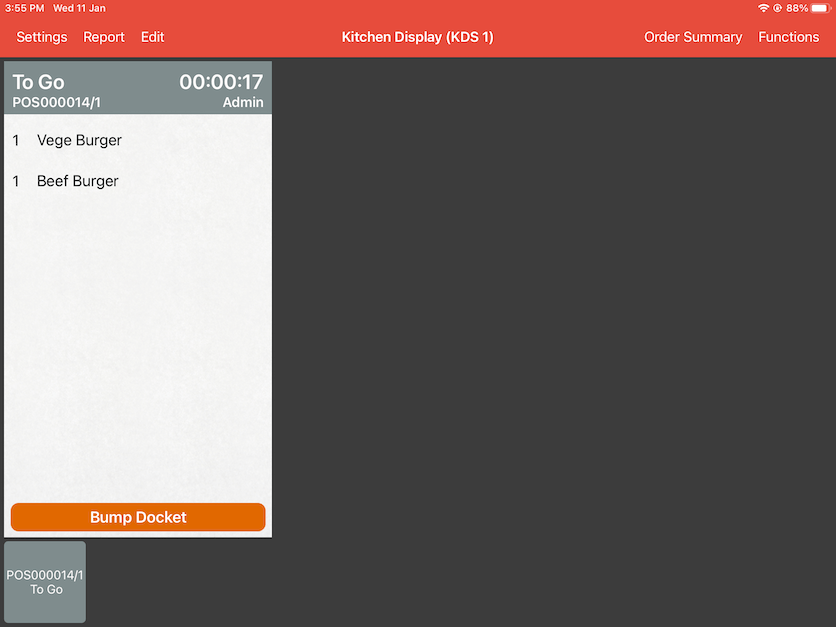
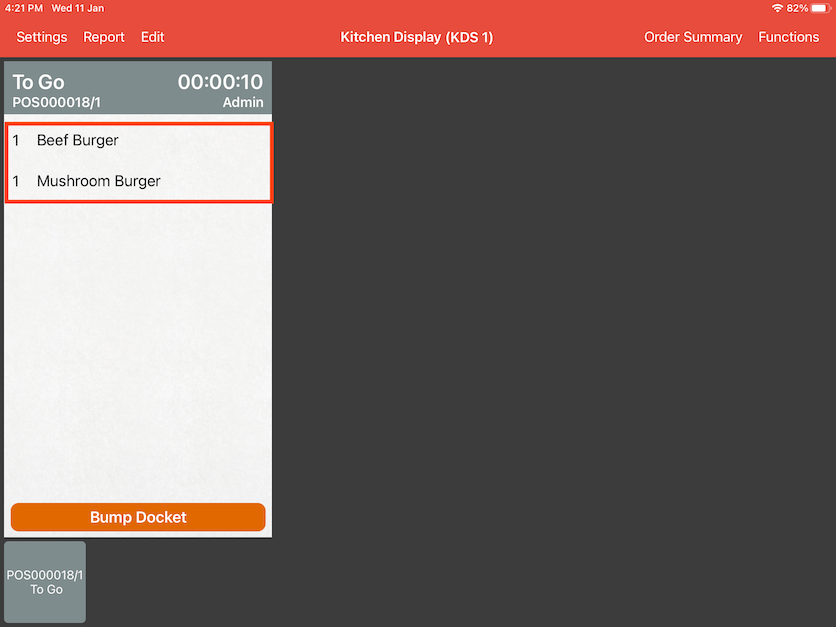
Order preparation time mode allows you to track the start and end time of an order's preparation time. We will show you how it looks like on the kitchen's display without enabling this first.
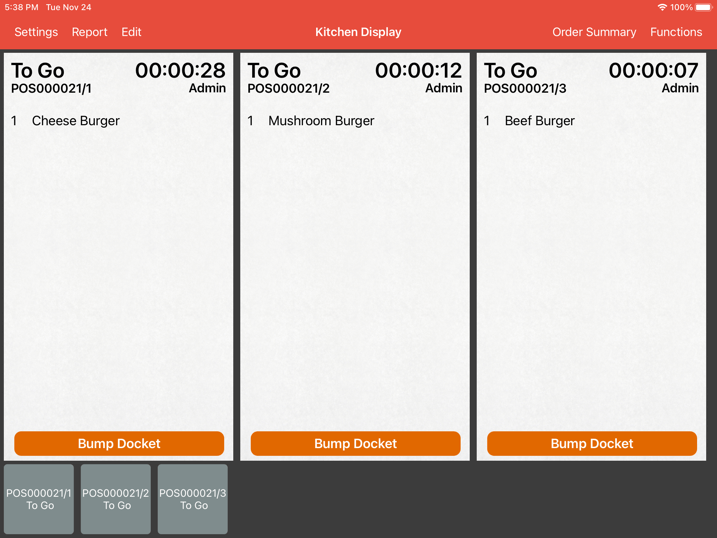
Go to POS and send an order to the kitchen. The KDS app will receive a docket. The timer on the docket will start as soon as the kitchen received the docket and this is when the chef will start preparing the food.
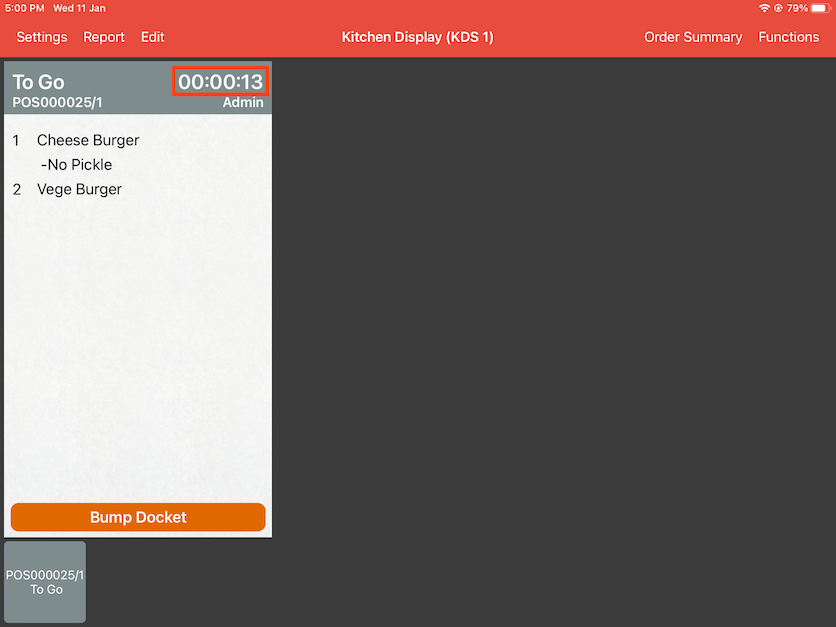
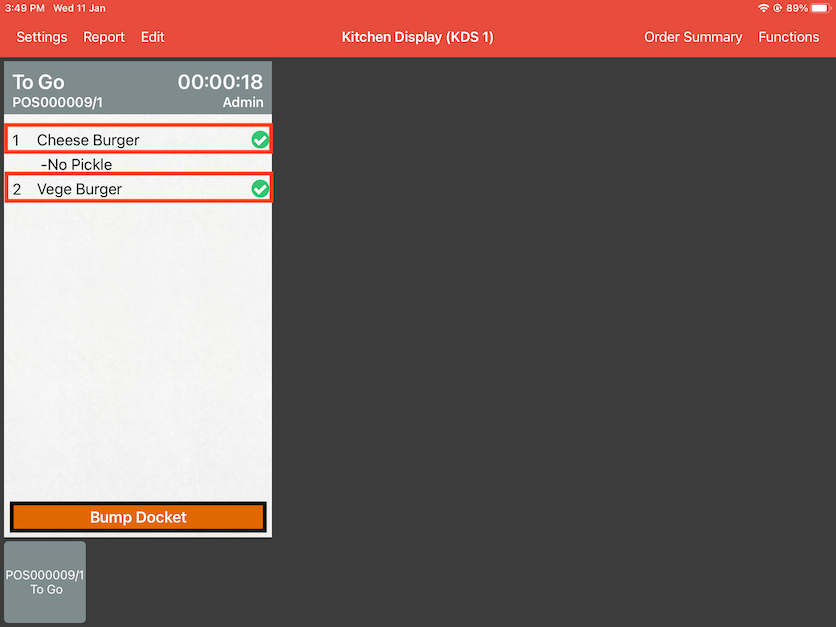
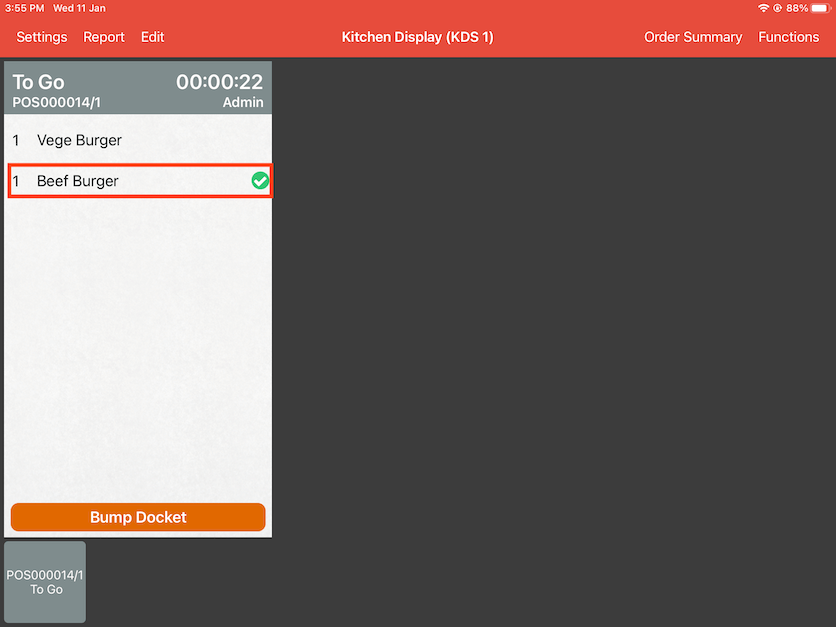
Once the chef is done preparing the food, they will click on the item to indicate the food is ready to be served. A green tick will also appear beside the item to let you know which item you have clicked on. The timer will go on until the docket is bumped. Click on Bump Docket to complete this docket.
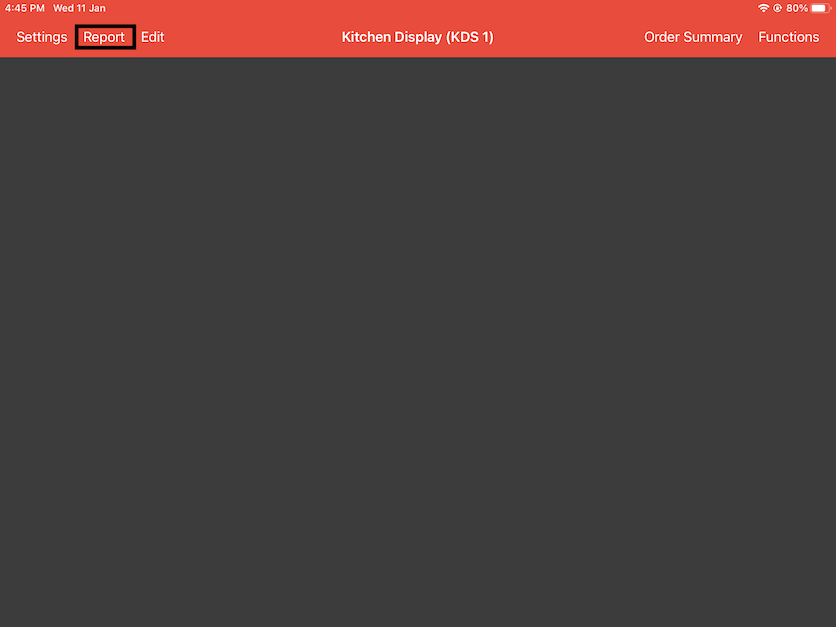
Now we will show you is the time for food preparation being recorded in Report. On the KDS app, click on Report on the top.
Select KDS Job Order then click on Generate Report.
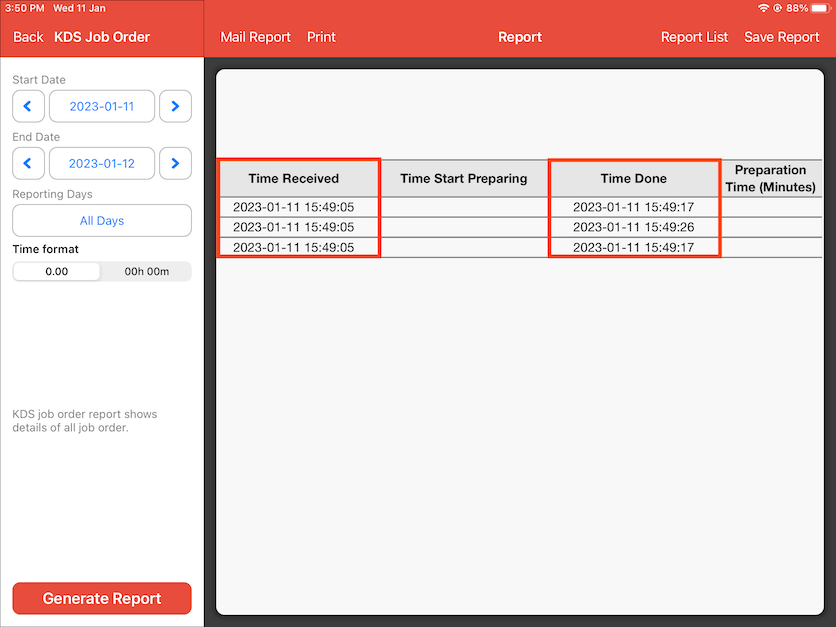
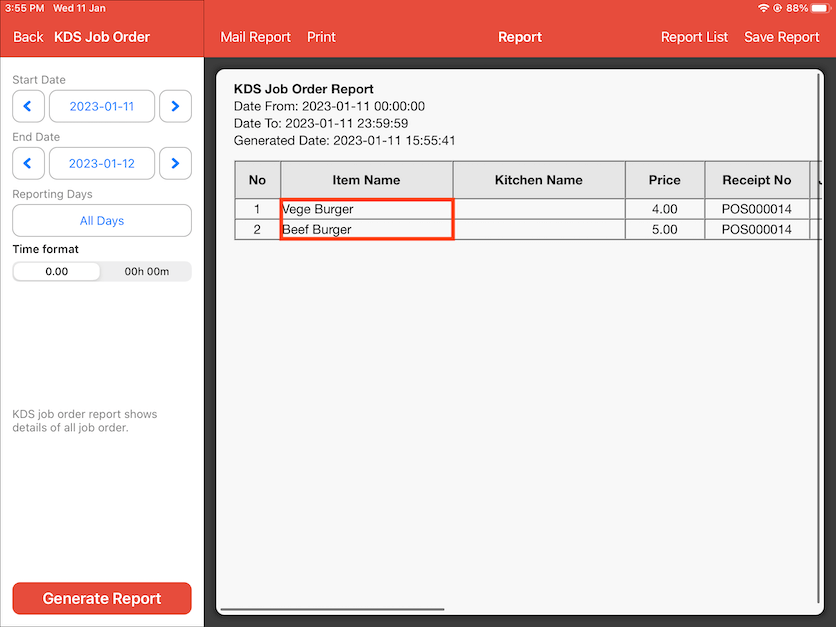
The KDS Order Report for today will be generated and it will show the items that were made by the kitchen. Scroll to the right to view the time preparation.
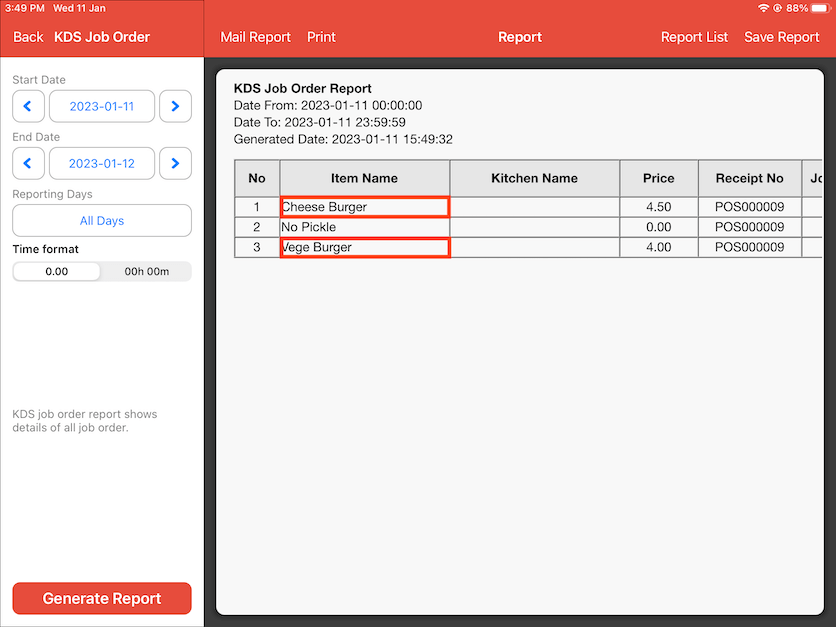
The time received and time done for these items have been recorded. However, time start preparing and preparation time (minutes) for individual items are not recorded.
If you have multiple items on the same docket, you will not be able to tell the time differences for all individual items if Order Preparation Time Mode is not enabled.
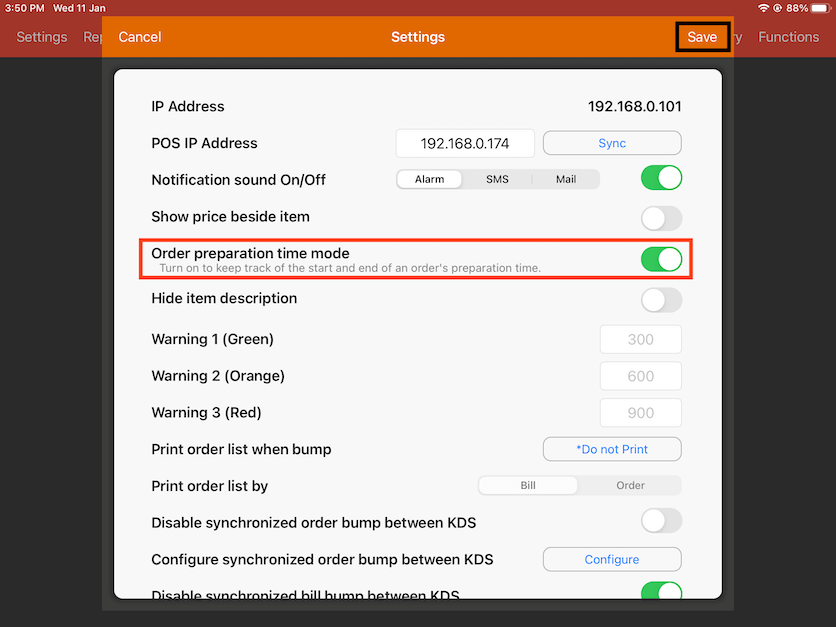
Go back to Settings on the KDS app and enable Order Preparation Time Mode then click Save after.
Go to POS and send an order to the kitchen again. The KDS app will receive a new docket and the kitchen will start preparing the food.
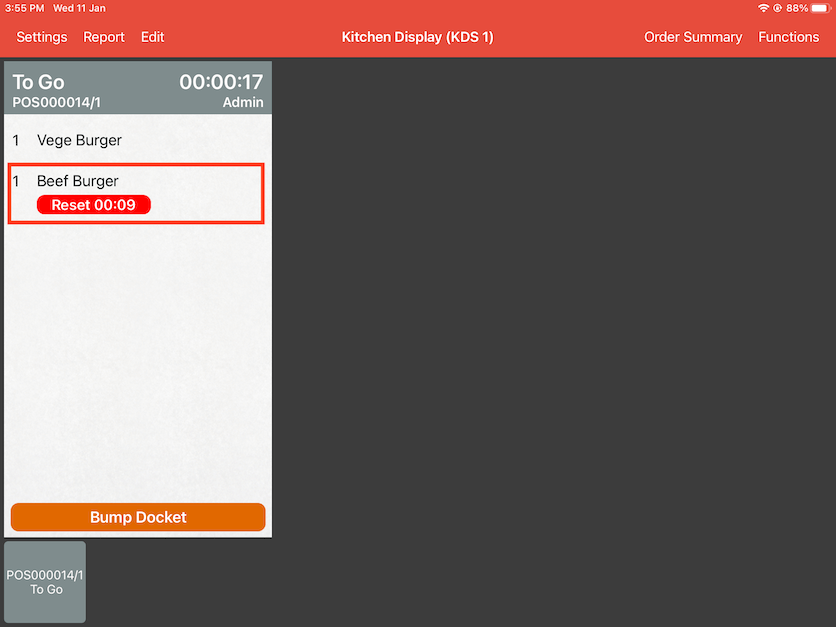
The chef will be making the Beef Burger first so they can click on the item and a red label with the timer will appear under. The timer will start recording the preparation time of the Beef Burger only.
You can also click on Reset to the reset the timer if you have not started making the Beef Burger.
Once you are done making the Beef Burger, click on Beef Burger and the green tick will appear to indicate preparation is done and the finishing preparation time will also be recorded.
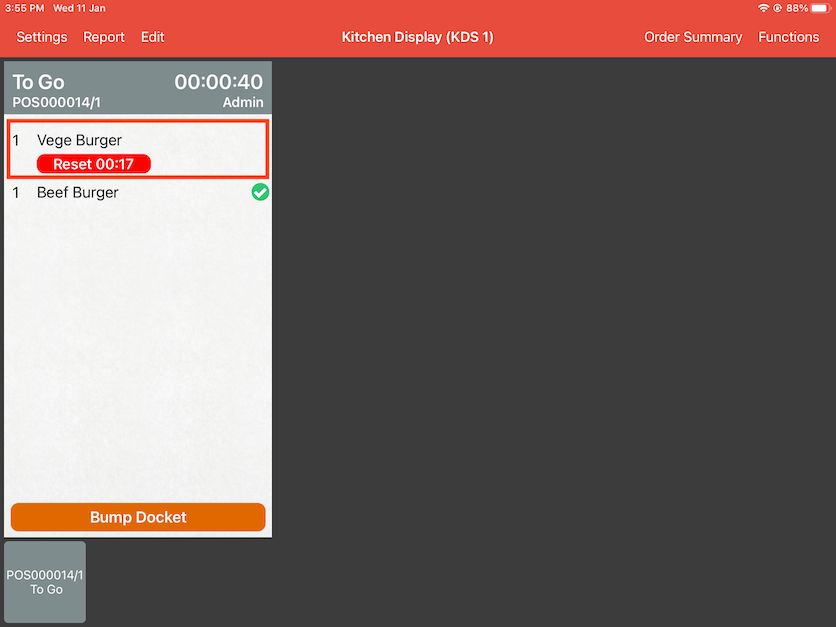
Proceed to click on Vege Burger to finish up the order.
Once you are done with this docket, click on Bump Docket to complete this order.

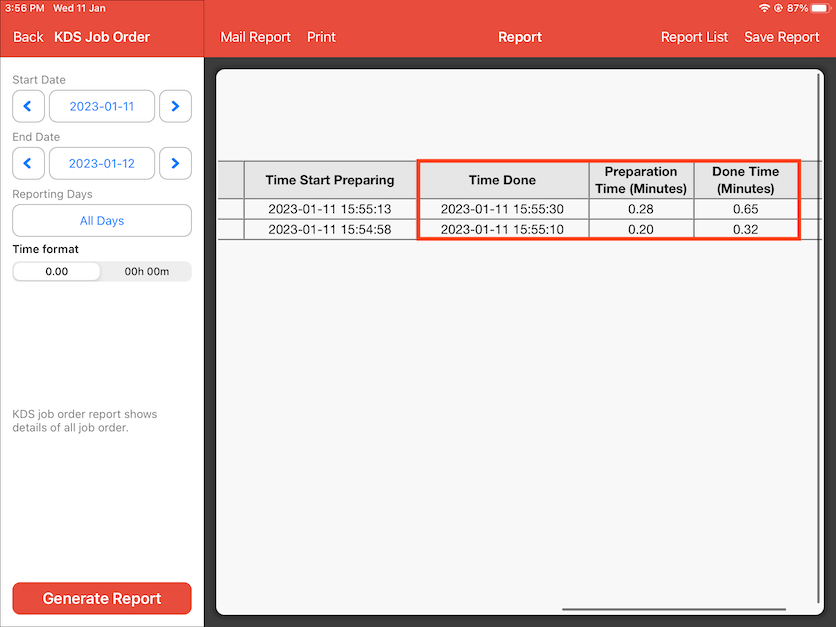
Select Settings in the KDS app again then generate a Job Order report. The report will show up. Scroll to the right to view the Time Start Preparing, Preparation Time and Done Time for the burgers.
Now it shows the Time Start Preparing, Preparation Time (Minutes) and Done Time (Minutes) for both individual burgers. These 3 settings will only be recorded if Order Time Preparation Mode is enabled.
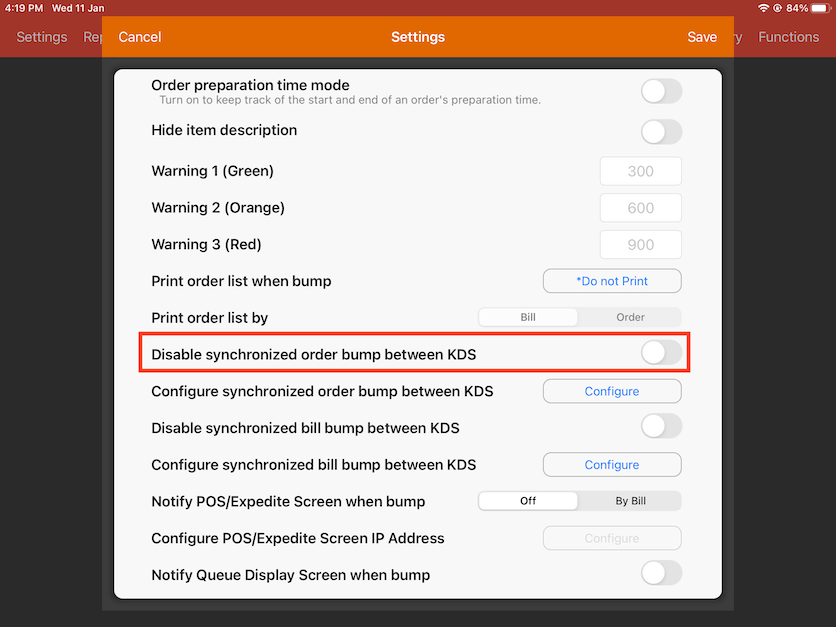
Disable Synchronized Order Bump Between KDS
You can click to toggle on this if you do not want to sync the order bumps between different KDS. However, we will show you how the order bump looks on the default settings first.
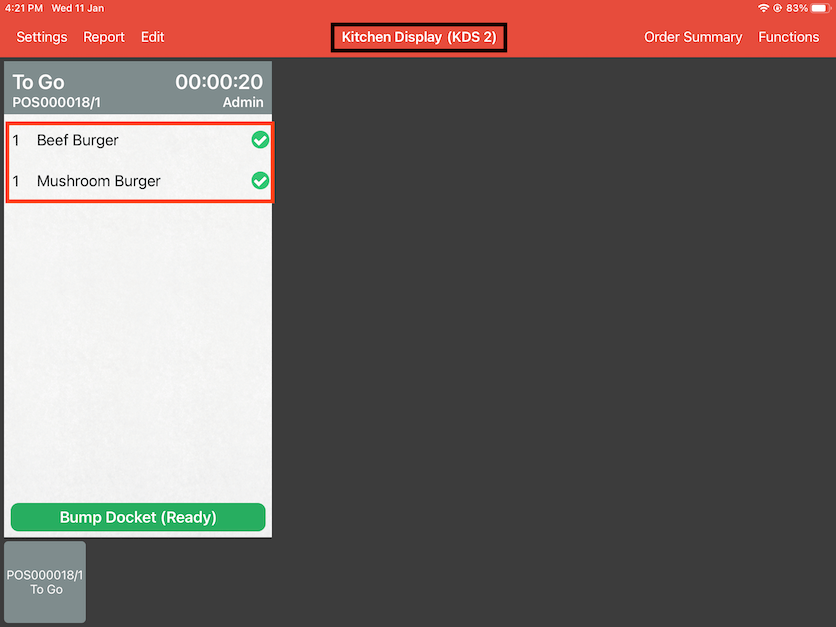
Go to POS and send an order to the kitchen. Depending on how many kitchen display iPads you have, all of the KDS app on the iPads should receive the same order. In this example, there are two kitchen displays - KDS 1 and KDS 2 and both KDS are used in different stations in the kitchen.
Now the chef in station 1 is done preparing the Vege Burger so he will click on the item in KDS 1 to indicate that preparation is done and the food is ready to be served. A green tick will show up beside the item.

Because order bumps between KDS are not disabled, a green tick will also show up beside the Vege Burger in KDS 2. Now the chef in station 2 knows that the preparation for Vege Burger is done by the other chef from station 1. This can be useful to avoid making any mistakes on the same order for both chefs in station 1 and 2.

However, if you do not want the order items to sync and bump for the KDS, continue reading below on how to disable this feature.
Go back to the KDS app on either iPads and select Settings. The settings tab will pop up. Click to toggle on Disable synchronized order bump between KDS then click Save after.
Some restaurants choose to disable this feature because they have a different kitchen operation system depending on their business.
For example, the kitchen has different preparation stations working on the same dish and they do not want to sync the order bump to avoid any confusion and mistakes between the stations.

Now send an order from the POS and the both KDS 1 and KDS 2 will receive the same order. Let's say KDS 2 is at the final station (station 2) so the chef will click on the burger to indicate that this burger is done.
Although the chef have ticked on the burgers in KDS 2, the green tick will not show up in KDS 1 (station 1) because we have disabled synchronized order bumps.
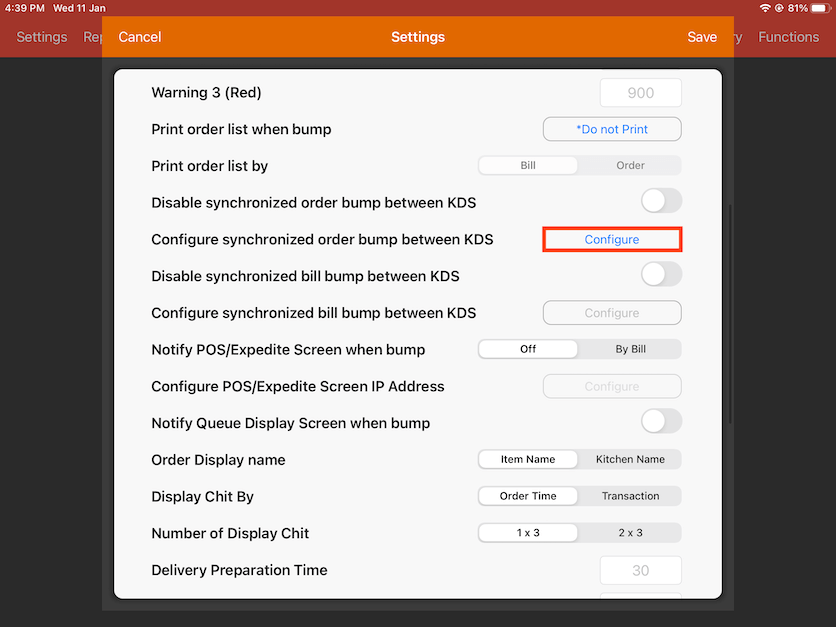
Configure synchronized order bump between KDS
Click on the Configure button and this allows you to disable or enable synchronized order bumps between specific KDS if you have multiple kitchen displays or expedite screens.
Note you cannot configure this if you have toggled on Disable synchronized order bump between KDS.
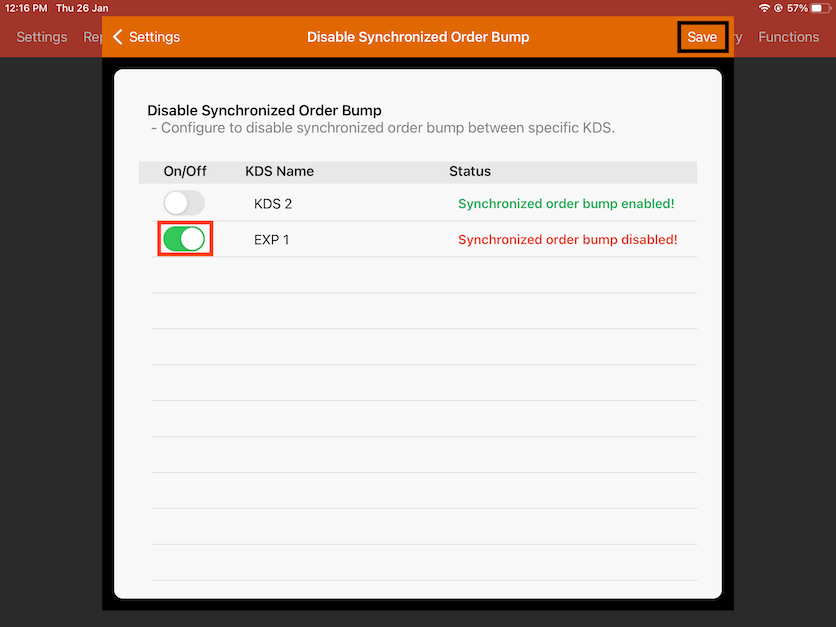
Here it shows the different KDS options you have. The current settings shown in this example is in KDS 1.
KDS 1 and KDS 2 (another iPad) are both kitchen displays, thus synchronized order bump is enabled. However, EXP 1 is an expedite screen which is not for kitchen use so we want to disable synchronized order bump for this. Click to toggle off EXP 1 in KDS 1 then click Save to finalise the changes. Make sure to disable EXP 1 in KDS 2 as well.
Now send an order from the POS. KDS 1(current iPad), KDS 2 and EXP 1 will receive the same order. In this example, the chef in station 1 has finished preparing the burgers. Click to the tick the items to indicate the preparation is done.
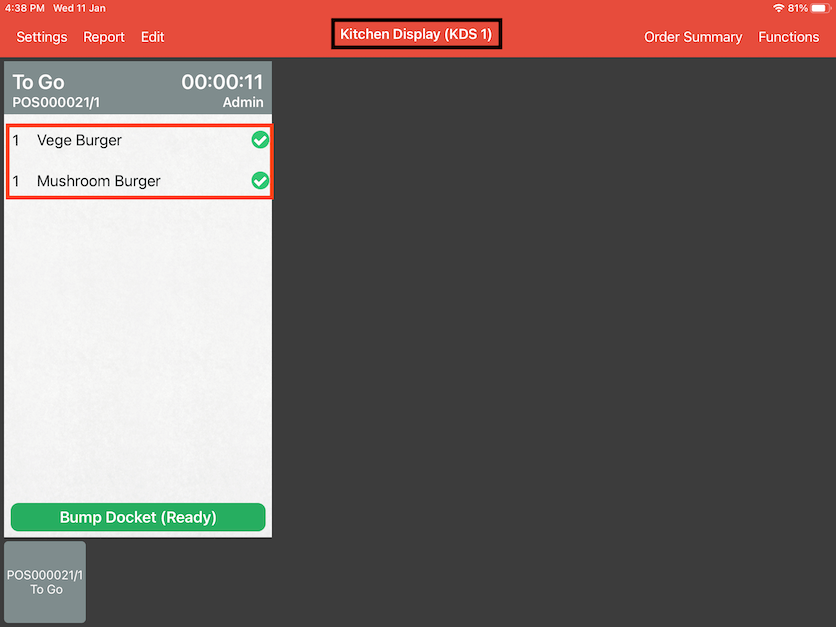
Because both KDS 1 and KDS 2 have synchronized order bump enabled, KDS 2 will also receive the green ticks from KDS 1 when the chef ticked the items.

But we have disabled synchronized order bump for EXP 1 so this expedite screen will not receive a green tick on the items at all.
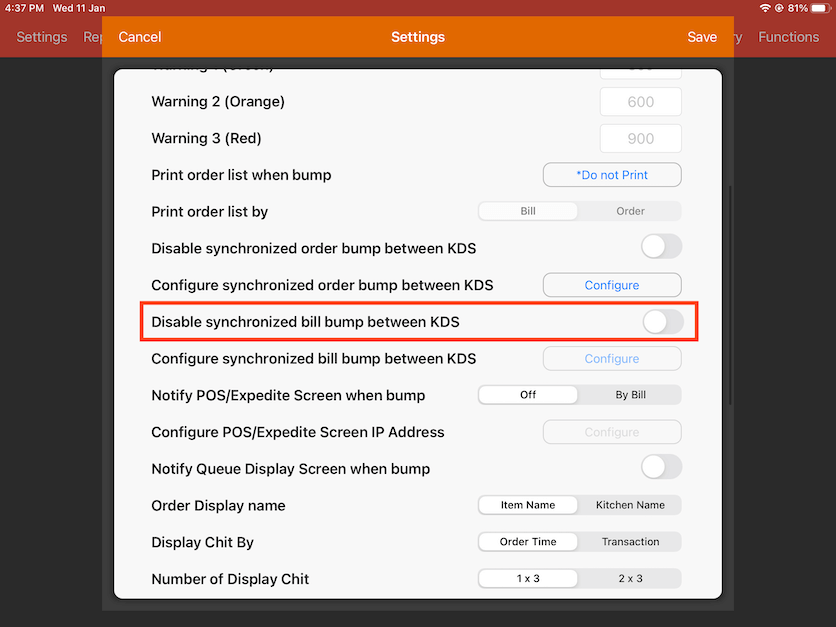
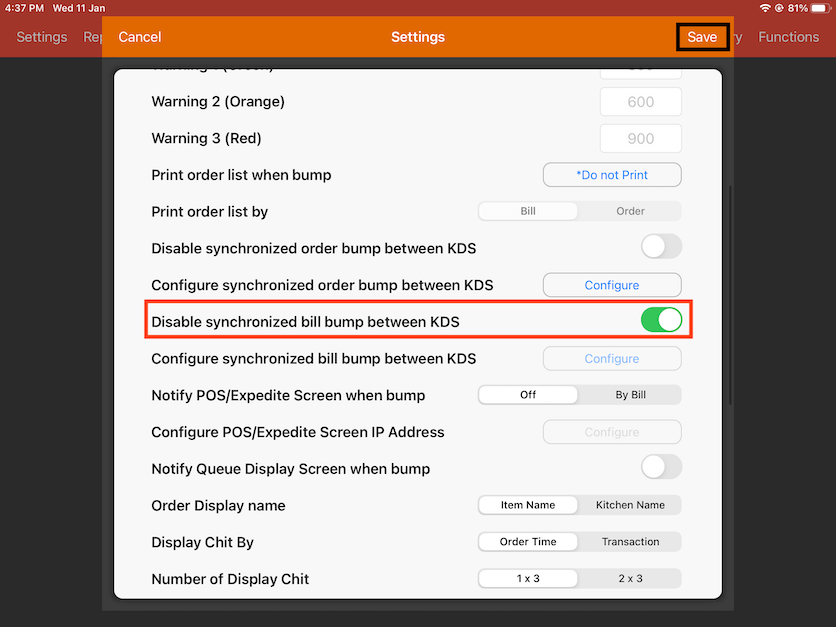
Disable synchronized bill bump between KDS
You can click to toggle on this if you do not want to sync the bill bumps between different KDS. However, we will show you how the bill bump looks on the default settings first.
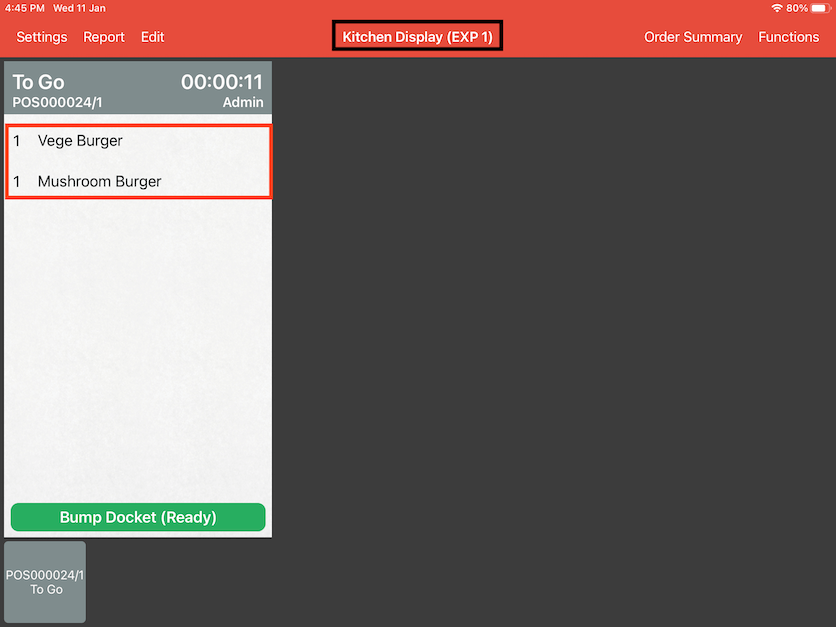
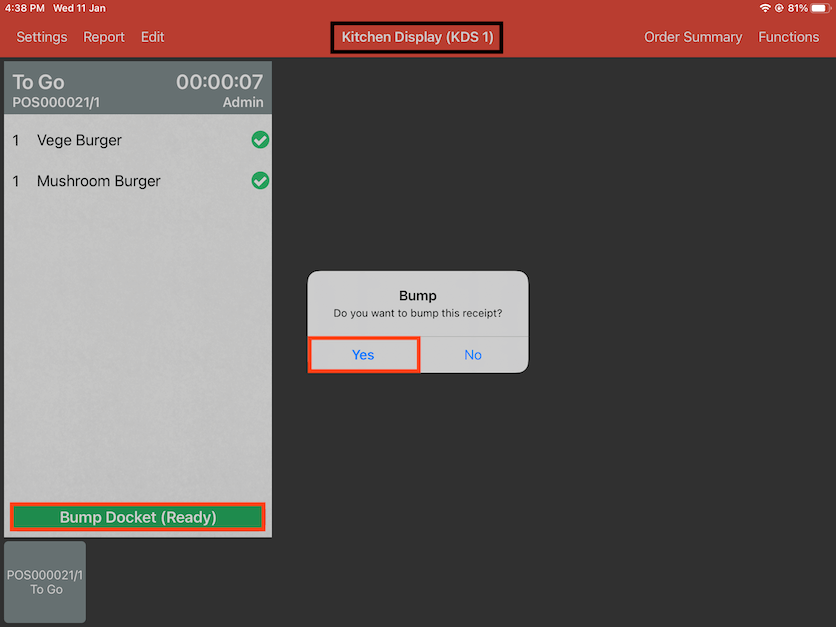
Go to POS and send an order to the kitchen. Depending on how many kitchen display iPads you have, all of the KDS app on the iPads should receive the same order. In this example, there is only one kitchen displays (KDS 1) and one expedite screen display (EXP 1).
Now the chef is done preparing this order so he will click on Bump Docket (Ready) to complete this order. A pop up will appear asking for confirmation if you want to bump this receipt. Click Yes to continue.

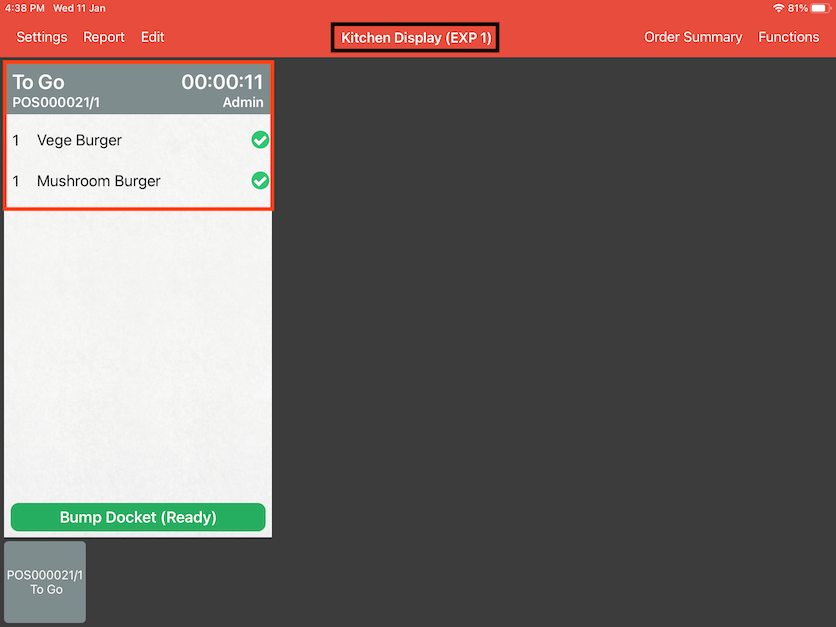
Since the bill in KDS 1 has been bumped, the same bill in EXP 1 will also be bumped. Thus, the bill will not show up here anto indicate the order has been completed.
But if you do not want this feature, continue reading below on how to disable this. This can be useful for the waiter's reference to know if they have served all the foods for that order. Once all the foods are served, the waiter can bump the docket themselves to indicate that the order is completed.
Click to toggle on Disable synchronized bill bump between KDS then click Save after.
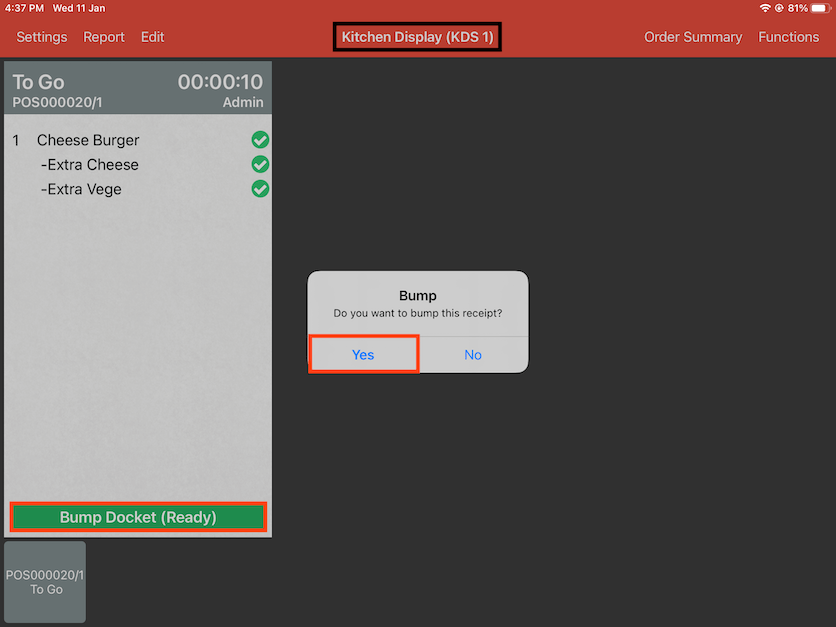
Go to POS and send an order to the kitchen again. KDS 1 will receive the order. Click on Bump Docket (Ready) to complete the order after the food preparation is done. A pop up will show up. Click Yes to confirm.
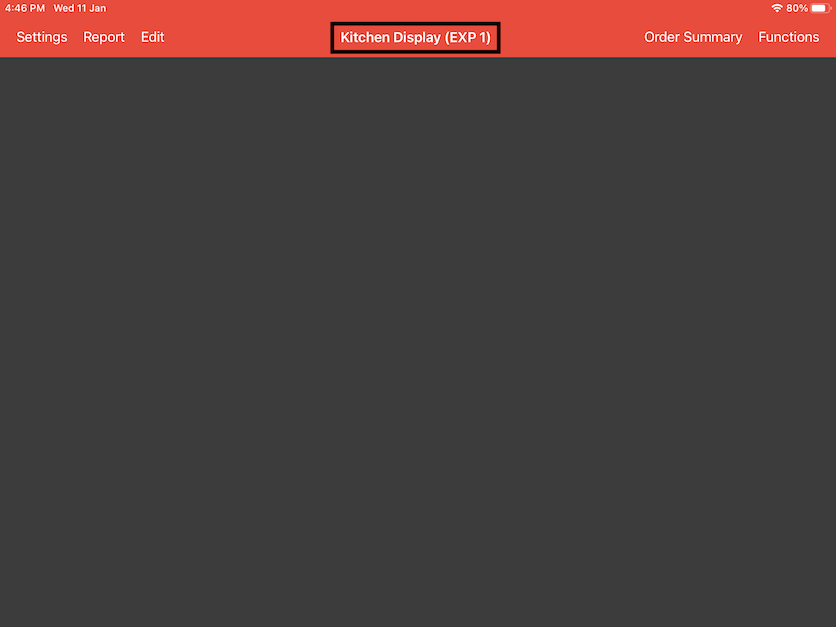
Because synchronized bill bump has been disabled, the order in EXP 1 is not bumped and will remain.
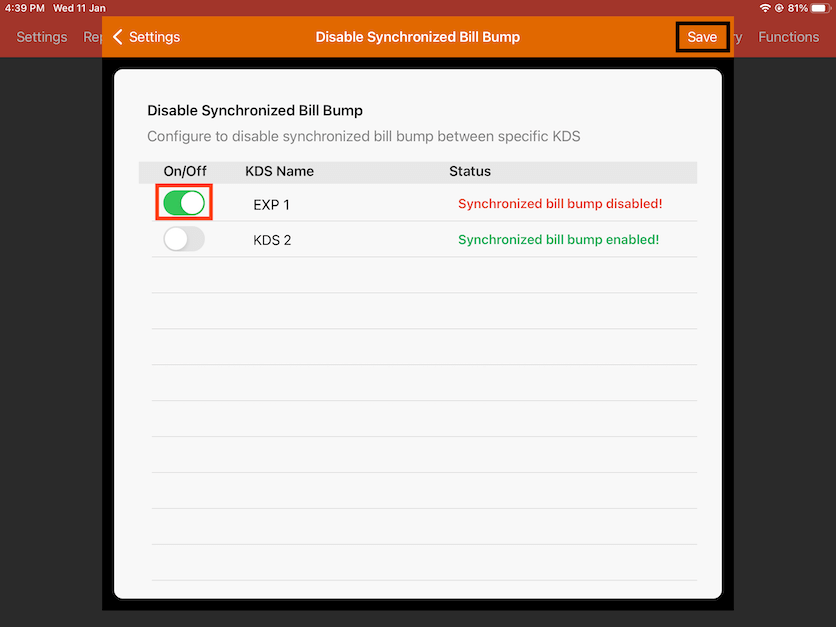
Configure synchronized bill bump between KDS
Click on the Configure button and this allows you to disable or enable synchronized bill bumps between specific KDS if you have multiple kitchen displays or expedite screens. Note you cannot configure this if you have toggled on Disable synchronized bill bump between KDS.

Here it shows the different KDS options you have. The current settings shown in this example is in KDS 1. We only want to have synchronized bill bump between KDS 1 and KDS 2 in this case because EXP 1 is not for kitchen use.
Click to toggle on EXP 1 in KDS 1 (current iPad) to disable synchronized bill bump then click Save after. Make sure to disable EXP 1 in KDS 2 as well.
Now send an order from the POS. KDS 1(current iPad), KDS 2 and EXP 1 will receive the same order. Click on Bump Docket (Ready) when the order is completed then click Yes to confirm.
Because both KDS 1 and KDS 2 have synchronized bill bump enabled, the same bill in KDS 2 will also be bumped. But we have disabled synchronized order bump for EXP 1 so the same bill will remain and will not be bumped.

Notify POS/Expedite Screen when bump
This option will set the kitchen display to notify configured POS/expedite screen when all orders of a bill are bumped.
If the IP address is configured to the main POS, whenever an order is bumped from this KDS, a notification will be sent to the main pos letting cashier know the order is completed.
Similarly there can be another iPad with kitchen display installed to receive notification for any KDS whenever an order is bumped.
POS/Expedite Screen IP Address
Insert the IP address of the device to send to if the previous option is turned on.
Order Display name
Orders can be displayed by “Item Name” or “Kitchen Name”.
“Item Name” and “Kitchen Name” can be edited under the main POS “Settings” -> "Add Item/Combo".
Display Chit by
Adjust display chit by time or transaction.
Selecting “Order Time” will arrange chits in the KDS by the order of when it is received.
Selecting “Transaction” will group the chits with the same transaction together.
Below is a Screenshot of KDS Settings Part 2.

Number of Display Chit
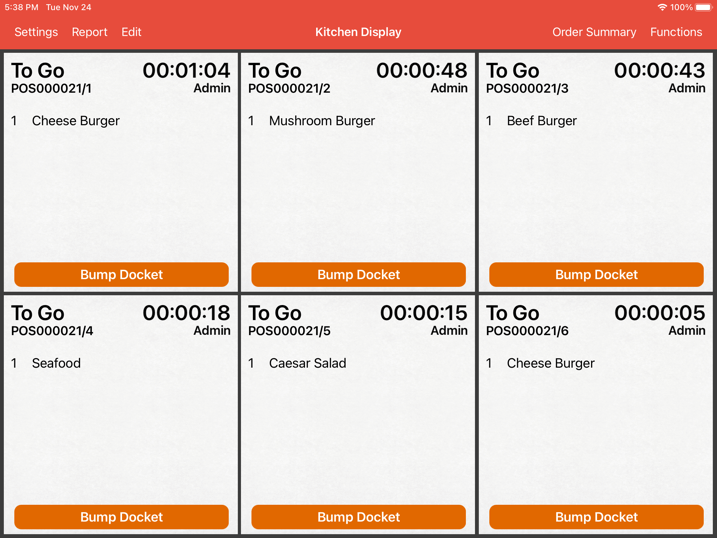
Adjust the maximum number of display chits on KDS screen.
Type 1 x 3
Type 2 x 3
Delivery Preparation Time
Whenever there is a pre-order at a later date, the delivery preparation time will be added before the delivery time to accommodate preparations.
Collection Preparation Time
Whenever there is a pre-order at a later date, the collection preparation time will be added before the collection time to accommodate the preparations.
Font Size
Adjust the font size and bold.
Modifier Font Color
Enables users to change font color.
App’s Language
Adjust the language of the app.
Bump All Order
This button will automatically bump all orders in this KDS.
Delete All Order
This button will erase all orders from this KDS.
All existing reports will be erased as well.
Delete Synced Database
This button will erase all theme, color, synced POS, and printer data.
Feedback or Bug Report
We would appreciate any feedback to improve our customer’s experience, contact us via this button.