Guide | MobiPOS > Online Reward/Loyalty > General Settings
Online Reward/Loyalty
Online reward/loyalty programs allow customers to join or register as members to collect and redeem rewards.
To configure Online Reward/Loyalty, follow the following steps.
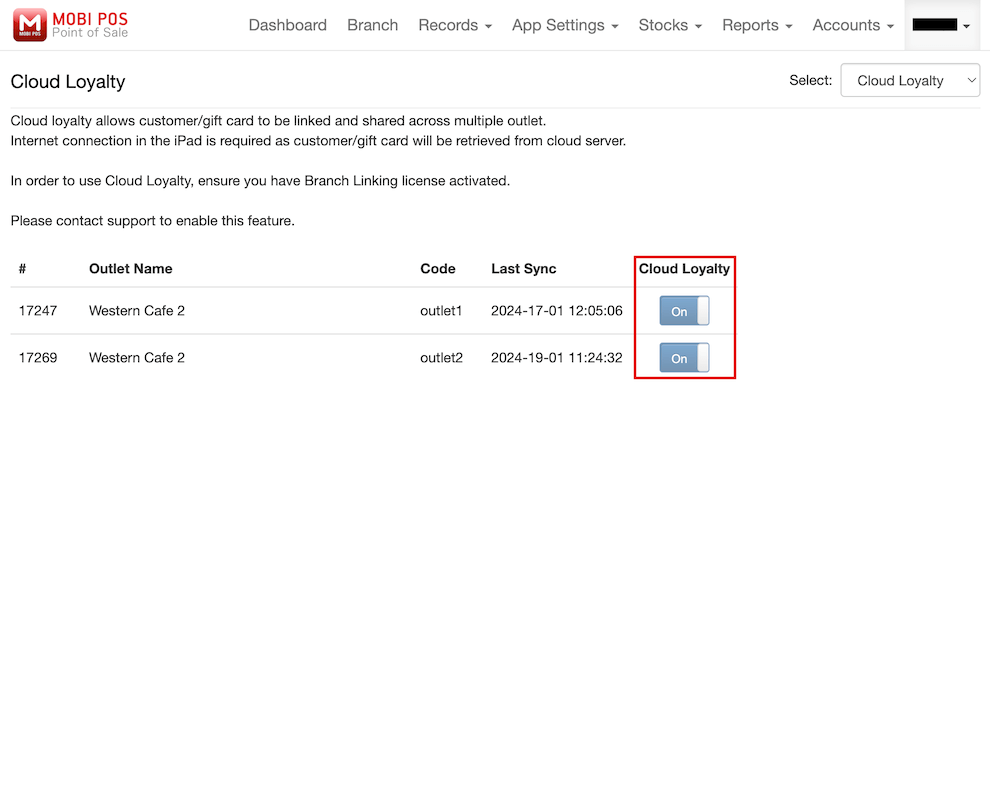
To access the Online Reward/Loyalty, you must have Cloud Loyalty enabled.
You can verify the status by visiting the Cloud Loyalty/Custody.
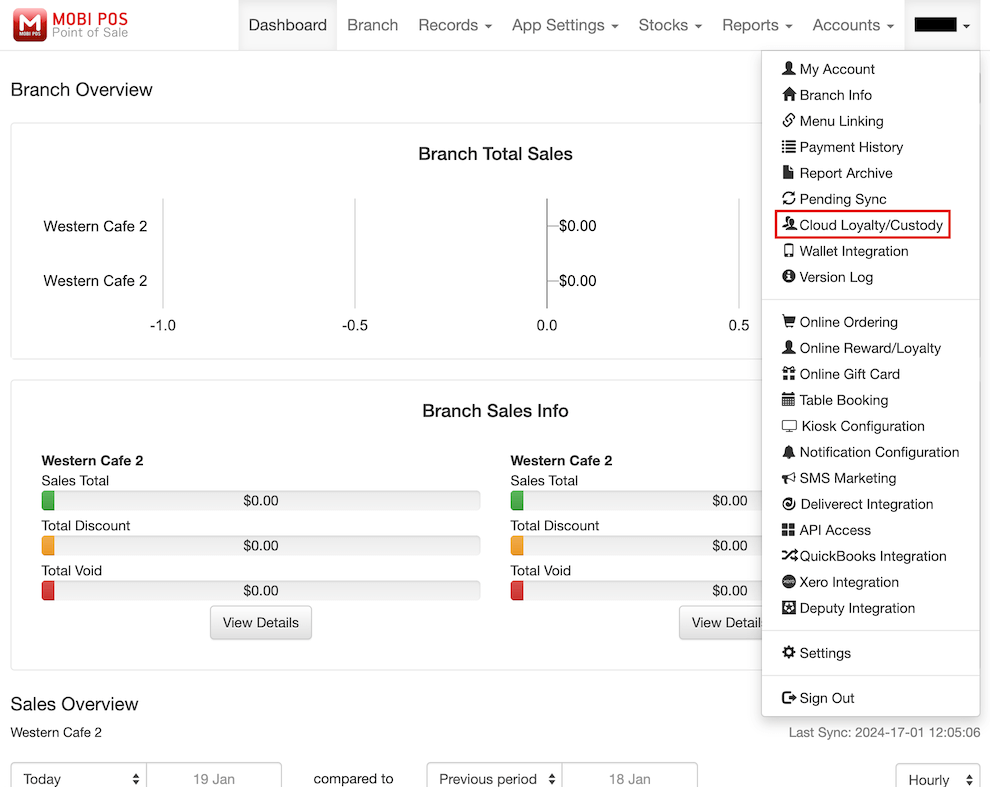
Check Cloud Loyalty Status
First, proceed to MobiPOS CloudSync and log in to your account.
Then, click on your username at the top right corner and select Cloud Loyalty/Custody from the drop-down list.
If it's not enabled, kindly reach out to our support team for assistance in enabling it.
Configure Online Reward/Loyalty
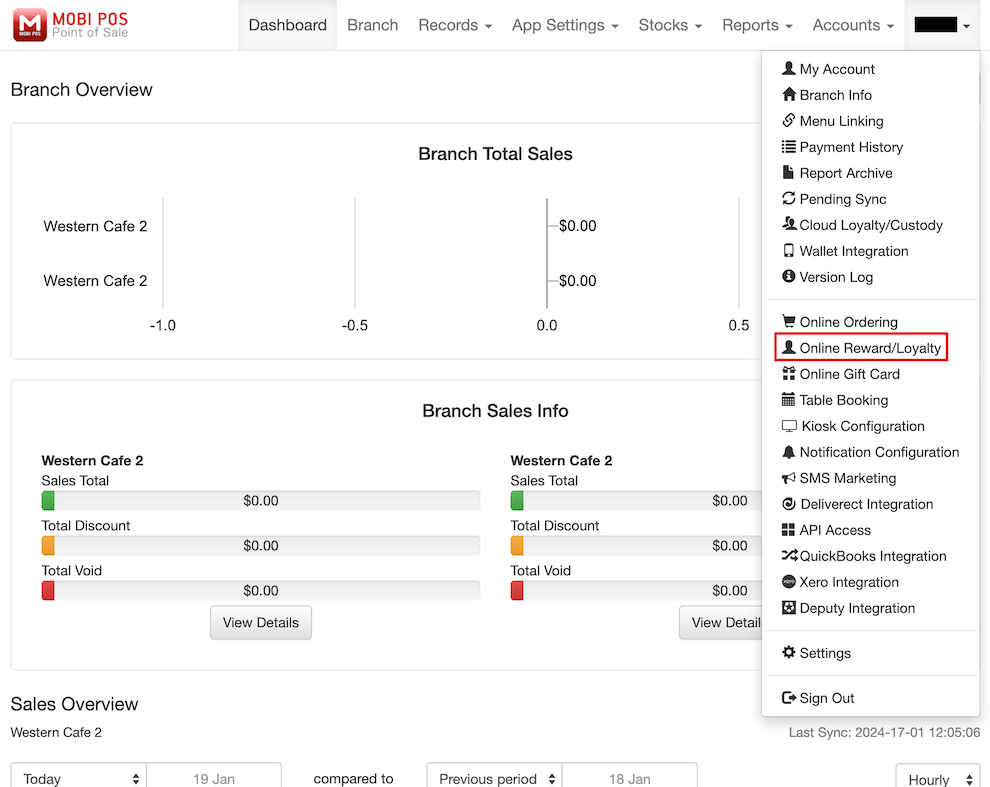
After enabled Cloud Loyalty, click on your username at the top right corner and select Online Reward/Loyalty from the drop-down list.
First, enable Reward/Loyalty to use this functionality.

Proceed by entering your Reward Name, Reward URL, and Email.
Reward Name: The title of your membership program.
Reward URL: The specific web address for your restaurant's rewards.
Email: The contact address for customer inquiries.

By configuring the information above and clicking Save, you should now have access to your restaurant's rewards URL.
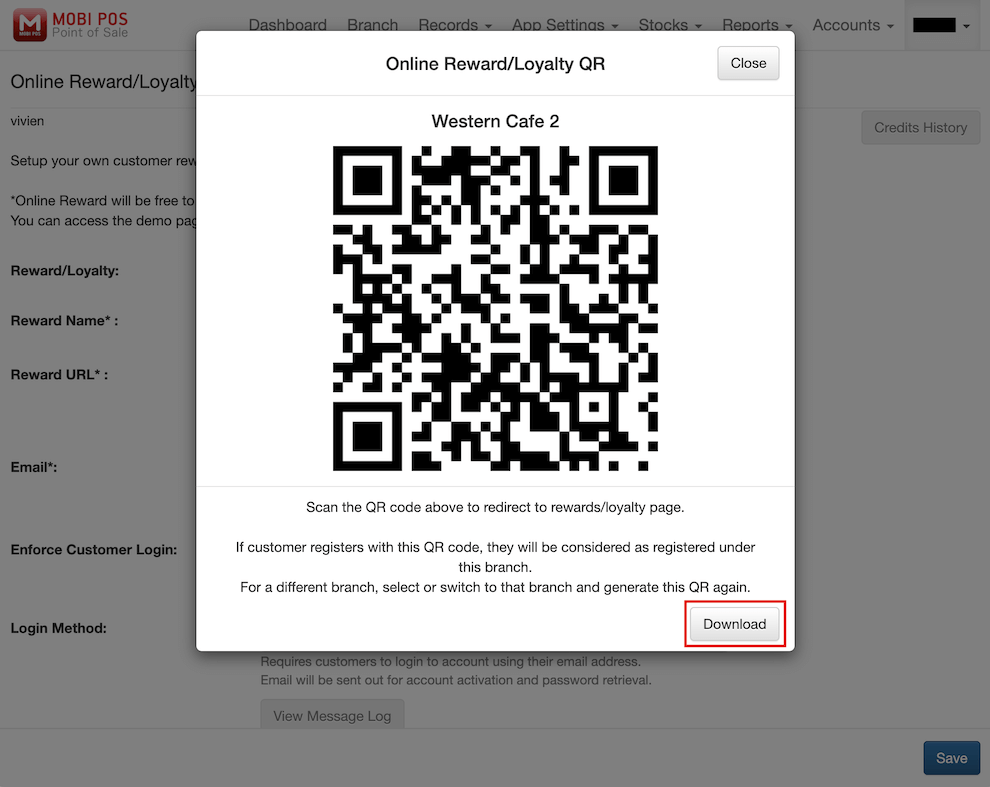
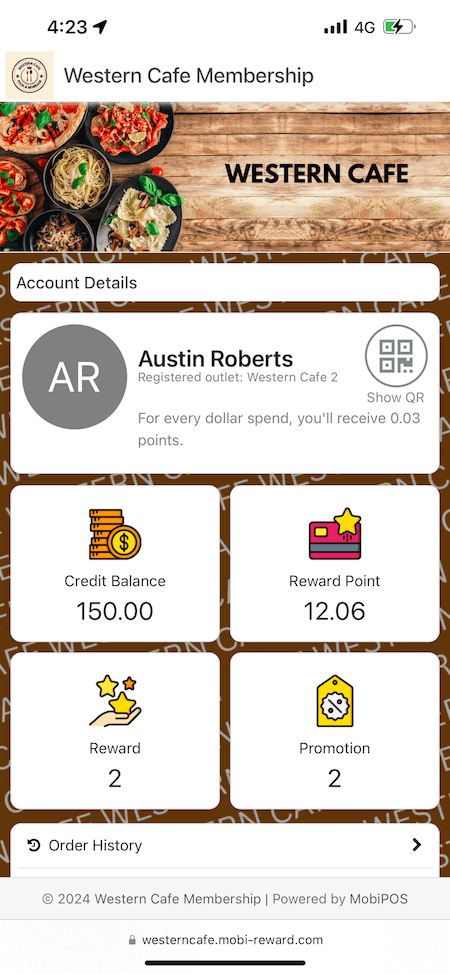
For customers to access your restaurant's rewards page, click on View QR to obtain the QR code.

Subsequently, click on Download to save the QR code, which can be printed for customers to scan and access the rewards page. If you have multiple branches, select and switch to the respective branch to generate the QR code.
Now, you can configure how you want the online rewards system to function.
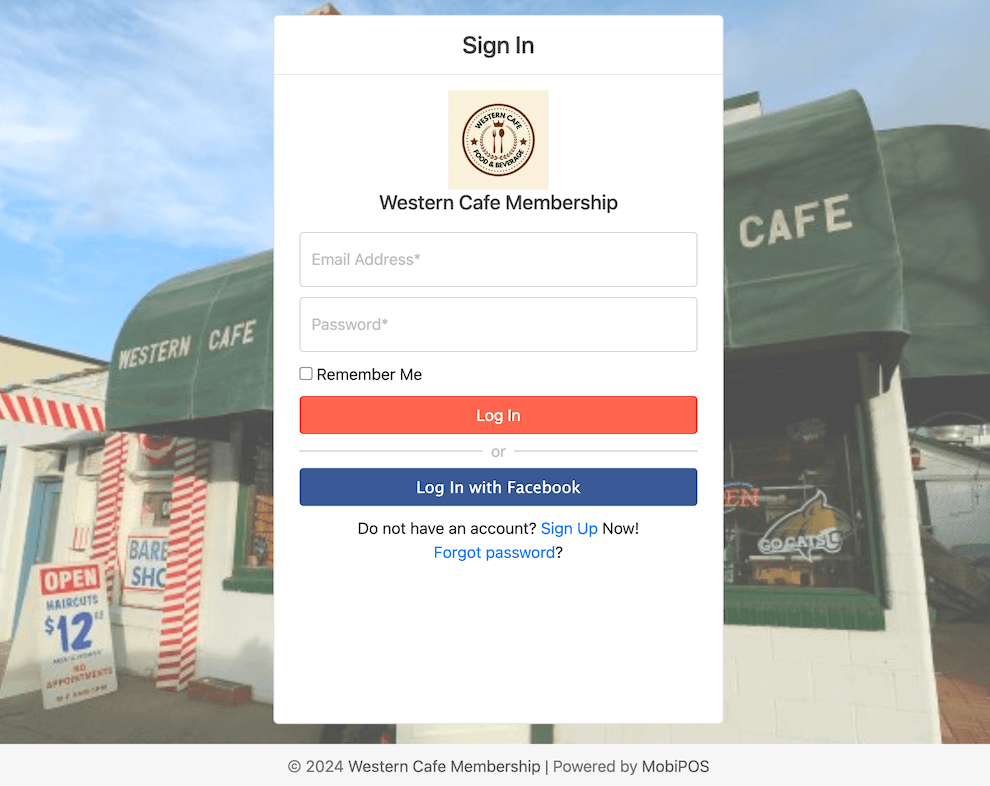
Enforce Customer Login
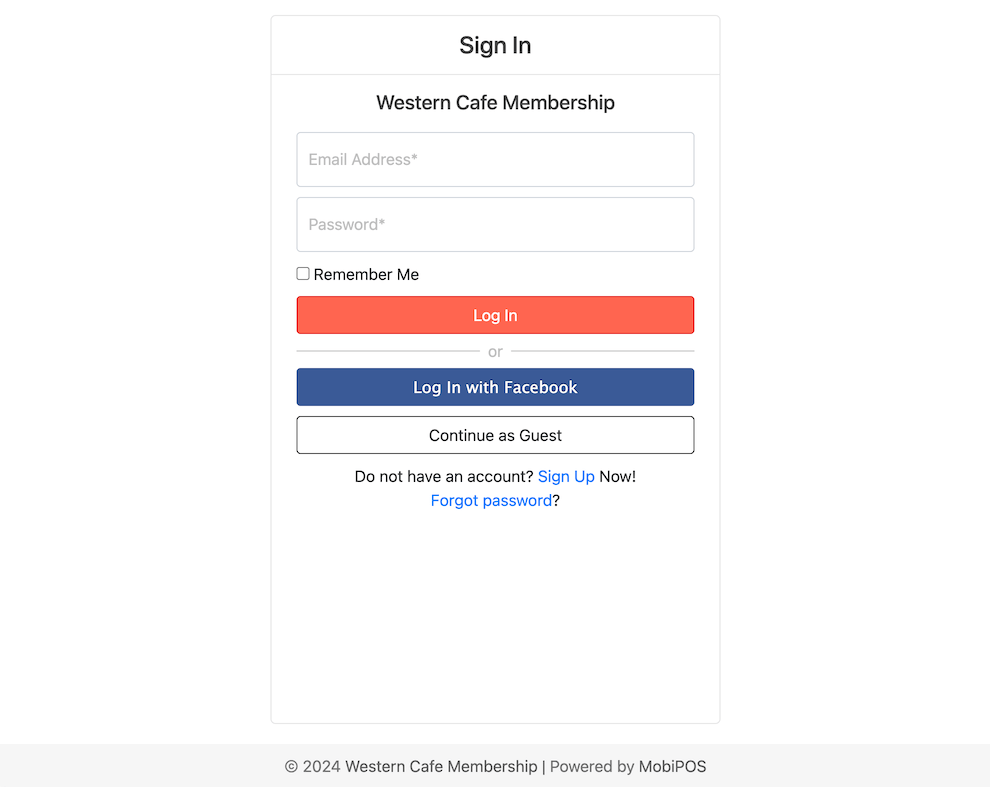
Activate Enforce Customer Login if you prefer customers not to access rewards as guests (no login required).
The example below shows the rewards page without enforcing customer login.
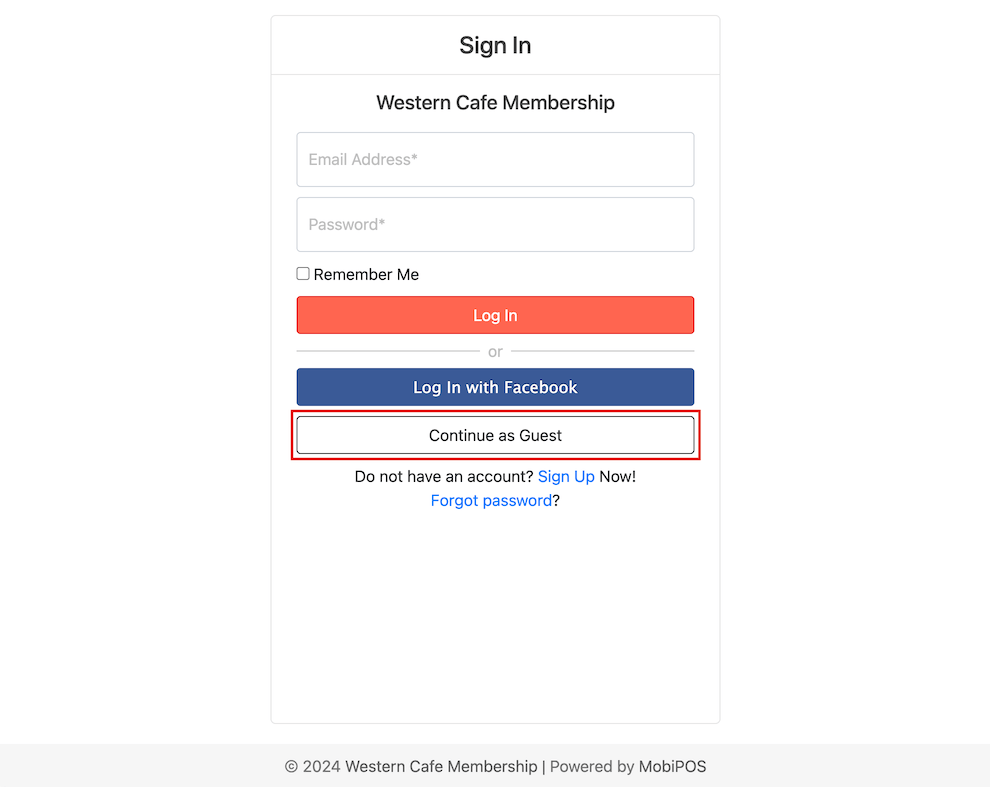
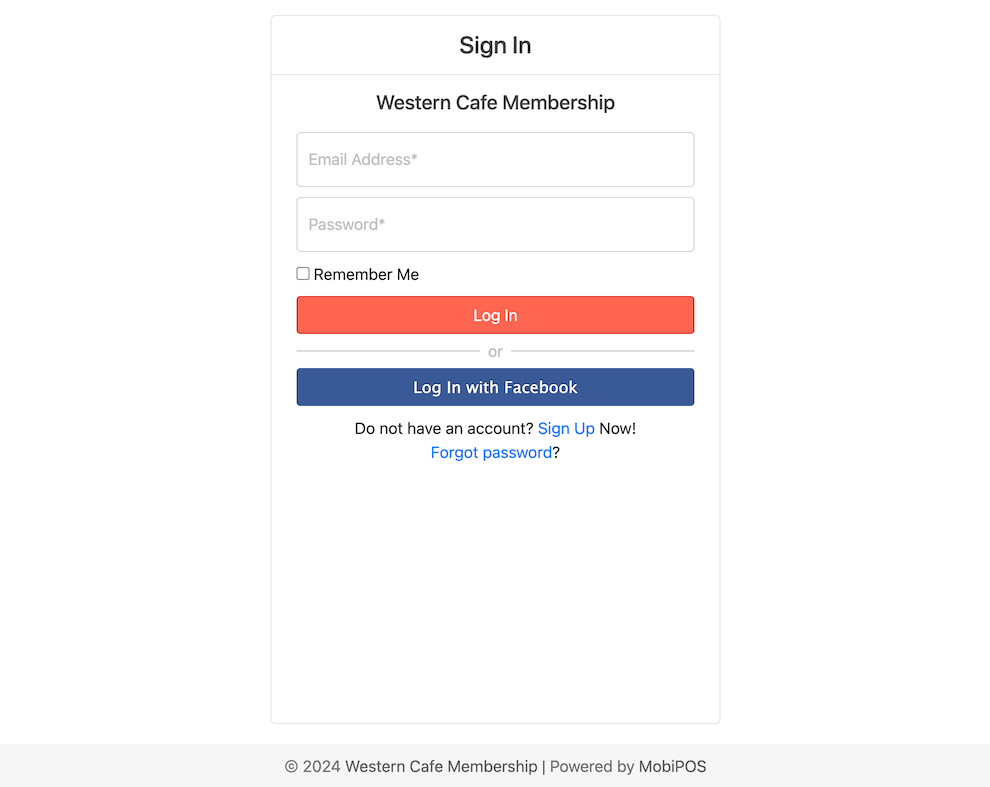
If you enable Enforce Customer Login, the option to log in as a guest will be disabled.
Login Method
You can also set the login method for your restaurant's rewards page, either by email, phone, or by letting them choose one from both options.
Typically, we recommend using email as the login method.
However, for increased security and to deter the creation of multiple accounts, you may opt for phone verification.
While both email and phone methods will ask for account verification, using the phone method is more secure and less susceptible to users creating multiple accounts.
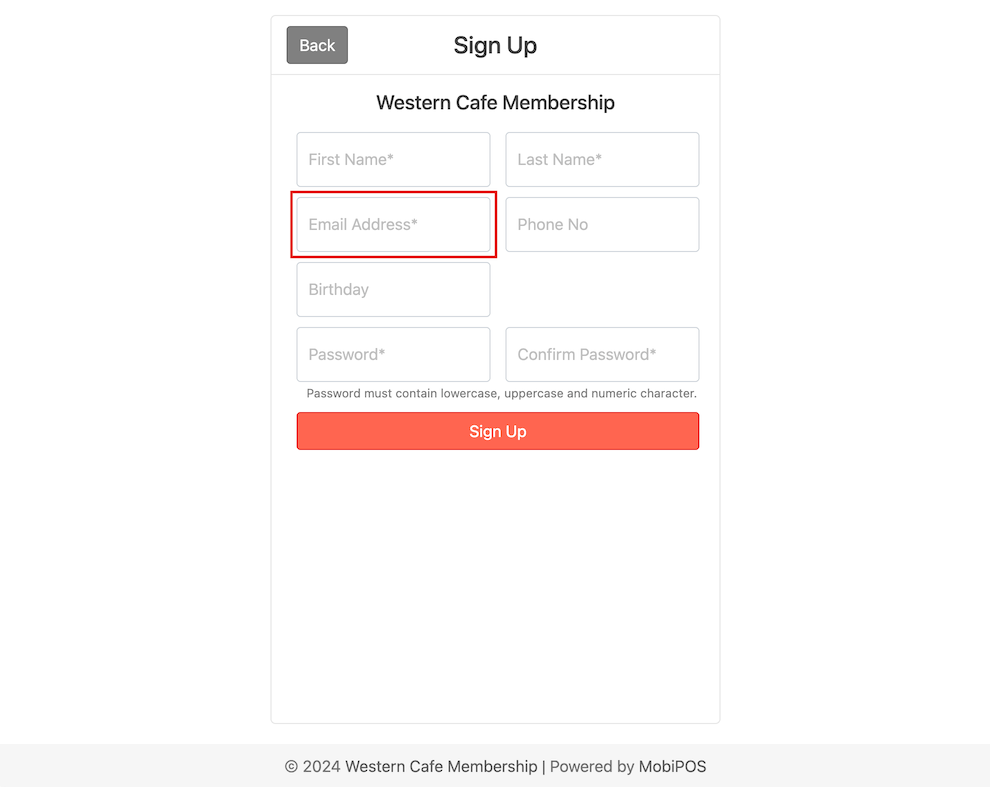
In this example, we will enforce login through email only.

When using email for login, customers are required to provide their email address to sign up as a member.
Fields marked with an asterisk (*) indicate required information that customers need to fill in.
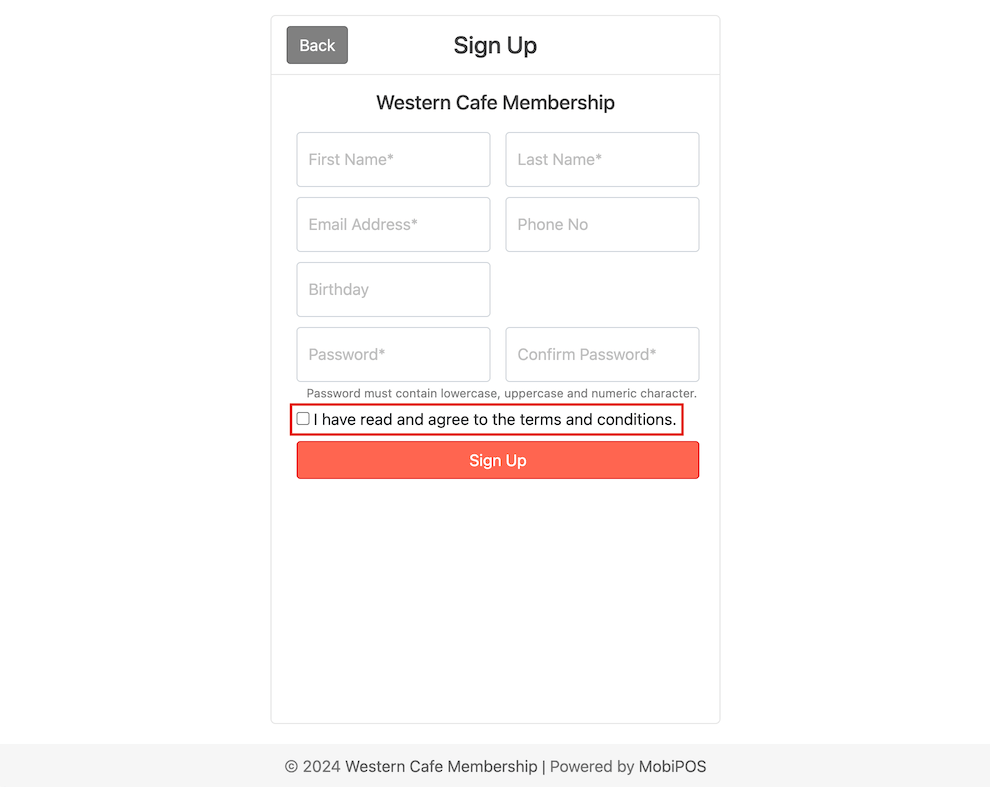
Enforce Sign Up Confirmation
For sign-up confirmation, if enabled, customers are required to agree to the terms and conditions before they can successfully register as members.
This ensures that they have read and acknowledged the terms and conditions associated with joining as members to receive rewards.

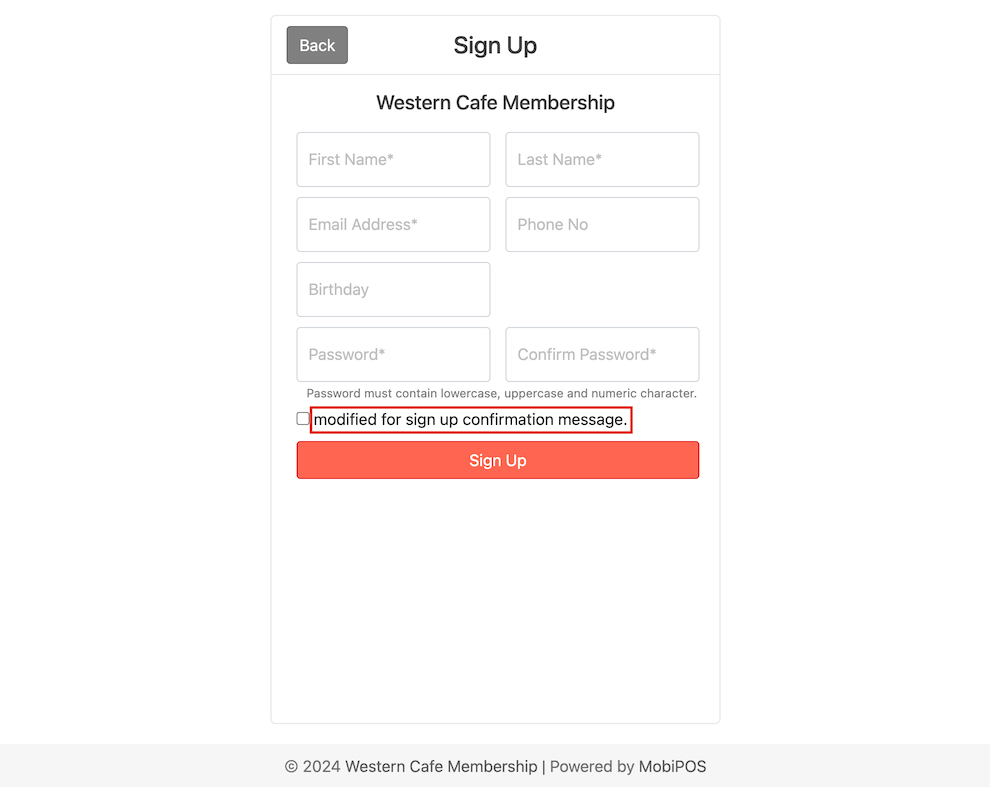
Sign Up Confirmation Message
You can customise the message to be displayed in this section for your terms and conditions.
The confirmation message will default to 'I have read and agree to the terms and conditions' if you do not customise it.
HTML tags are supported in this section, allowing you to design the message with formatting options such as making it bold, italic, etc.

Compulsory Registration Branch
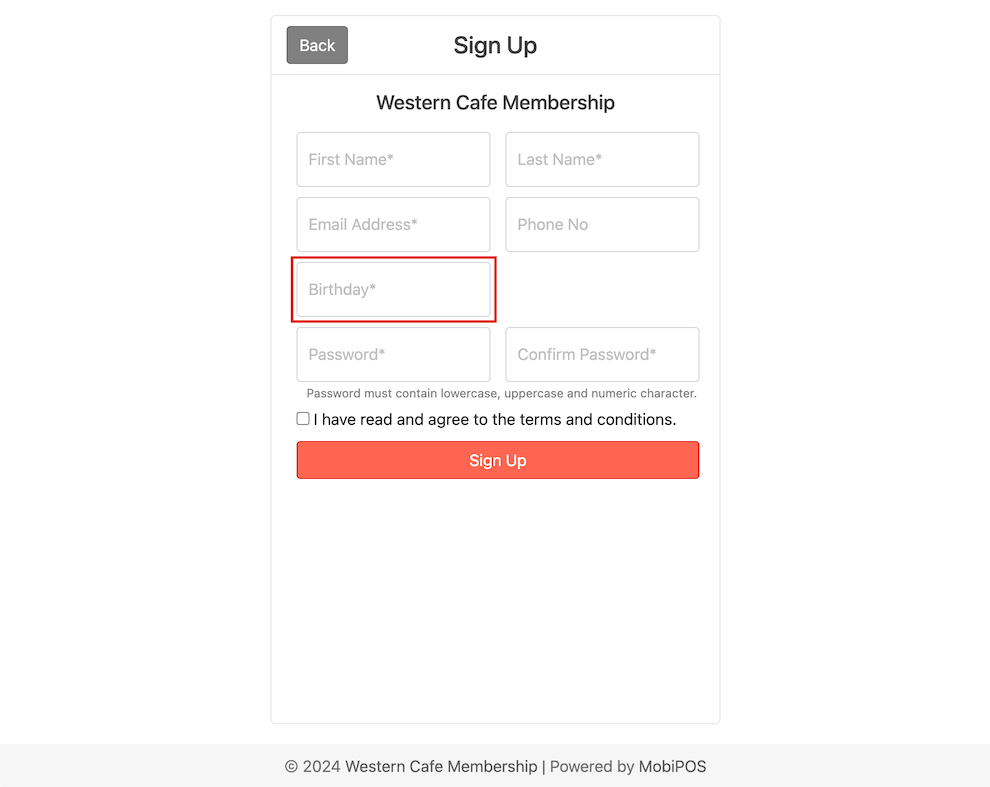
Next, configure the fields you want customers to provide when they sign up as members.
For example, you can enable the Birthday option, requiring customers to provide their birth date during the sign-up process.

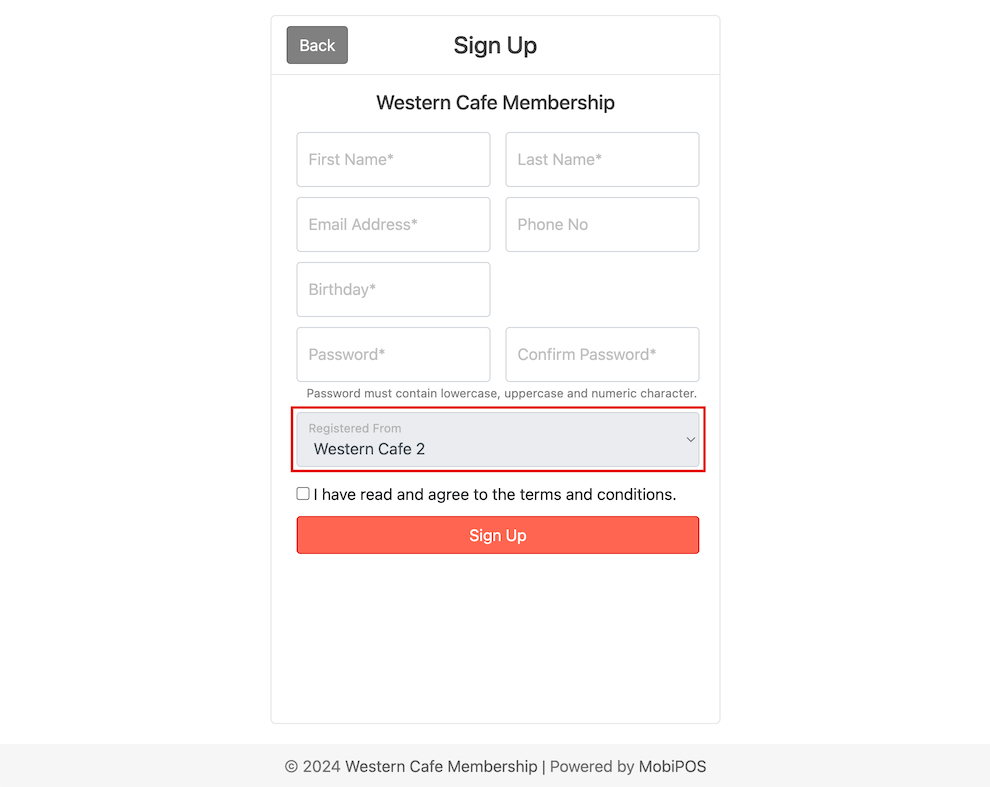
Display Registration Branch
If your restaurant has multiple branches, you can enable the Display Registration Branch option.
As explained in the general settings above, each branch will possess a unique QR code for customers to register as members.
Upon enabling this feature, the system will automatically identify the branch from which the customer joined as a member.
In cases where the system fails to auto-detect the registering branch, customers can manually select the branch from the drop-down list.
This functionality enables you to track and monitor the number of members registered at each branch.

Member Expiry Date
You can also set the expiry date for the membership program.
There are three options for the expiry date: no expiry, number of months, or a specific date.

Scenario 1: No Expiry
If you select No Expiry, the customer's membership will remain valid indefinitely, making it a lifetime membership.
Scenario 2: Number of Months
If you select No Expiry, the customer's membership will remain valid indefinitely, making it a lifetime membership.
Scenario 3: Specific Date
This option is ideal for special events or promotions.
You can set a specific date on which all customer memberships under this program will expire.
In this example, we will set the expiry date for this membership program as the 31st of March 2024.
This means that regardless of when customers sign up, their membership will only last until the 31st of March 2024 without a fixed duration.
Next, you can also design how you want the rewards page to look.
Rewards Website Customisation
You can upload images in the formats of .png, .jpeg, .bmp, or etc.
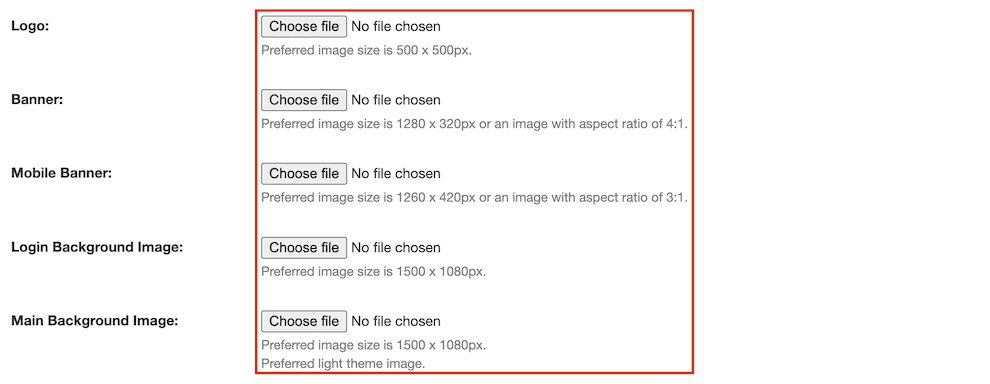
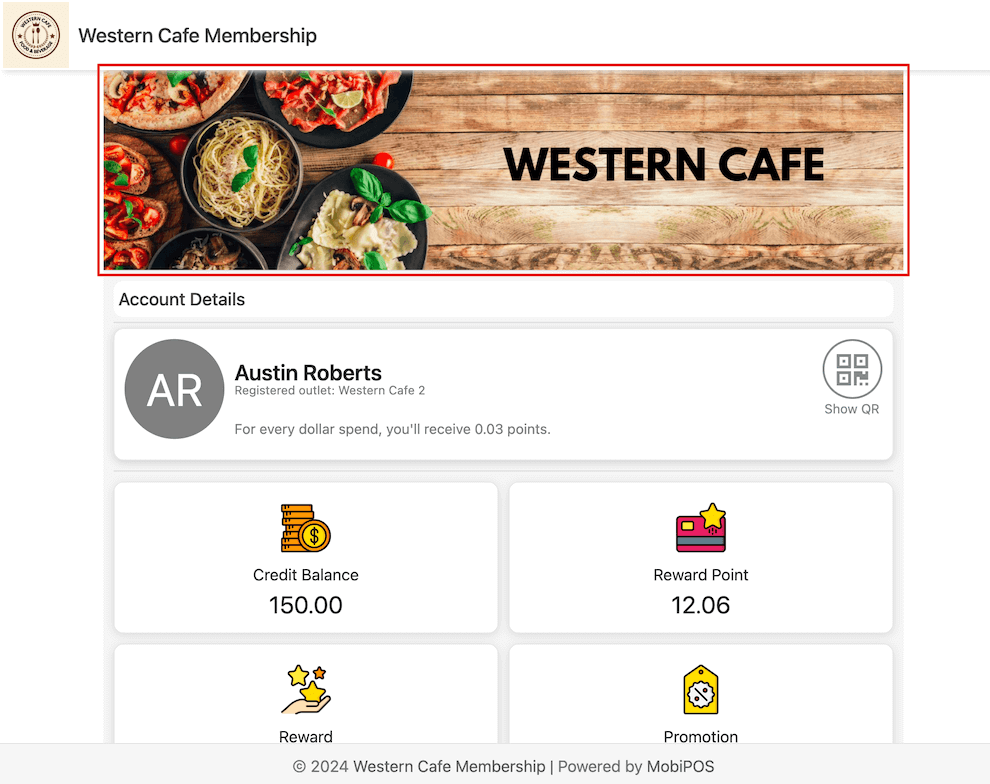
Here is an example if you have uploaded a logo.
Here is an example if you have uploaded a banner.
Here is an example if you have uploaded a mobile banner.
A mobile banner is the same as a regular banner, but it is an image with a different ratio specifically tailored for mobile users to enhance aesthetics.

Here is an example if you have uploaded a login background image.
Here is an example if you have uploaded a main background image.
Rewards
Click on Configure to set up rewards.
Please refer to Creating Reward for more detailed explanations.

Promotions
Click on Configure to set up promotions.
Please refer to Creating Promotion for more detailed explanations.

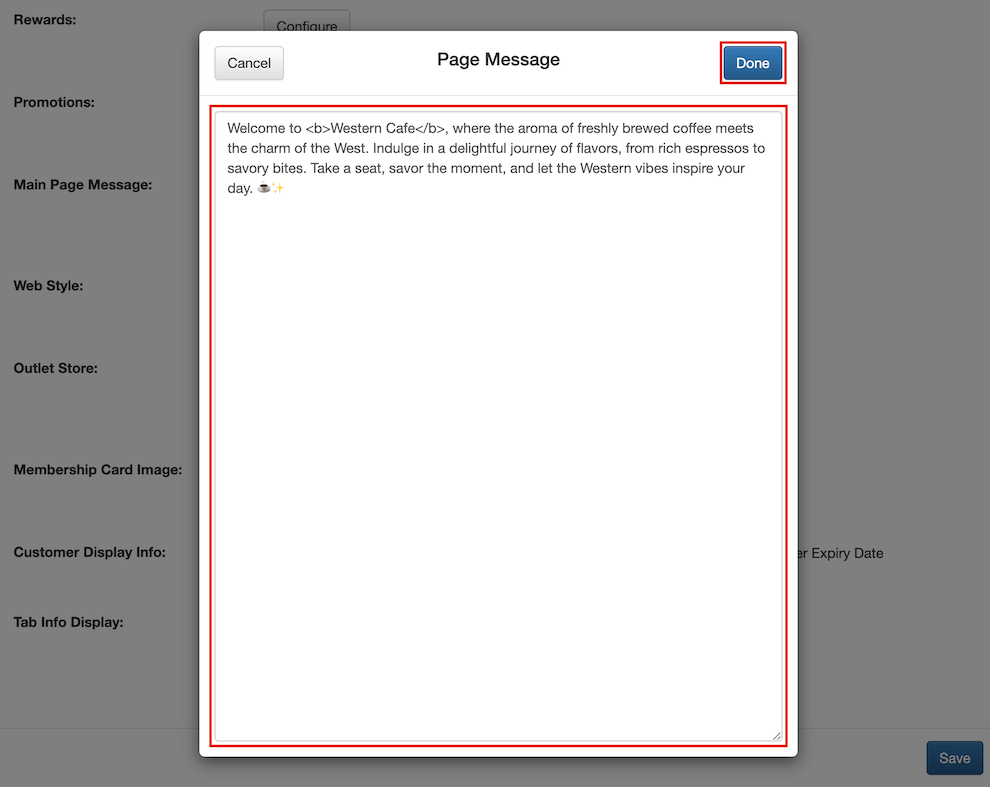
Main Page Message
Click on View/Edit to design the text messages you want to display in the middle section of the main page.

Enter the message.
HTML tags are supported in this section.
Hence, you can design the message with formatting such as making it bold, italic, etc.
Then, click on Done.
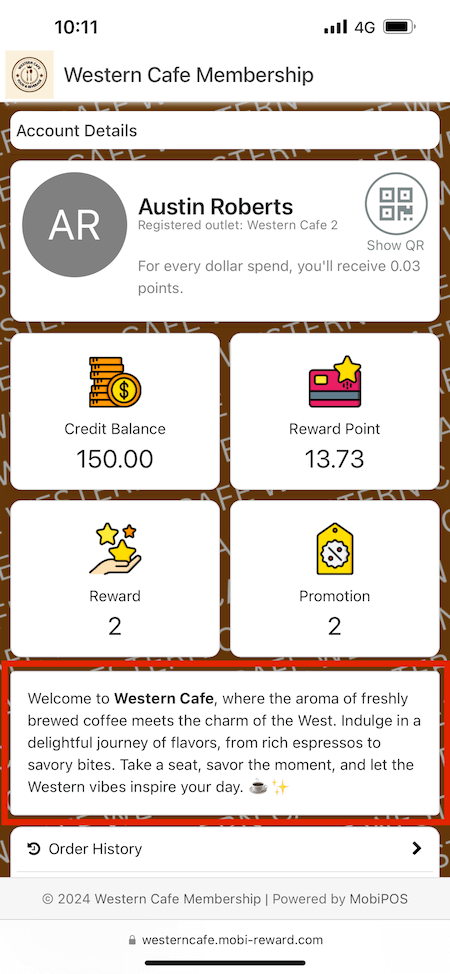
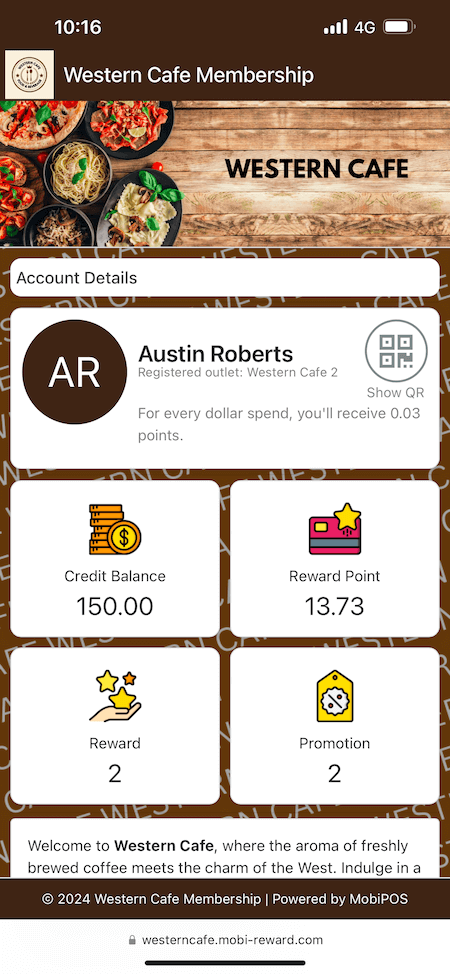
This is how it will look after you have designed the main page message.
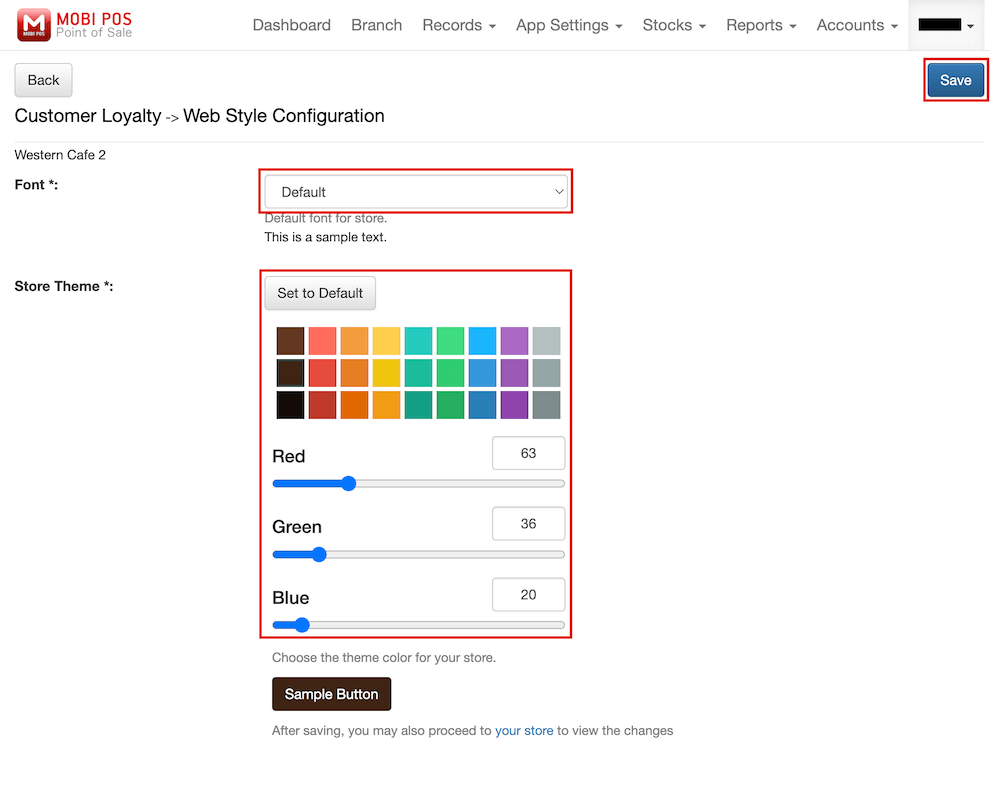
Web Style
Click on Configure to customise the theme of your rewards page.

Then, you can select the font and store theme (colour) of the rewards page.
A sample text and a sample button are displayed below to visualise the changes.
After configuring the styles of the rewards page, you can click on the Save button to save the changes made.
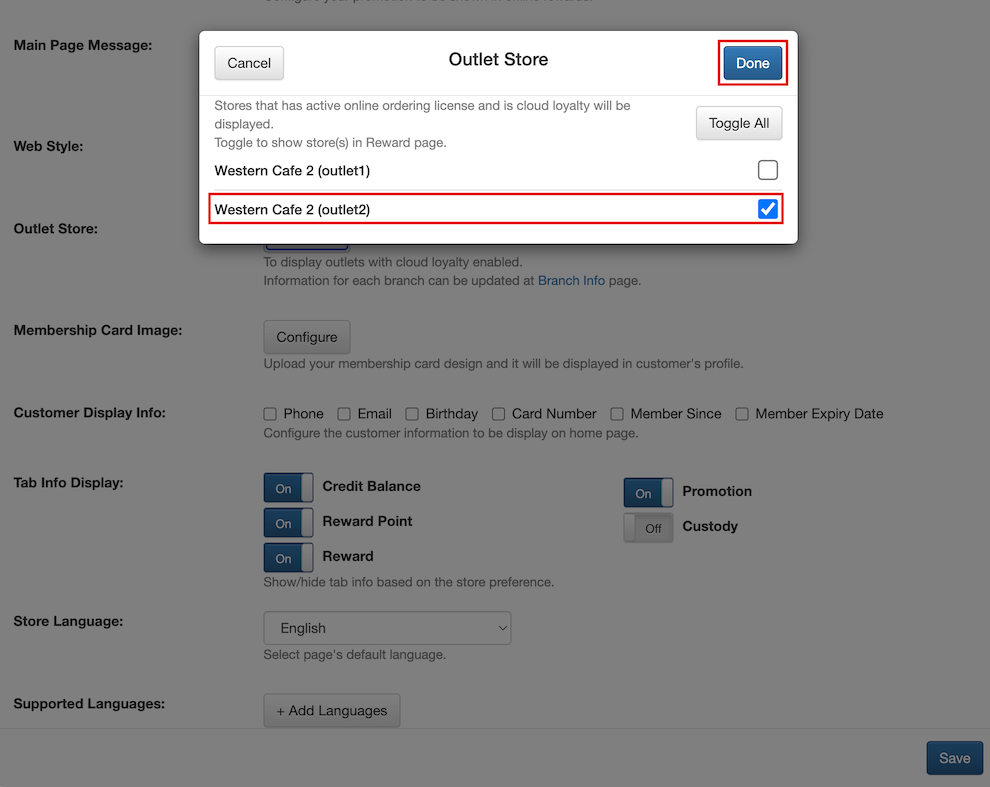
Outlet Store
This feature allows you to configure the outlet store where you want the membership program to be displayed on the rewards page.
It is typically used when not all of your branches are participating in a specific event or promotion.
Click on Configure.

In this example, only ‘Western Cafe 2’ are participating in this particular membership program, while ‘Western Cafe’ is not involved.
Then, click on Done.
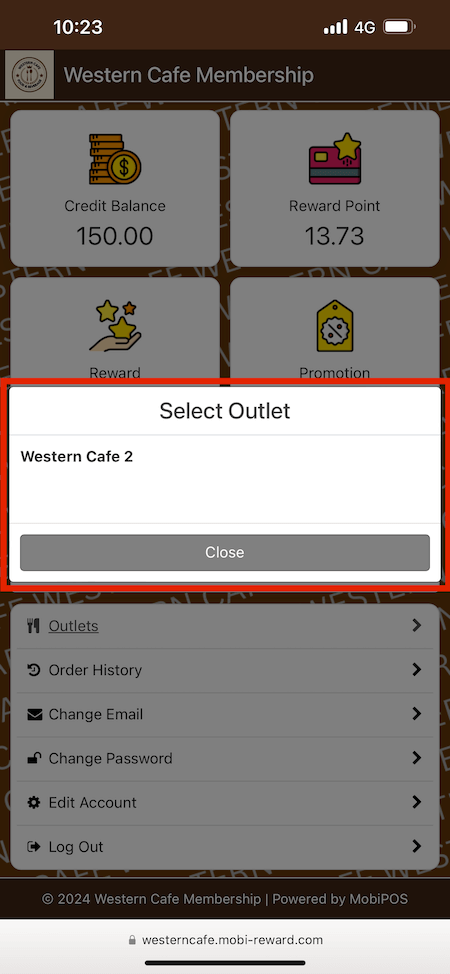
The following is an example of how the rewards page will look after configuring the outlet store for the membership program.
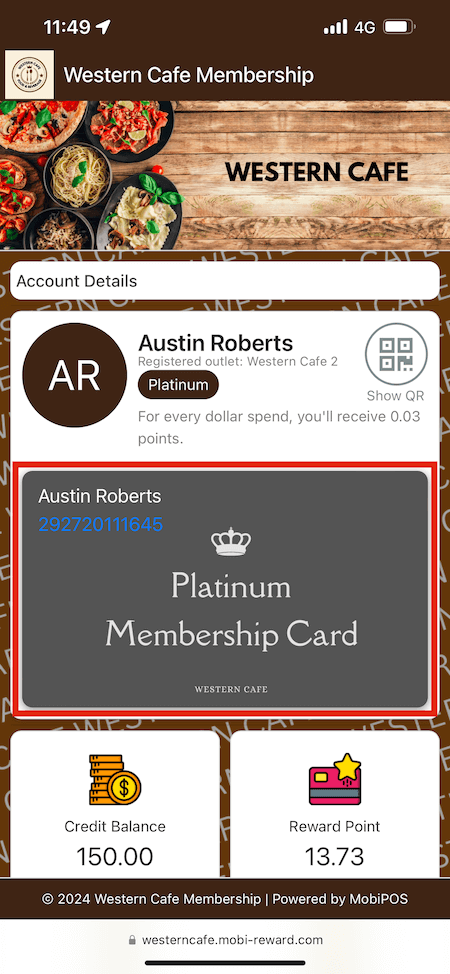
Membership Card Customisation
In this section, you can customise how you want the e-membership card to look.
Click on Configure under Membership Card Image to customise your e-membership card image.

If you haven't created any customer groups for your restaurant, you will only be able to customise the default card image. This is the membership card that customers will see if they are not a member of any other membership program.
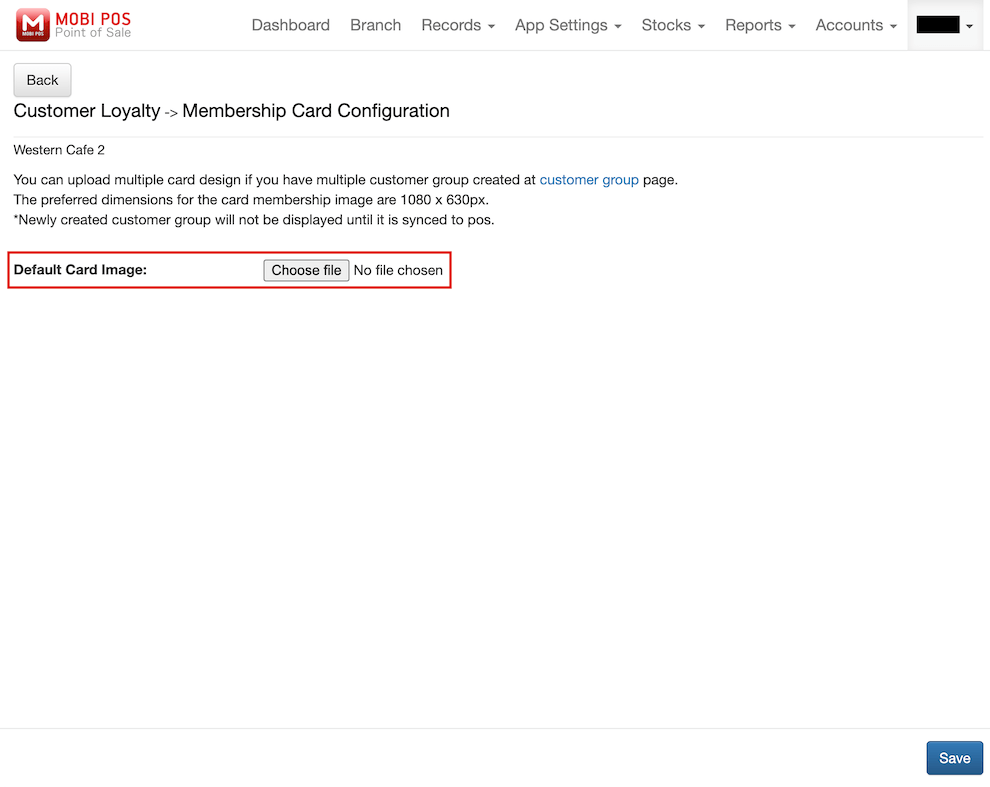
To have different e-membership cards, you are required to first create your customer group on the Customer Group page.
You can access it through MobiPOS Cloud -> App Settings -> Customer Group.
Click on Add to enter the customer group name.
You can also change the availability of the customer group by toggling the switch on or off and arrange the sequence by dragging the hamburger icon up or down.
Then, click on Save.
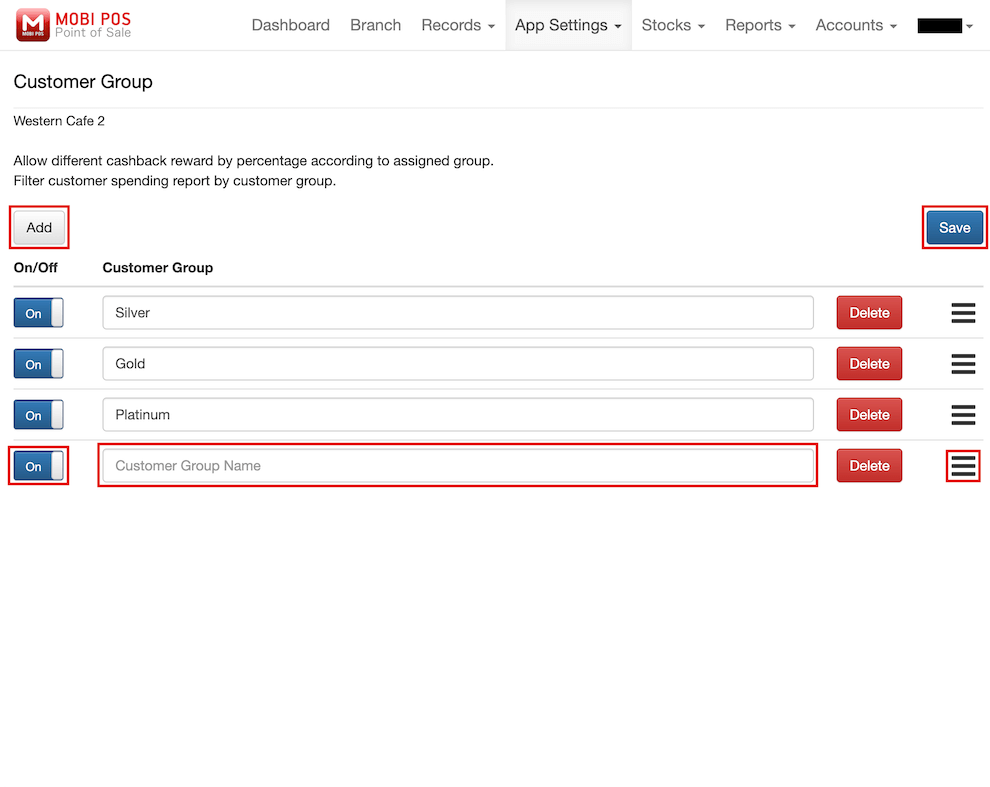
Please note that newly created customer groups will not be displayed until they are synced to the POS system.
Once you have created your customer group, you can now upload the membership card image for different customer groups.
If you do not upload an image for the membership cards, the default card image will be used.
Then, click on Save.

Display Information
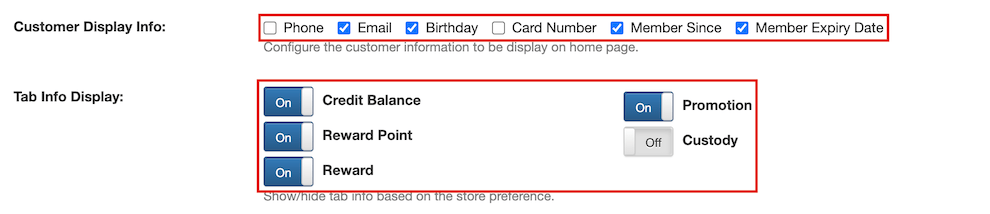
Back on the Online Rewards/Loyalty page, you can also configure the customer's information you want to display on the home page of the rewards.
Check the customer information such as phone, email, birthday, etc that you wish to display under Customer Display Info.
Additionally, you can customise the tab information displayed on the rewards page.
For example, if your store doesn't provide custody services, you can turn off the option for custody and turn on other relevant options.
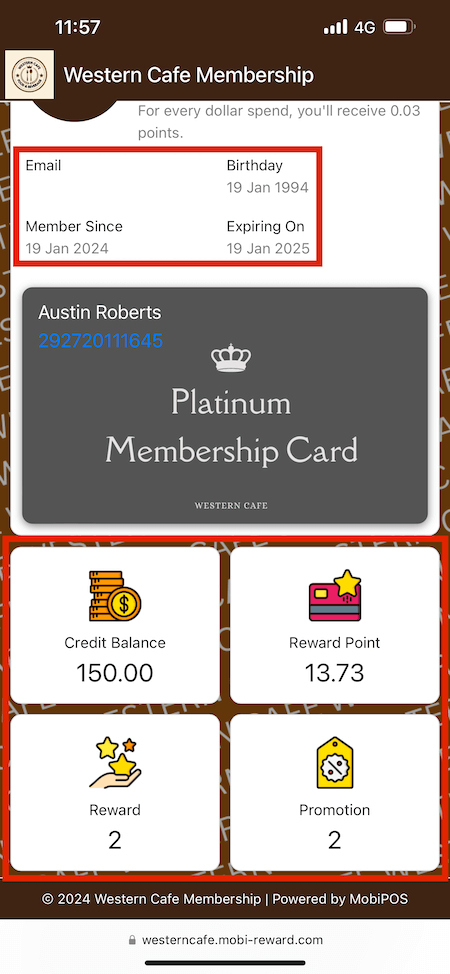
This is how the rewards page will appear if you set the store preferences as shown in the image above.
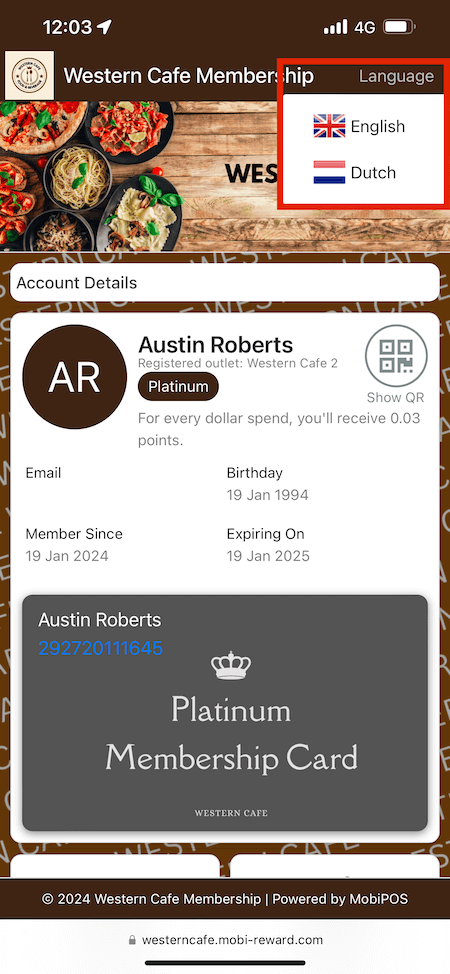
Language
You can set the language for your rewards page.
By default, the language of the rewards page is English.
However, you can change the language by selecting your desired language from the drop-down list.
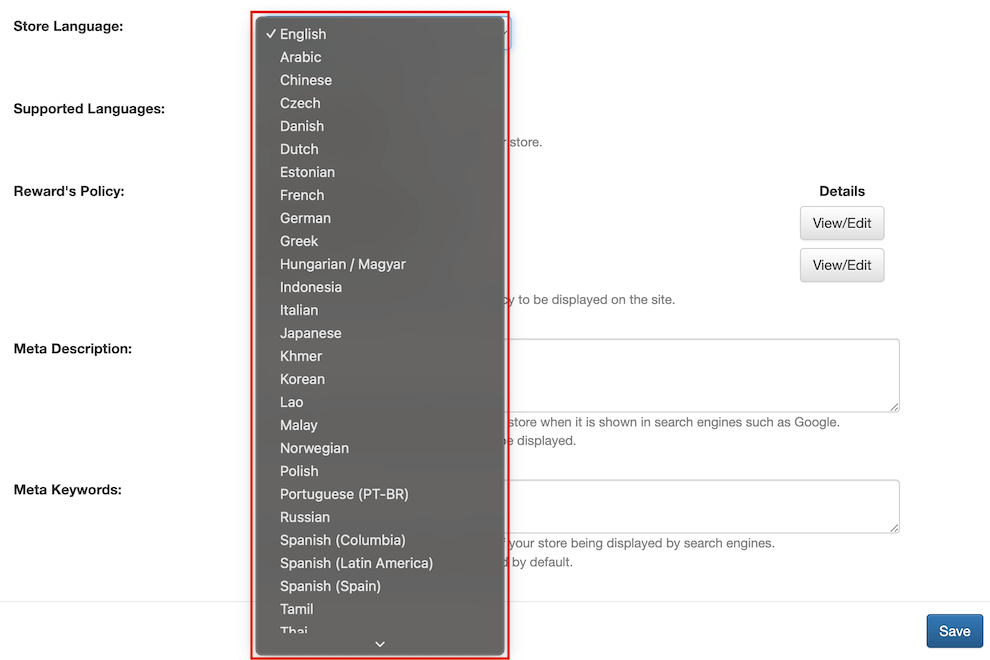
In addition, you can offer language options for customers.
For example, you can provide additional supported languages for the rewards page other than the store language set above.
Click on the + Add Languages under Supported Languages to include the languages you want.

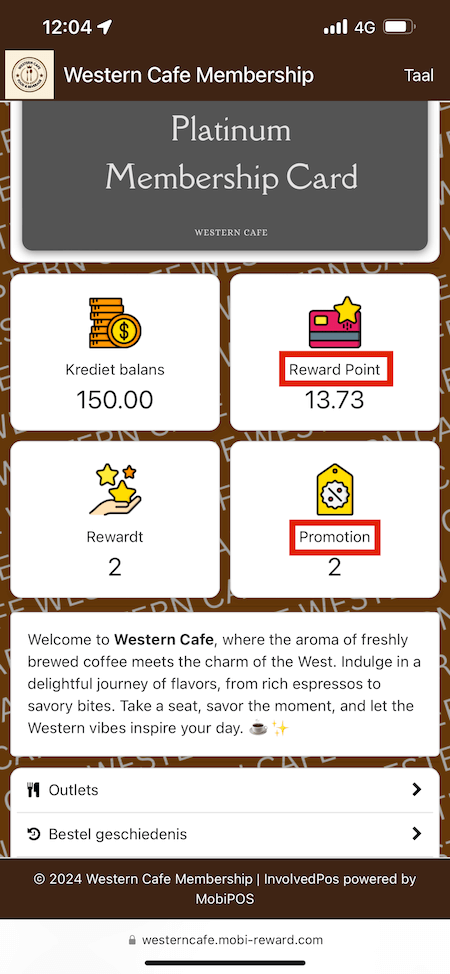
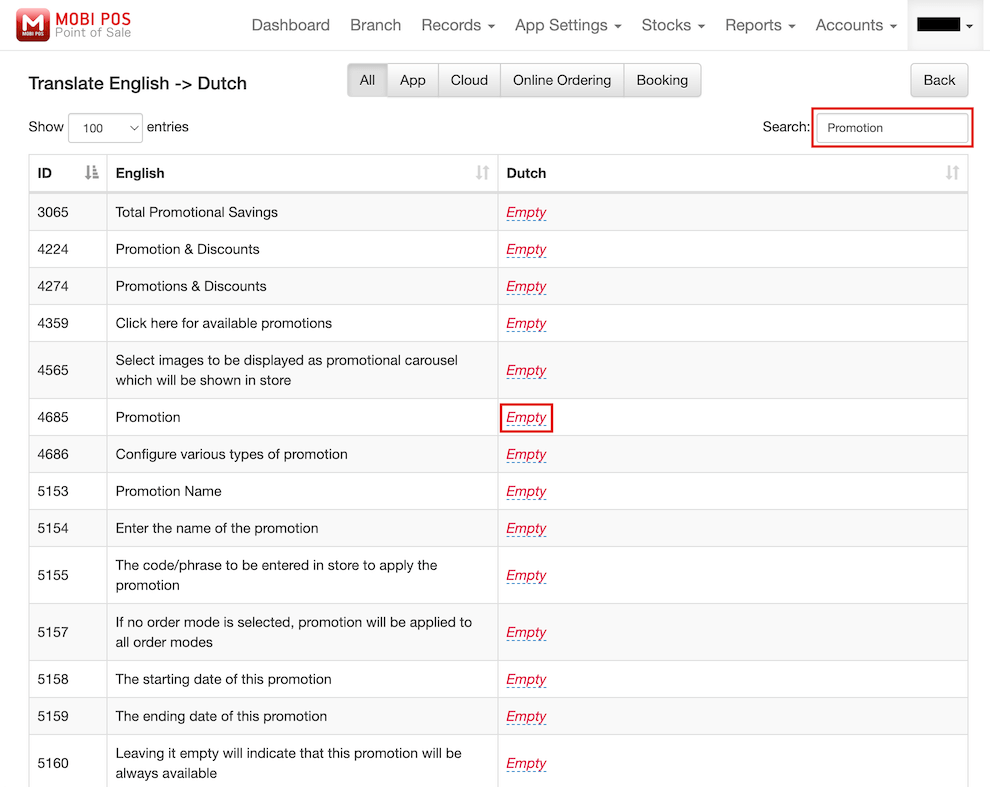
For additional supported languages, certain words on the rewards page may not be translated. For instance, terms like Reward Point and Promotion might remain in the original language.
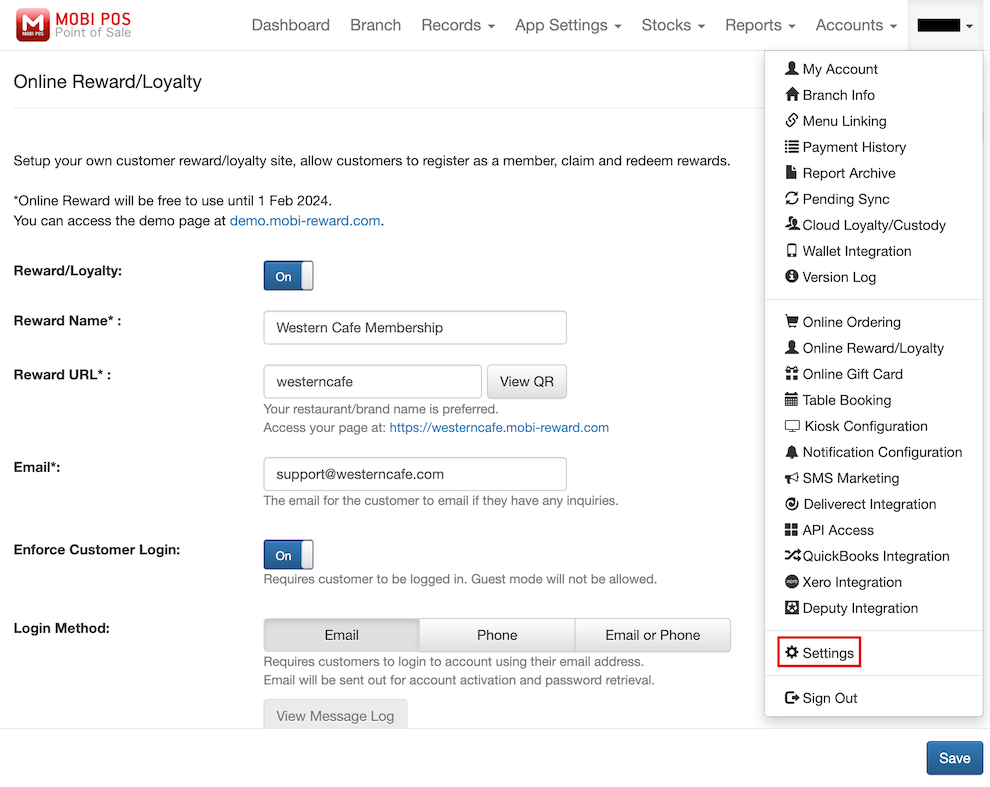
Therefore, you need to click on your username to access the drop-down list and then click on Settings.
Then scroll down to find the supported language under the Translation section and click on it.
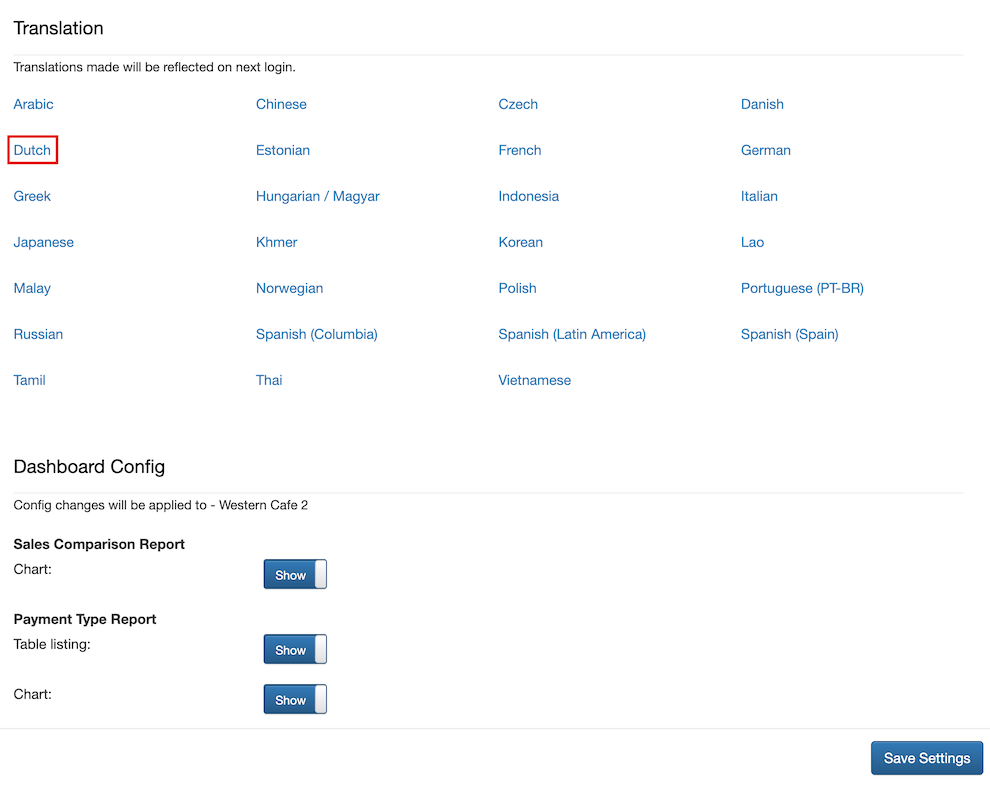
You can use the search bar to find the term, e.g., Promotion.
As the translation for Dutch from English is still empty, you can add your own translation for the term in Dutch.
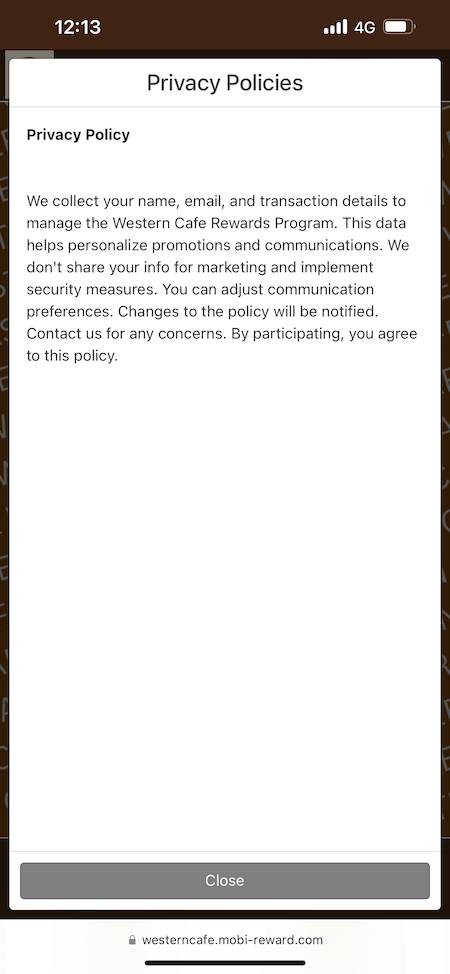
Reward's Policy
You can choose what to display at the footer of the rewards website.
For example, if you wish to display both Terms and Conditions and Privacy Policy, you can toggle the On button for both.
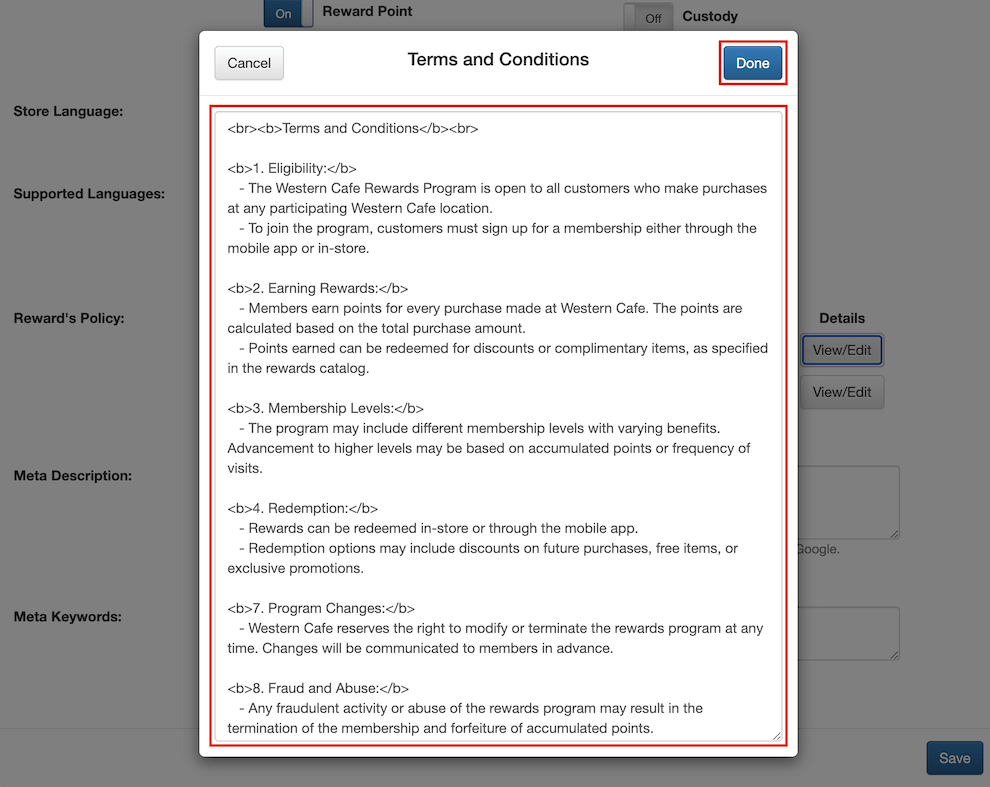
Then, you can click on View/Edit to customise the text to be displayed for Terms and Conditions and Privacy Policy.

Enter the text to be displayed, and click on Done when complete.
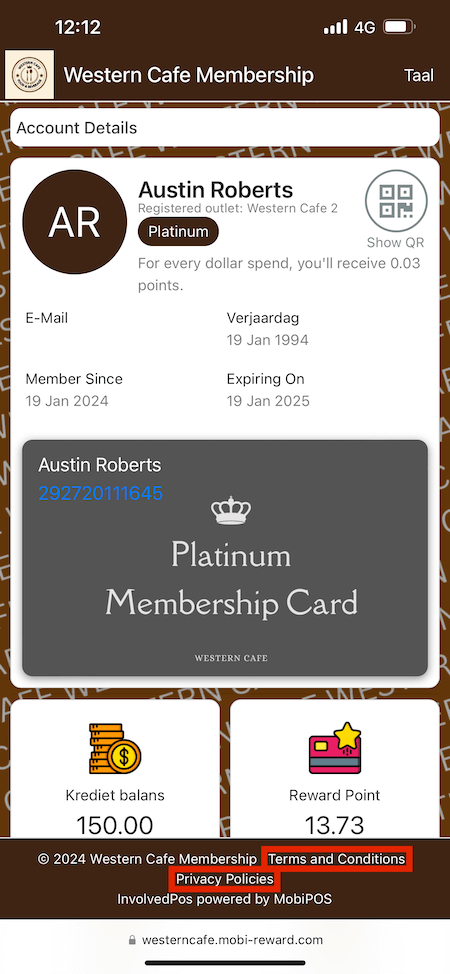
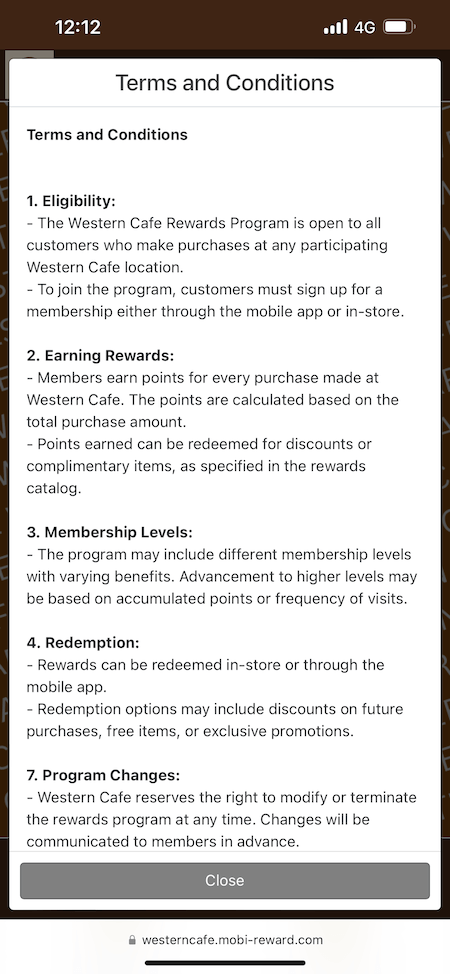
On the rewards page, click on Terms and Conditions and Privacy Policy in the footer to view more information about them.
Search Engine Optimisation
For search engine optimisation, you can set the Meta Description and Meta Keywords for your restaurant's rewards website.
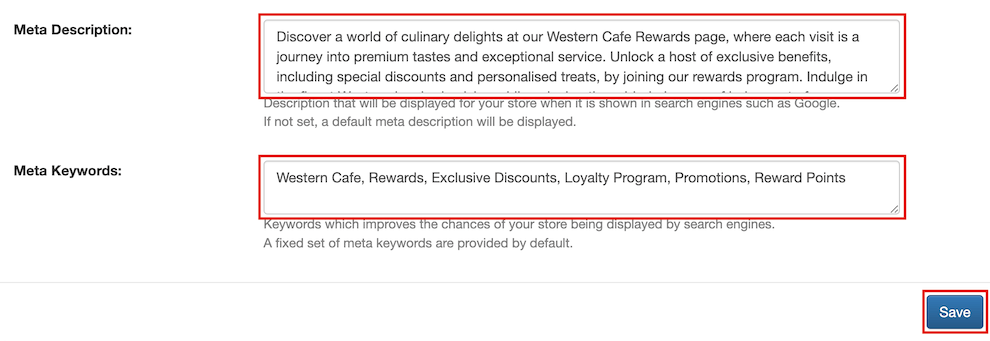
The Meta Description is the description that appears under the website title on search engines like Google when users search for your restaurant's rewards website.
Meta Keywords are the specific words or phrases you provide to the search engine that are relevant to your rewards website.
Customers can search using these keywords, and search engines use them to match relevant information.
These keywords are hidden from the public and are solely for search engine use.
Finally, click on the Save button to save the configurations you have made.